NDR: Virtual Sensor Deployment (Azure)
Description
 CAUTION: The examples below are intended to be serve as general guidelines. Your platform or software version may differ, resulting in variations in images, screens, options, or other elements.
- This guide is intended to serve as an example only. Users must modify applicable details, such as IP addresses, subnets, and device names, to align with their specific environment.
- Exercise caution when making changes to your firewall or environment, as unplanned modifications can result in downtime, depending on the complexity of the configuration and infrastructure.
- Your experience may vary if you are using a different software version or a product from another brand or manufacturer. Please note that you are solely responsible for the configuration and management of your devices.
1. Preparing
The Azure instance types in the az create commands in the procedure below use the instance types listed below:
Keep in mind that these are example instance types that meet the requirements stated in the Virtual Appliance Sizing Specifications section. You can select other instance types with the necessary vCPUs and RAM to perform your expected workload, as stated in the system requirements.
- Network Traffic – Standard_B12ms
- Sandbox and IDS Enabled – Standard_F16s_v2
To prepare for the installation:
- Open firewall ports for log ingestion.
- Open firewall ports for Network Traffic, Sandbox, and IDS features, as necessary.
- Reply to your NDR integration ticket to have the sensor images deployed in your region.
- You will need to provide the Azure region for the sensors your are installing.
- Do this at least 3-5 business days before installing, so that there is enough time to deploy the images to your region.
Current Azure Sensor Versions
The current sensor versions for Azure deployments are as follows:
- Modular Sensor – 5.3.0
2. Authorizing the Stellar Cyber Software Images
You must authorize the Stellar Cyber software images so that they are available in the Azure portal:
- Log in to your Azure portal at https://portal.azure.com/.
- Click the hamburger menu at the upper left and select the entry for Microsoft Entra ID.

Your Microsoft Entra Overview page appears.
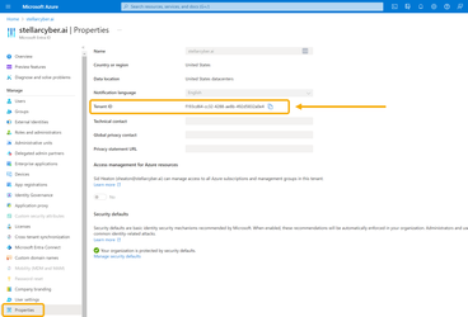
- Scroll down and click Properties.

The Properties page appears.
- Copy the value shown for Tenant ID. You need this for the next step and also when creating the VM, so keep it handy.
- Put your Tenant ID in the following URL and paste it in your browser:
https://login.microsoftonline.com/<tenant id>/oauth2/authorize?client_id=58238038-43b4-4446-8260-0fa97ace1085&response_type=code&redirect_uri=https%3A%2F%2Fwww.microsoft.com%2F
The Permissions requested message appears.
- Click Consent on behalf of your organization.
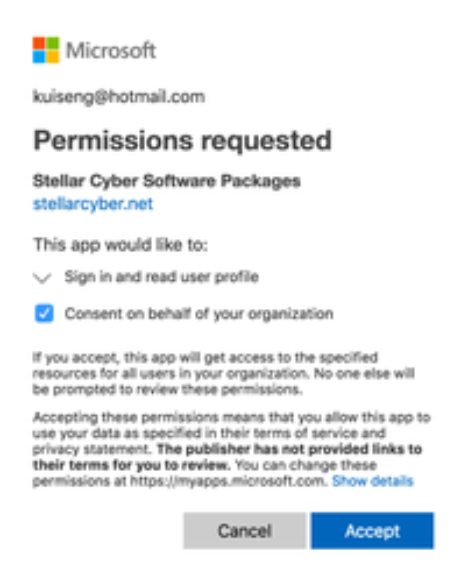
- Click Accept.
- Click Enterprise Applications.

The Enterprise applications | All applications page appears.
- Search for Stellar. The Stellar Cyber applications that you authorized appear.

If you don't see any Stellar Cyber applications, contact Stellar Cyber support.
- You can either create a new Resource Group for the deployment or deploy into an existing group. Use this step to create a new Resource Group. Otherwise, you can skip to the next step.
- Click Resource Groups.

The Resource groups page appears.
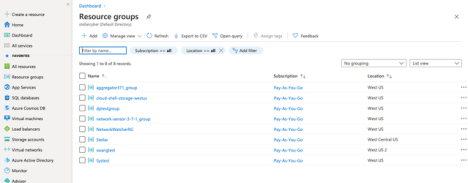
- Click Add. The Create a resource group page appears.

- Choose your Subscription.
- Enter the name of your group in the Resource group field.
- Choose the Region where you want to deploy the resource.
- Click Review create.
- Click Create. The resource group is created and the Resource groups page appears.
- Click the name of the resource group where you want to deploy the sensor. This is either the resource group you just created or an existing resource group.

The group details appear.
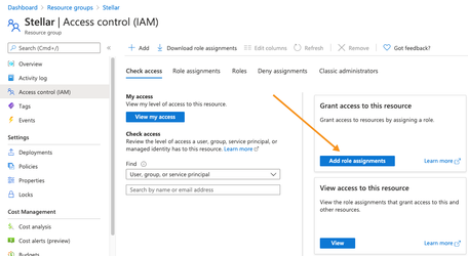
- Click Access control (IAM).

The Access control (IAM) page appears.
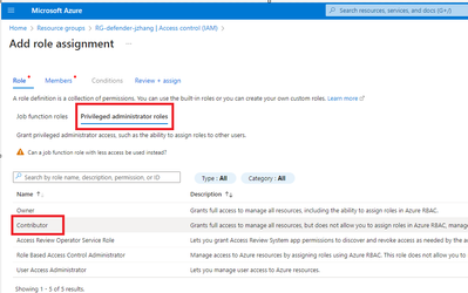
- Click Add role assignments to display the Add role assignment controls.
- Click on Privileged administrator roles and choose the Contributor option, as illustrated below:
- Leave the default selection of User, group, or service principal in the Assign access to drop-down.
- Enter Stellar in the Select field. The available Stellar Cyber software packages appear.
- Choose Stellar Cyber Software Packages.
- Click Save. The Resource groups page appears again.
- Click Home. The Azure services page appears.

- Click Subscriptions. The Subscriptions page appears.
- Choose your subscription. The subscription details appear.
- Click Resource providers.

The Resource providers page appears.
- Select Microsoft.Network.
- Click Register.
- Select Microsoft.Compute.
- Click Register.
- Click Cloud Shell.

A PowerShell windows opens and connects.
- Enter the following 3 commands to get an access token from the Stellar Cyber Azure portal:
az account clear
az login --service-principal -u '58238038-43b4-4446-8260-0fa97ace1085' -p '3238Q~KMtVAIyuC6gDVMhboKEW7w6W~bXYQhFcZx' --tenant '2f580e30-1cc1-4c08-9e80-704999508e1a'
az account get-access-token
- Enter the following commands to get the access token from your tenant ID. Replace Tenant ID with the value you copied earlier.
Make sure you use your Tenant ID, copied from your Azure Portal, as described in this step.
az login --service-principal -u '58238038-43b4-4446-8260-0fa97ace1085' -p '3238Q~KMtVAIyuC6gDVMhboKEW7w6W~bXYQhFcZx' --tenant '<Tenant ID>'
az account get-access-token
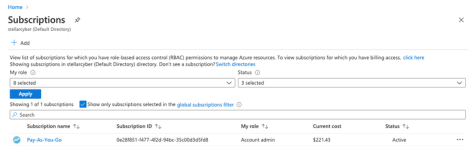
- If you have multiple Azure subscriptions, use the az account list --output table command to make sure that the subscription where you want to deploy the sensor is currently the default. For example:
PS /home/j> az account list --output table
Name CloudName SubscriptionId State IsDefault
Pay-As-You-Go AzureCloud xxxxxxxx-f477-4f2d-94bc-35c00d3d5fd8 Enabled False
Subscription-Dev AzureCloud xxxxxxxx-ac50-4d82-a6ea-a14db86f3957 Enabled True
Subscription-QA AzureCloud xxxxxxxx-9114-4cb0-a044-7e01f074575c Enabled False
In this example, Subscription-Dev has IsDefault set to True and is where the deployment will take place. You can change the default subscription with the az account set --subscription <subscription> command. Let's change the default subscription to Subscription-QA:
PS /home/j> az account set --subscription xxxxxxxx-9114-4cb0-a044-7e01f074575c
PS /home/j> az account list --output table
Name CloudName SubscriptionId State IsDefault
Pay-As-You-Go AzureCloud xxxxxxxx-f477-4f2d-94bc-35c00d3d5fd8 Enabled False
Subscription-Dev AzureCloud xxxxxxxx-ac50-4d82-a6ea-a14db86f3957 Enabled False
Subscription-QA AzureCloud xxxxxxxx-9114-4cb0-a044-7e01f074575c Enabled True
After changing the default subscription, the sensor will now be deployed in Subscription-QA.
- Create a sensor VM.
This command points to the most recent sensor image. You can install different versions by changing the version number in the command below.
Keep in mind that these commands use an instance type that meets the system requirements, including SSD storage. You can specify a different instance type with sufficient vCPUs and RAM to handle your expected workload while making sure to observe all system requirements.
Note that any resources you specify in the az vm create command must already exist in the same resource group where you are creating the VM. This includes any values you supply for the resource-group, vnet-name, subnet, subnet-address-prefix, and nsg arguments.
You can also use variables to pass values for the parameters in the az vm create command. Refer to Using Shell Variables to Create the Sensor VM for details.
Enter the following command to create a modular sensor VM. Replace <resource-group> with an existing resource group in your deployment and <version> with the version of software you want to install (for example, 5.3.0:
az vm create --size Standard_B12ms --resource-group <resource-group> --name StellarModularSensor --image "/subscriptions/0e28f851-f477-4f2d-94bc-35c00d3d5fd8/resourceGroups/Stellar/providers/Microsoft.Compute/galleries/StellarCyberSoftwares/images/Stellar-ModularSensor/versions/<version>" --admin-username azureuser --admin-password P@ssw0rd#2022 --storage-sku StandardSSD_LRS --os-disk-size-gb 128
Note that you can optionally specify the virtual network, subnet, and network security group to be used by the VM by including the --vnet-name, --subnet, and --nsg arguments. The resources you specify must exist in the same resource group where you are creating the VM. For example, for a modular sensor:
az vm create --size Standard_B12ms --resource-group <resource-group> --name StellarModularSensor --nsg <network-security-group> --vnet-name <vnet-name> --subnet <subnet-name> --subnet-address-prefix <subnet-cidr> --image "/subscriptions/0e28f851-f477-4f2d-94bc-35c00d3d5fd8/resourceGroups/Stellar/providers/Microsoft.Compute/galleries/StellarCyberSoftwares/images/Stellar-ModularSensor/versions/<version>" --admin-username azureuser --admin-password P@ssw0rd#2022 --storage-sku StandardSSD_LRS --os-disk-size-gb 128
You can also install the sensor without a public IP address by including the --public-ip address "" argument. For example, here's the same command from above with the --public-ip address "" argument included:
az vm create --size Standard_B12ms --resource-group <resource-group> --name StellarModularSensor --nsg <network-security-group> --vnet-name <vnet-name> --subnet <subnet-name> --subnet-address-prefix <subnet-cidr> --public-ip address "" --image "/subscriptions/0e28f851-f477-4f2d-94bc-35c00d3d5fd8/resourceGroups/Stellar/providers/Microsoft.Compute/galleries/StellarCyberSoftwares/images/Stellar-ModularSensor/versions/<version>" --admin-username azureuser --admin-password P@ssw0rd#2022 --storage-sku StandardSSD_LRS --os-disk-size-gb 128
- Create inbound security groups for the sensor using the commands below, replacing <resource-group> with the name of your resource group and <NSG NAME> with the name of your network security group
Enter the following command for a modular sensor:
az network nsg rule create -g <resource-group> --nsg-name <NSG NAME> -n StellarPort1 --direction Inbound --protocol Udp --destination-port-ranges 8472 --priority 500
3. Using Shell Variables to Create the Sensor VM
The az vm create commands in the examples above all specify values for parameters directly in the command. As an alternative, you can also declare shell variables for parameters you commonly reuse and include them in the az vm create command as part of a script.
The same rules for parameters included in an az vm create command also apply when passing variables in a script:
- The specified resource-group must already exist.
- Any values you supply for the vnet-name, subnet, subnet-address-prefix, and nsg arguments must exist in the specified resource group.
The example below starts by defining values for many of the parameters in the az vm create command before reading them in as part of the command:
#PowerShell script
#Assign values to variables
$RESOURCE_GROUP="<MyResourceGroup>"
$VM_NAME="<MyVM>"
$VNET_NAME="<MyVNet>"
$SUBNET_NAME="<MySubnet>"
$SUBNET_PREFIX=”<x.x.x.x/x>”
$NSG_NAME=””<MyNSG>”
$IMAGE=”/subscriptions/0e28f851-f477-4f2d-94bc-35c00d3d5fd8/resourceGroups/Stellar/providers/Microsoft.Compute/galleries/StellarCyberSoftwares/images/Stellar-ModularSensor/versions/<version>”
$ADMIN_USERNAME="azureuser"
$ADMIN_PASSWORD="P@ssw0rd#2022"
#Create Modular Sensor VM using variable values
az vm create --size Standard_B12ms --resource-group $RESOURCE_GROUP --name $VM_NAME --vnet-name $VNET_NAME --subnet $SUBNET_NAME --subnet-address-prefix $SUBNET_PREFIX --nsg $NSG_NAME --image $IMAGE --admin-username $ADMIN_USERNAME --admin-password $ADMIN_PASSWORD --storage-sku StandardSSD_LRS --os-disk-size-gb 128
Refer to this article on Microsoft Learn for more information on using variables in the Azure CLI.
4. Connecting the Sensor to the Stellar Cyber Platform
To connect the sensor to the Stellar Cyber Platform:
- Log in to your new sensor. The default username/password is aella/changeme. You are immediately prompted to change the password.
- Change the password.
- After you change the password, your session closes automatically. When you log back in with your new credentials, the prompt changes to DataSensor>.
- Set the host name. The host name is displayed in Stellar Cyber and should be unique for each sensor:
- set hostname <new hostname>
- Assign the tenant
- The Tenant ID was provided in the ticket.
- set tenant_id <Tenant ID from Stellar Cyber>
- Use the set cm command to specify the hostname to reach the management interface of the Data Processor.
- When specifying a hostname, the system attempts to verify the hostname with the DNS server. If the DNS server is not reachable, the system reports the error and lets you either proceed with the configured hostname or quit.
- <Applicable CM URL from below>
- NOAM Console: cm-solutionsgrantedinc.stellarcyber.cloud
- EMEA Console: cm-emea-snwl.stellarcyber.cloud
- Verify with the show cm command. You should see the IP address of the DP listed as the CM Controller and the Status should be Established.
- Log out with the quit command.
5. Sensor Authorization
Once complete, please reply to your engineer’s email with the following information so we can confirm that we are seeing the sensor and authorize it.
Sensor Details
- Sensor Hostname
- Sensor IP Address
