How to Restrict VPN Access to SSL VPN Client Based on User, Service & Destination
Description
How to Restrict VPN Access to SSL VPN Client Based on User, Service & Destination
Resolution for SonicOS 7.X
This release includes significant user interface changes and many new features that are different from the SonicOS 6.5 and earlier firmware. The below resolution is for customers using SonicOS 7.X firmware.
1) Restrict Access to Network behind SonicWall based on Users
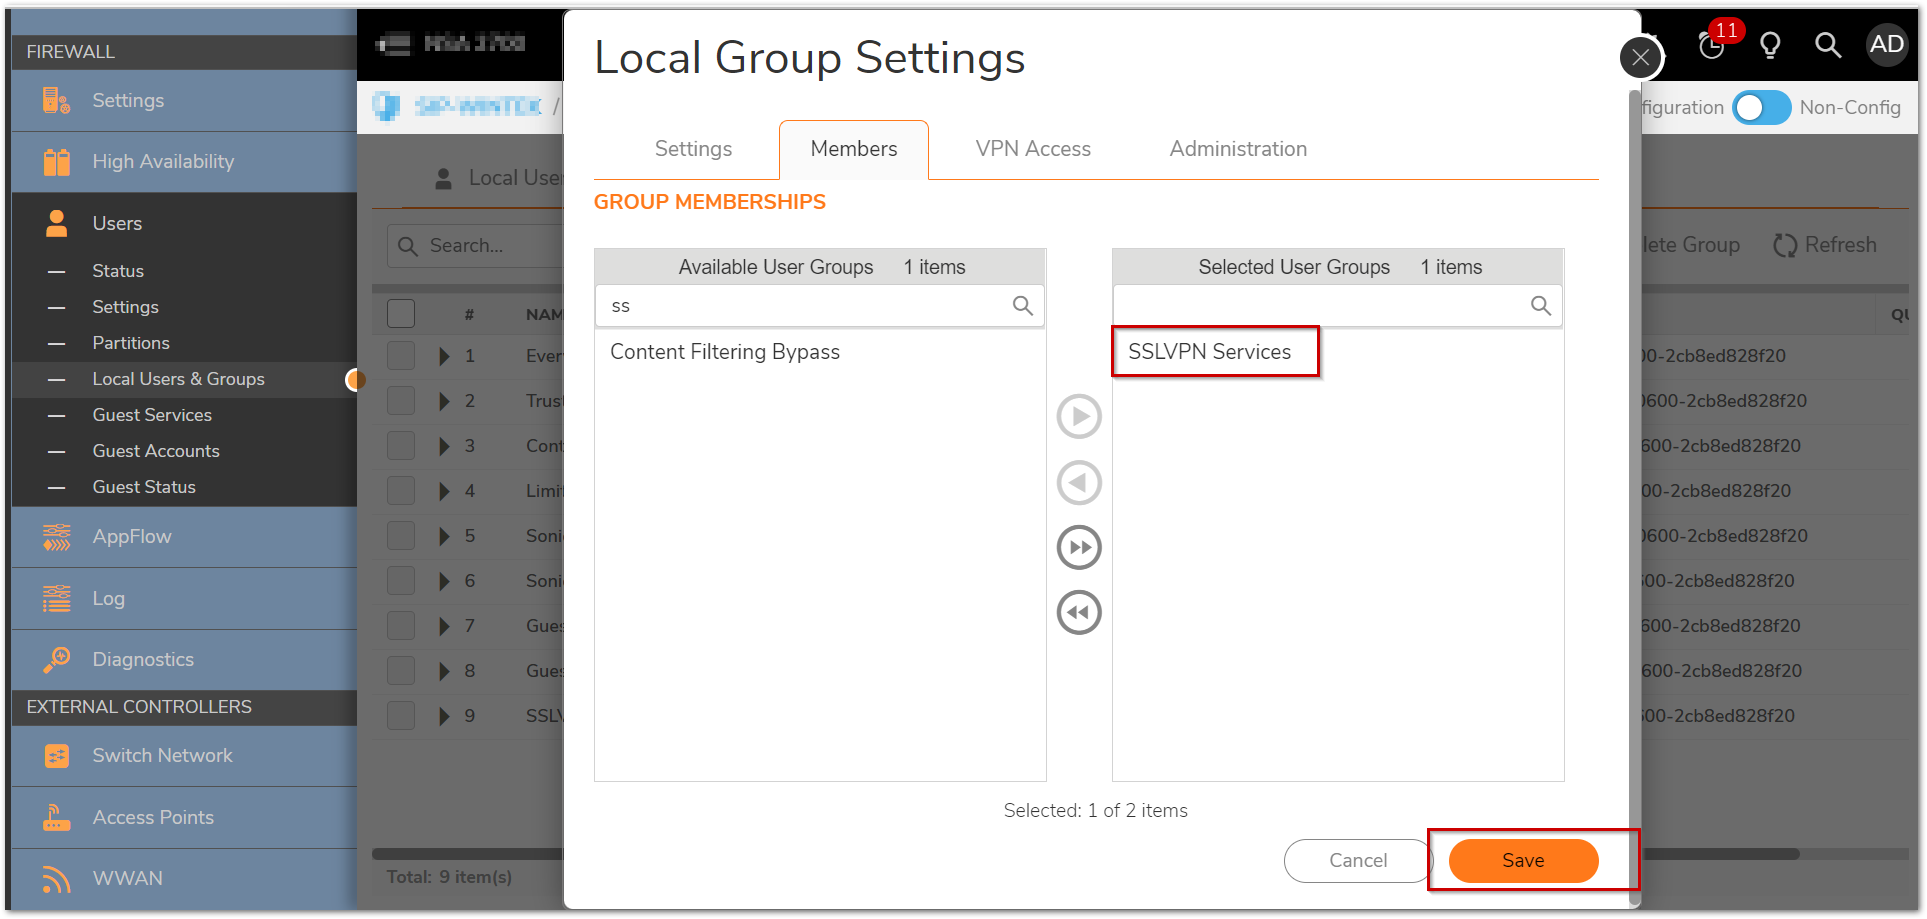
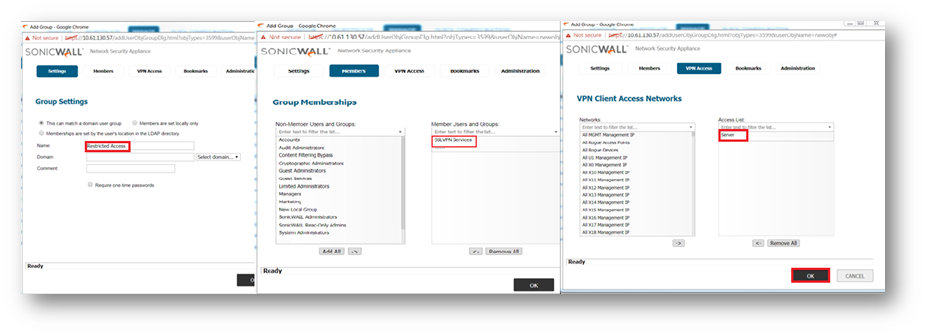
While Configuring SSLVPN in SonicWall, the important step is to create a User and add them to SSLVPN service group. So the Users who is not a member of SSLVPN Services Group cannot be able to connect using SSLVPN. You have option to define access to that users for local network in VPN access Tab.
When a user is created, the user automatically becomes a member of Trusted Users and Everyone under the Device| Users | Local Users & Groups | Local Groups page. To use that User for SSLVPN Service, you need to make them as member of SSLVPN Services Group.


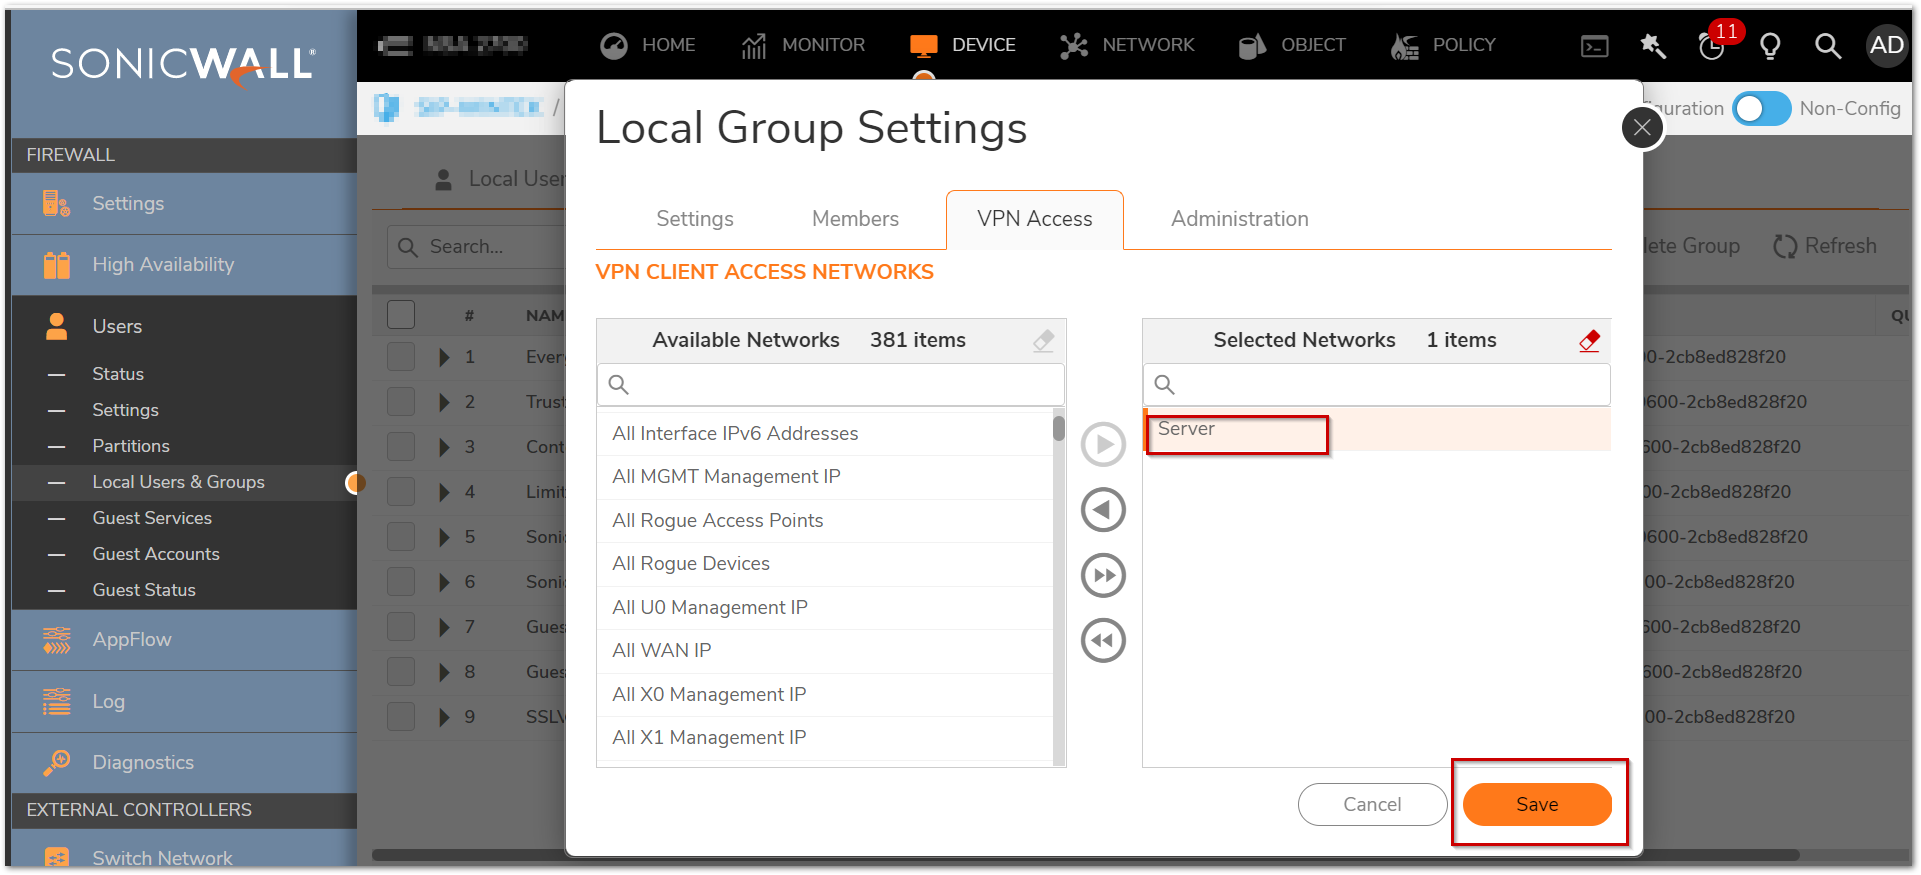
- For the "Restricted Access" user group under the VPN Access tab, select Server (address object that you had previously created for the restricted computers).

2) Restrict Access to Services (Example: Terminal Service) using Access rule
- Login to your SonicWall Management page
- Navigate to Policy|Rules and Policies|Access rules
- Select From SSLVPN To LAN
- Click Add to create a rule
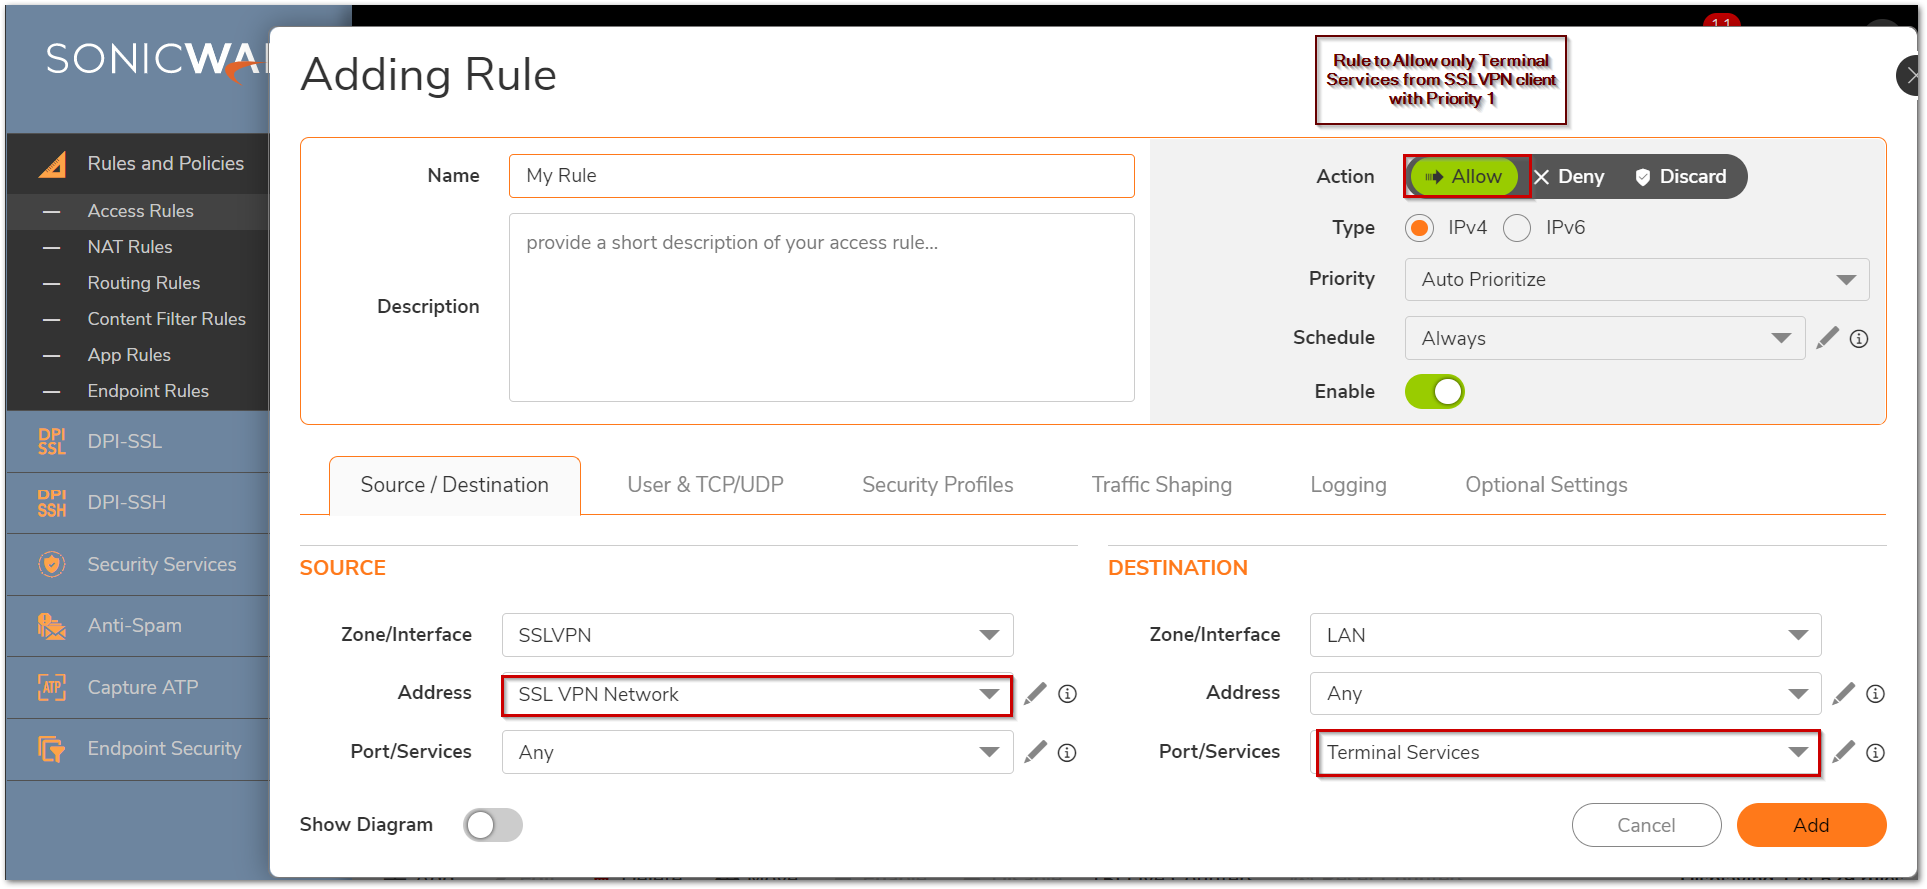
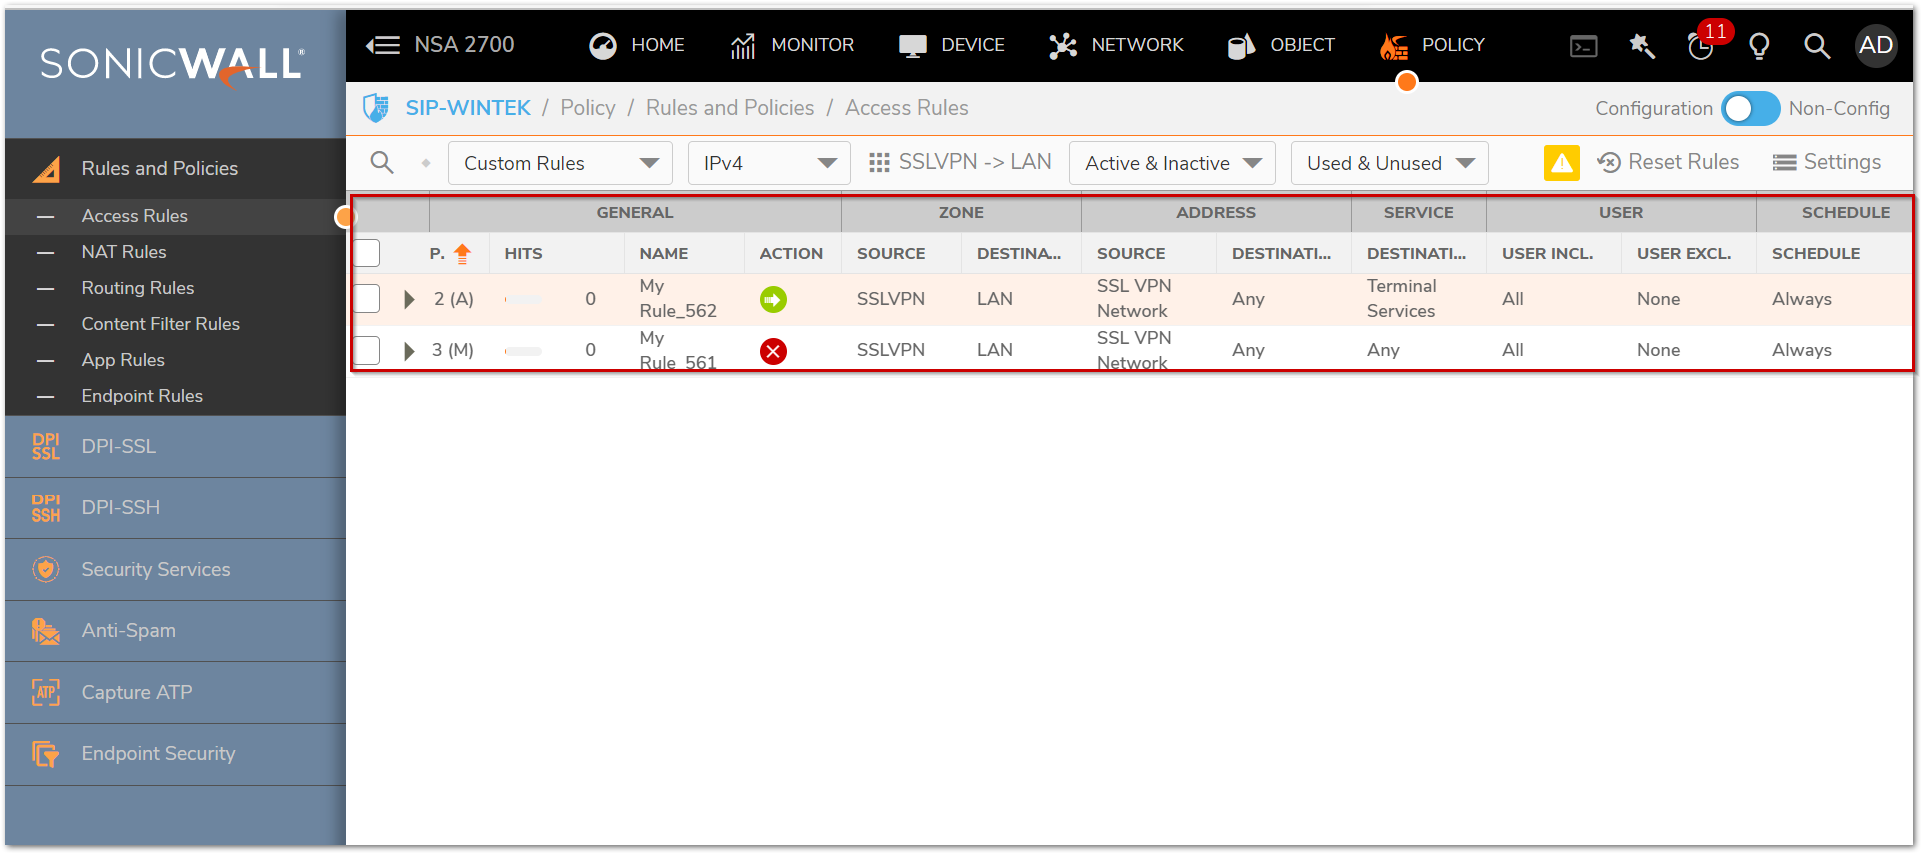
Create the following access rules.
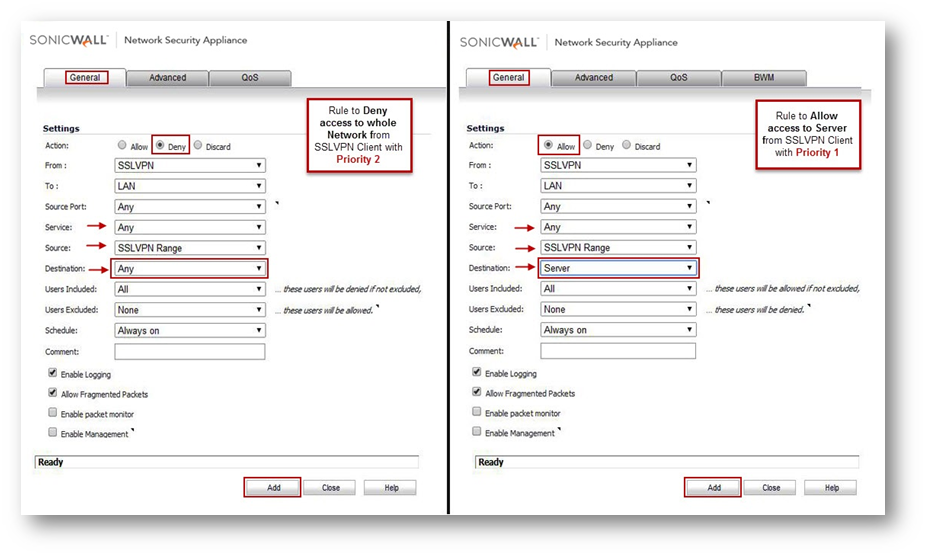
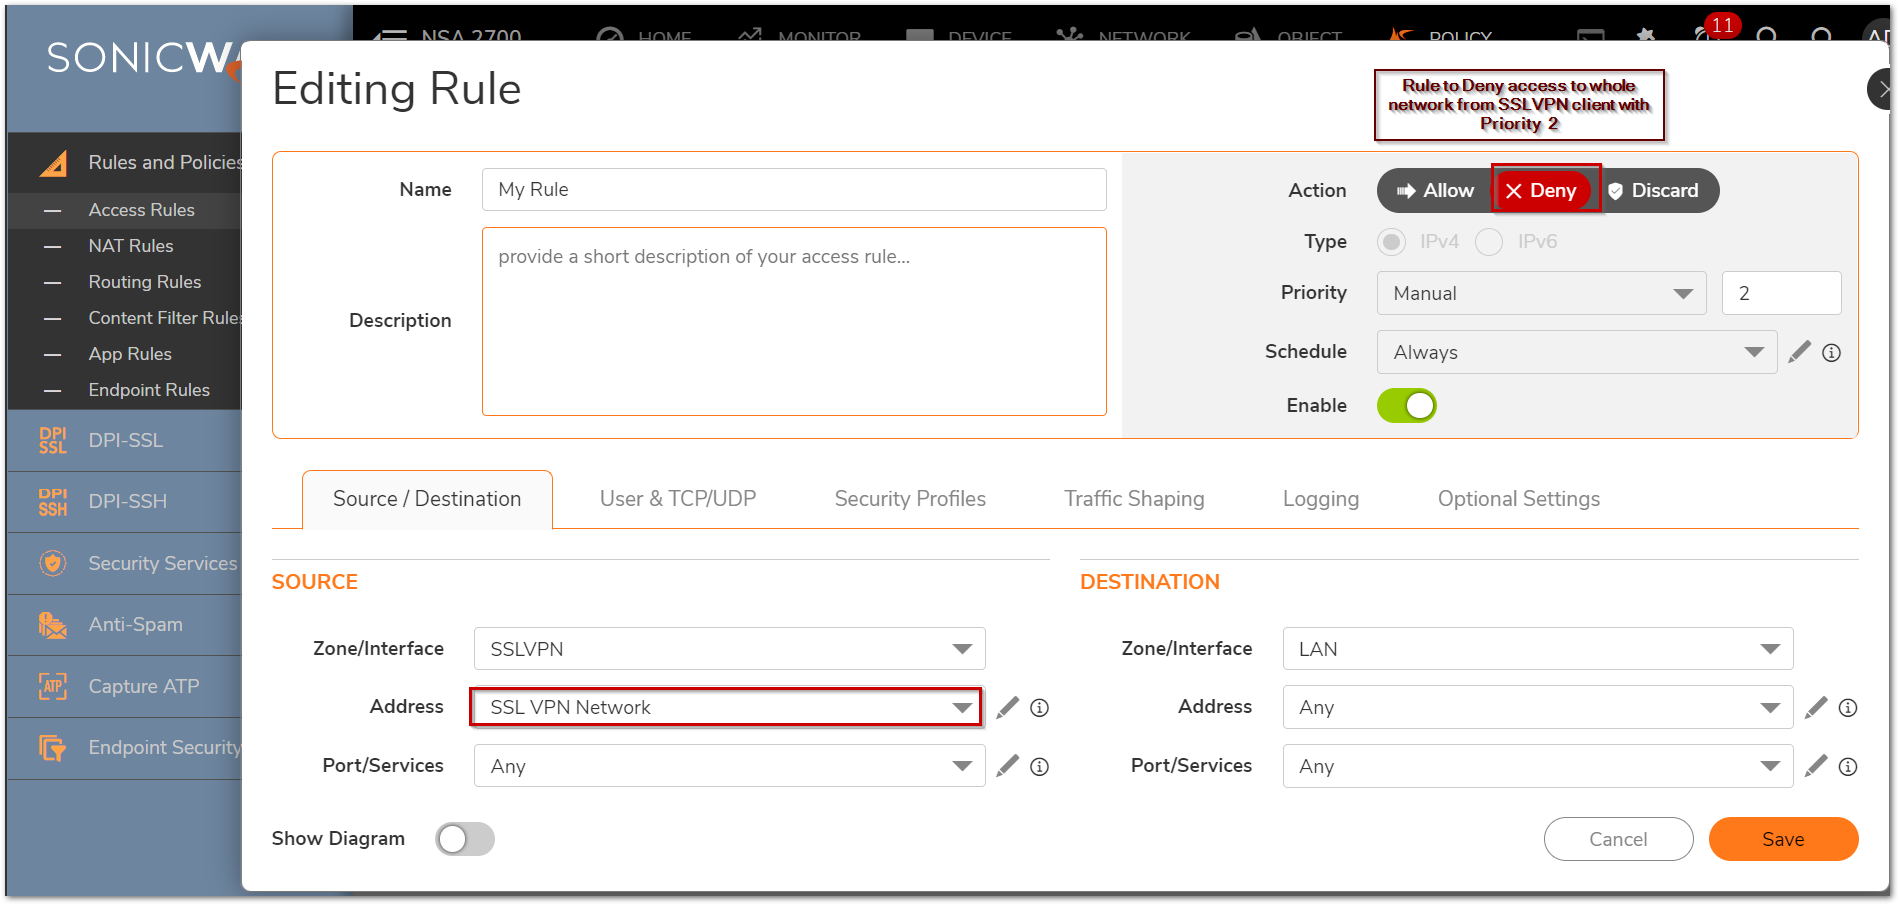
- Creating an access rule to block all traffic from SSLVPN users to the network with Priority 2.
- Creating an access rule to allow only Terminal Services traffic from SSLVPN users to the network with Priority 1.
Note: If you have other zones like DMZ, create similar rules From SSLVPN to DMZ.

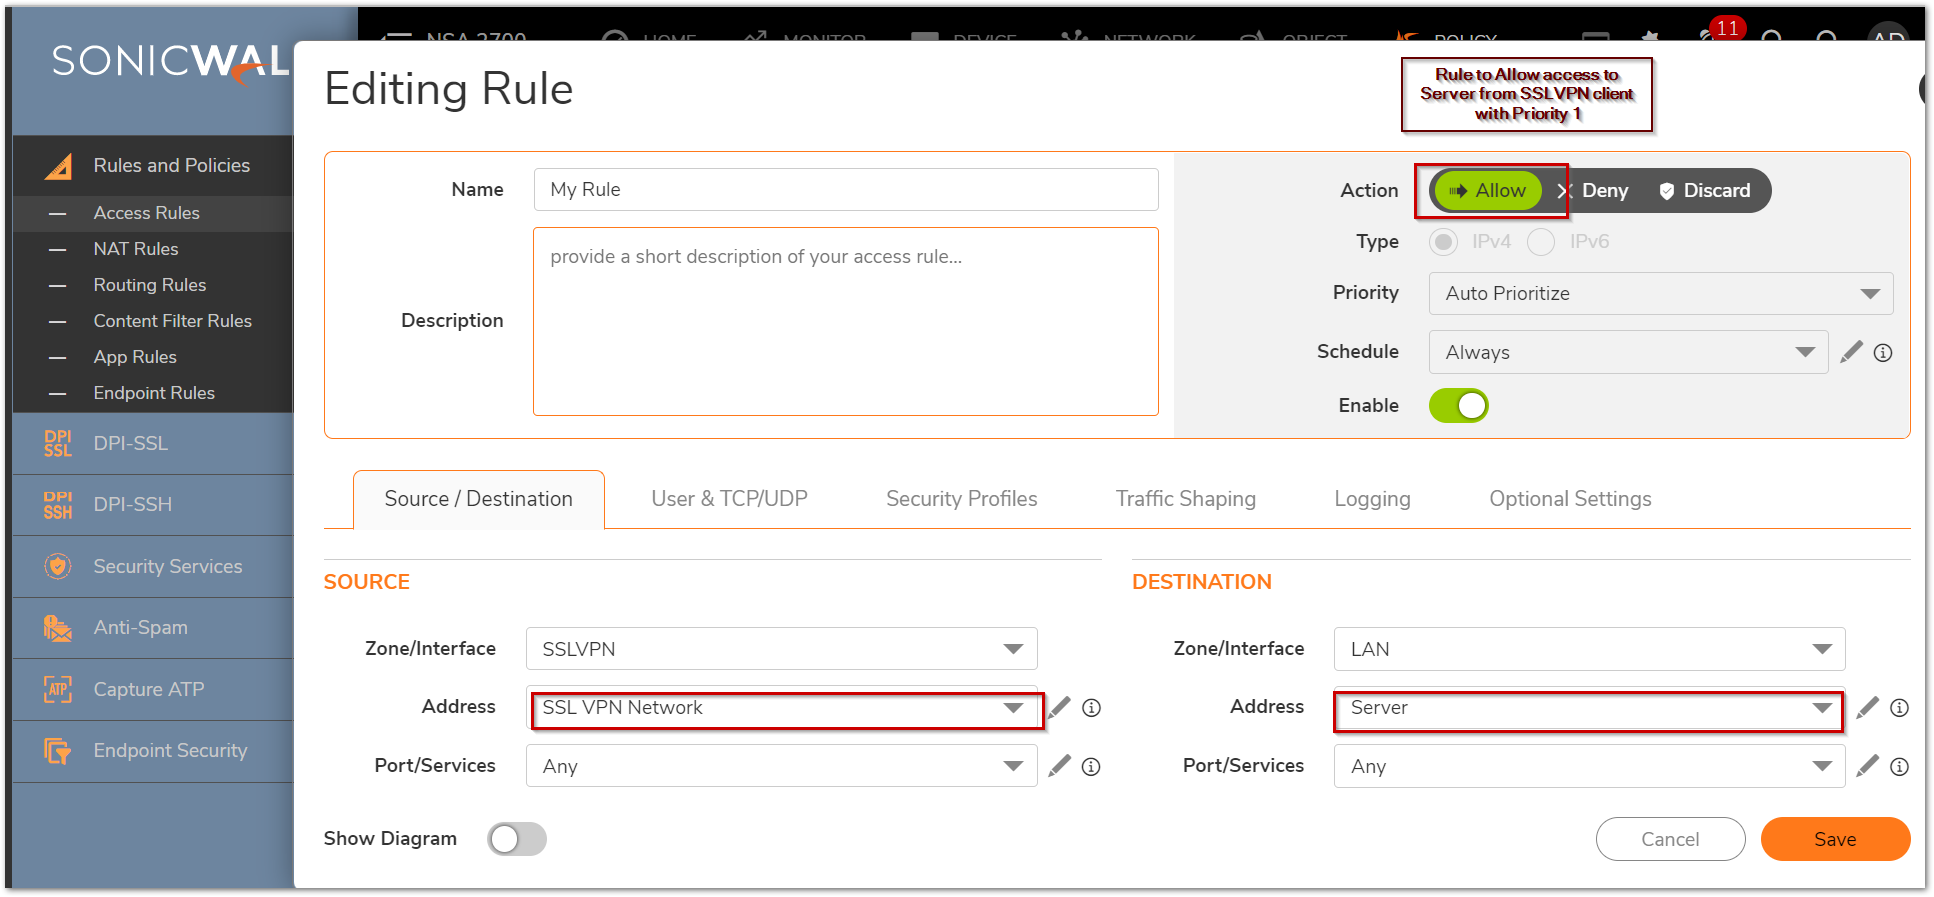
3) Restrict Access to Destination host behind SonicWall using Access Rule
In this scenario, SSLVPN users' access should be locked down to one host in the network, namely a Terminal Server on the LAN. It is assumed that SSLVPN service, User access list has already configured and further configuration involves:
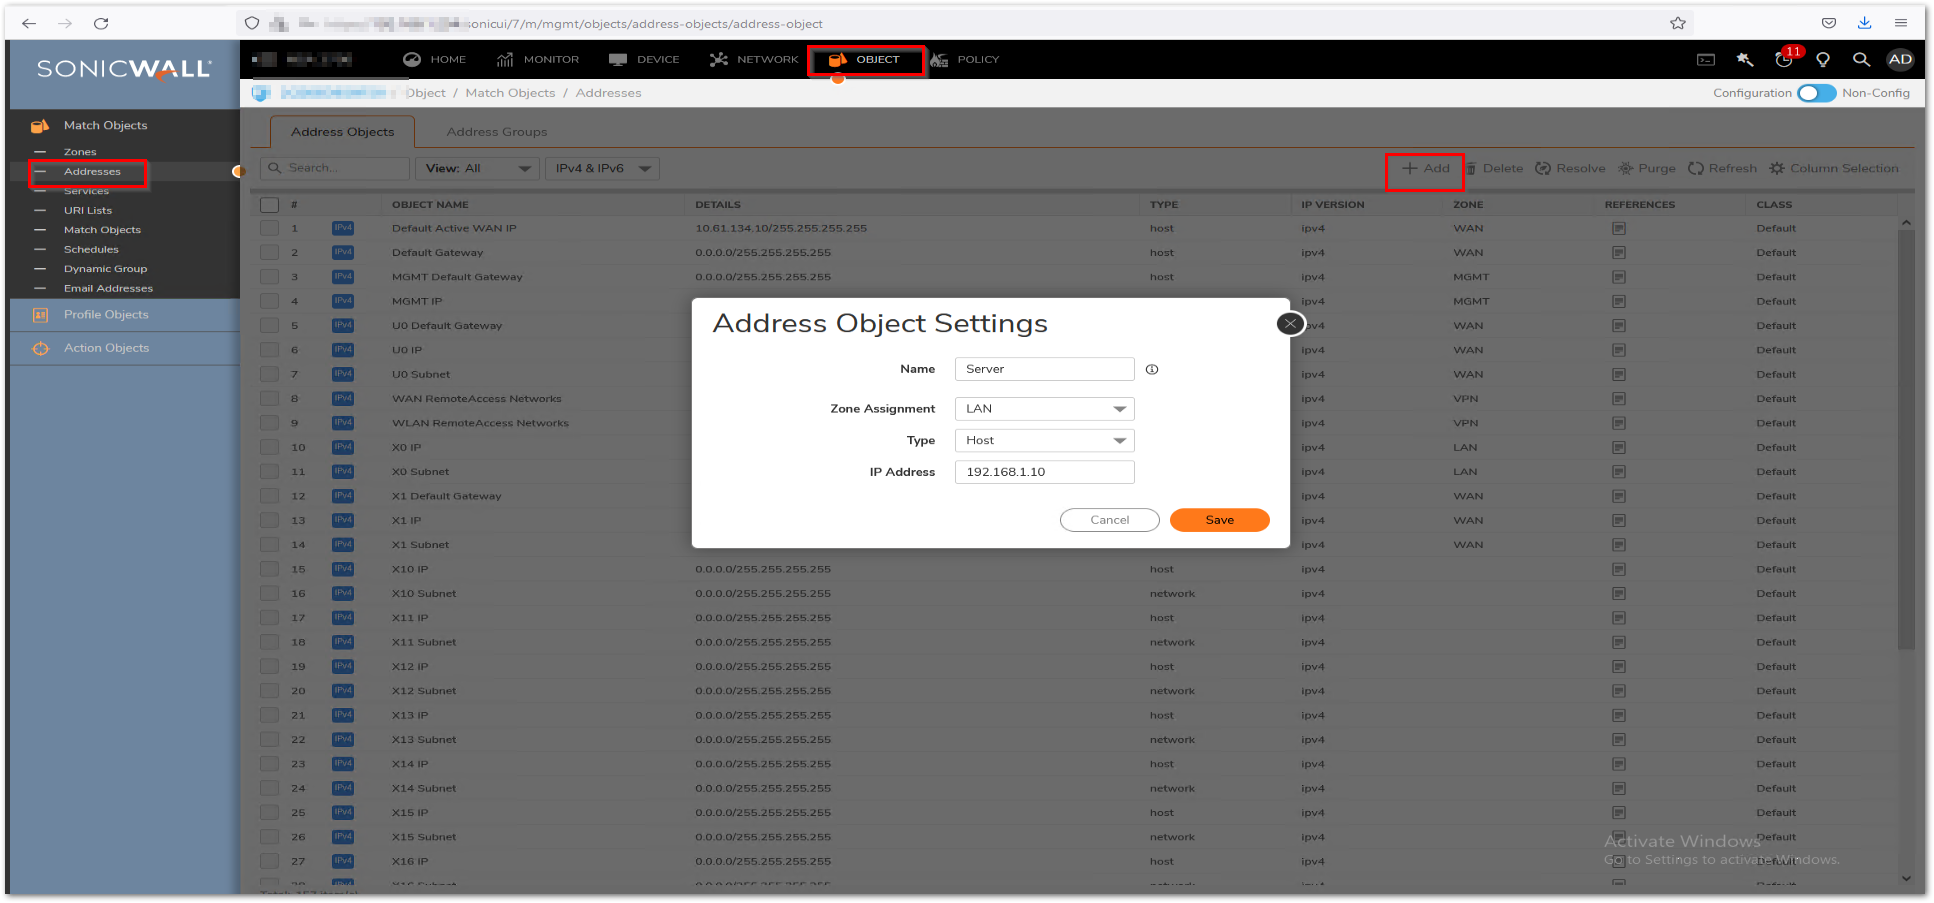
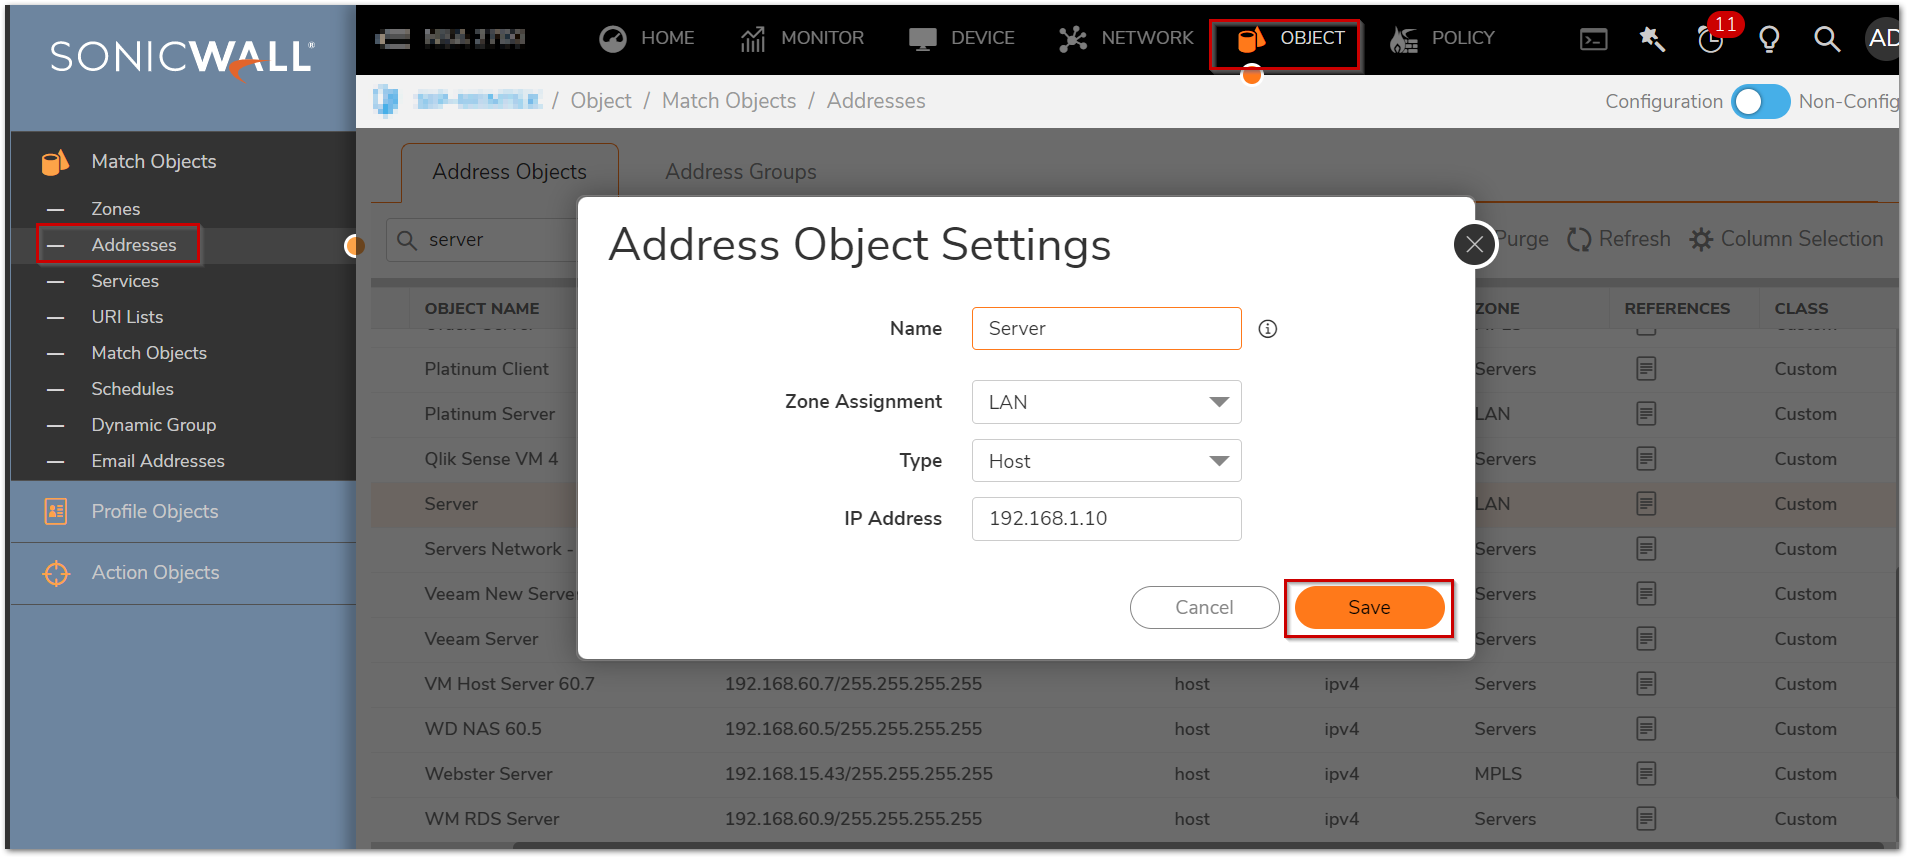
- Create an address object for the Terminal Server
- Create 2 access rule from SSLVPN | LAN zone
- Login to the SonicWall management page.
- Navigate to Object|Addresses, create the following address object.
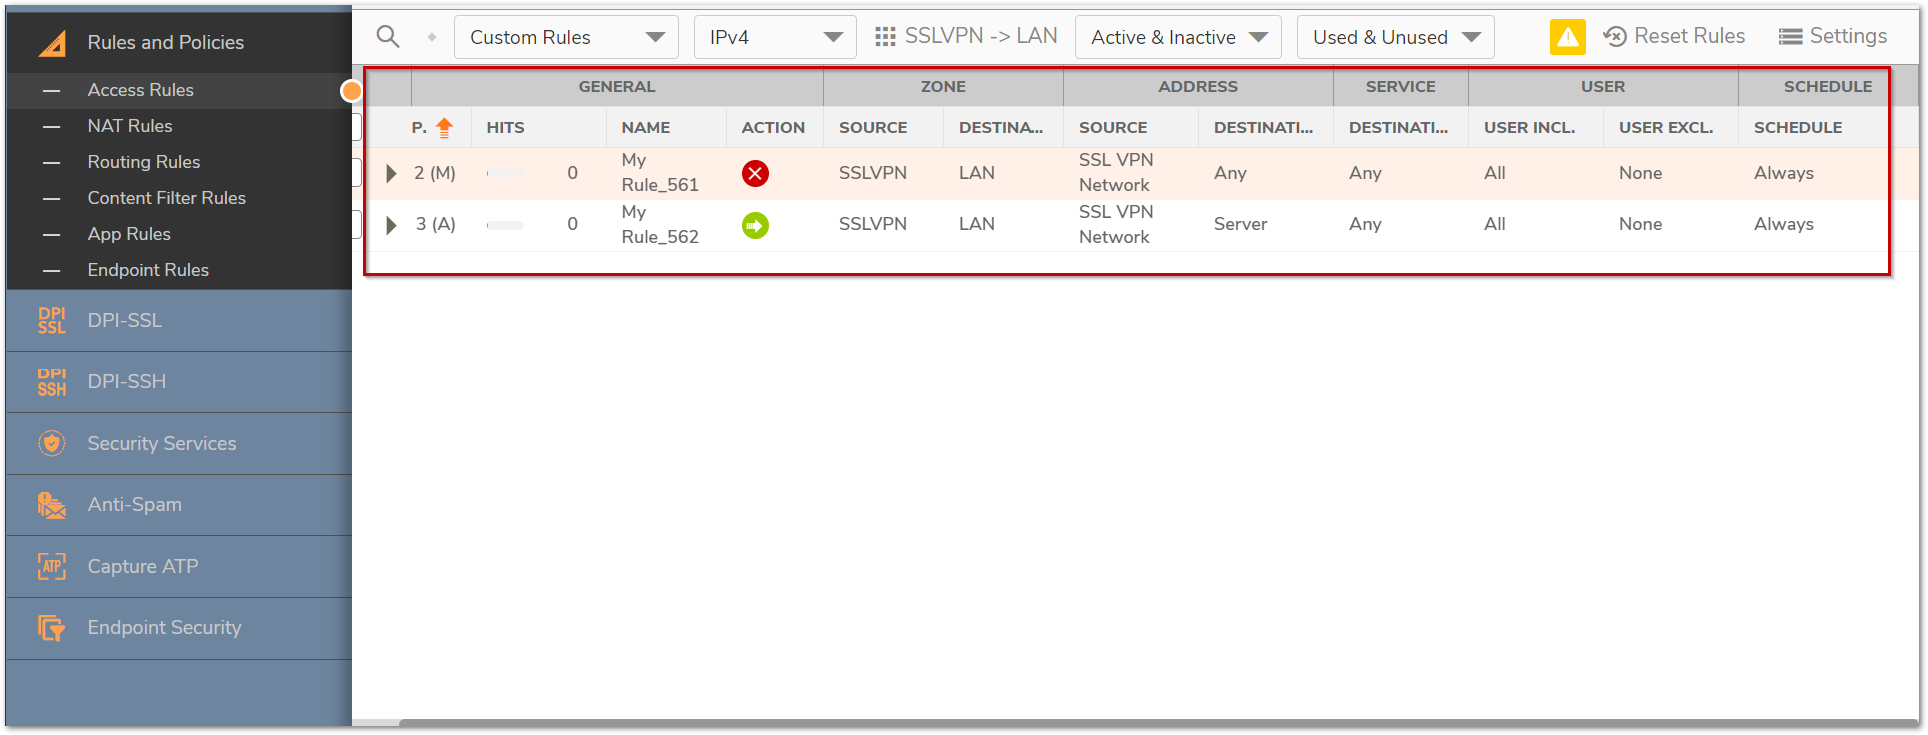
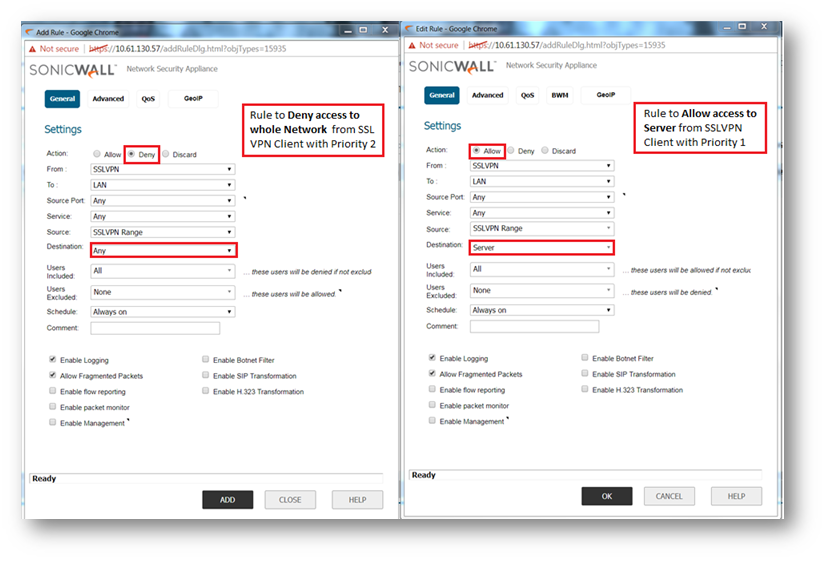
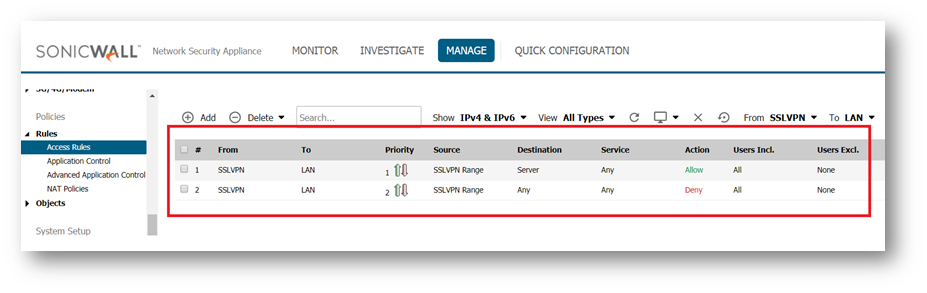
- Creating an access rule to block all traffic from remote VPN users to the network with Priority 2.
- Creating an access rule to allow all traffic from remote VPN users to the Terminal Server with Priority 1.
Resolution for SonicOS 6.5
This release includes significant user interface changes and many new features that are different from the SonicOS 6.2 and earlier firmware. The below resolution is for customers using SonicOS 6.5 firmware.
1) Restrict Access to Network behind SonicWall based on Users
While Configuring SSLVPN in SonicWall, the important step is to create a User and add them to SSLVPN service group. So the Users who is not a member of SSLVPN Services Group cannot be able to connect using SSLVPN. You have option to define access to that users for local network in VPN access Tab.
When a user is created, the user automatically becomes a member of Trusted Users and Everyone under the Manage | Users | Local Users & Groups | Local Groups page. To use that User for SSLVPN Service, you need to make them as member of SSLVPN Services Group.
If you click on the configure tab for any one of the groups and if LAN Subnet is selected in VPN Access Tab, every user of that group can access any resource on the LAN. Following are the steps to restrict access based on user accounts.
Adding Address Objects:
Login to your SonicWall Management page
Click Manage in the top navigation menu.
Navigate to Objects | Address Objects, under Address objects click Add to create an address object for the computer or computers to be accessed by Restricted Access group as below.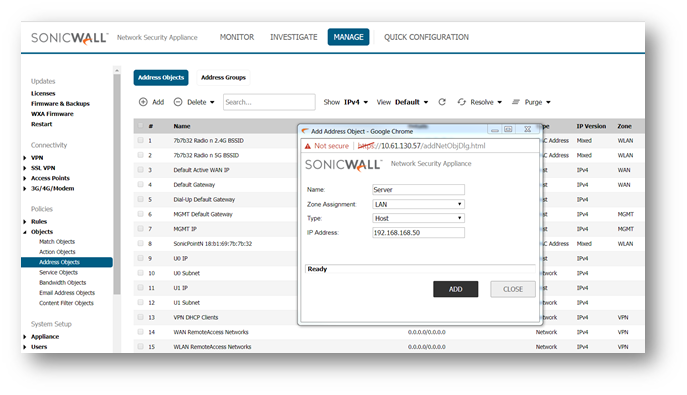
Adding and Configuring User Groups:
1) Login to your SonicWall Management Page
2) Navigate to Manage | Users | Local Users & Groups | Local Groups, Click the configure button of SSLVPN Services. Click the VPN Access tab and remove all Address Objects from the Access List.
3) Navigate to Users | Local Users & Groups | Local Groups, Click Add to create two custom user groups such as "Full Access" and "Restricted Access". Also make them as member of SSLVPN Services Group.
- For the "Full Access" user group under the VPN Access tab, select LAN Subnets.
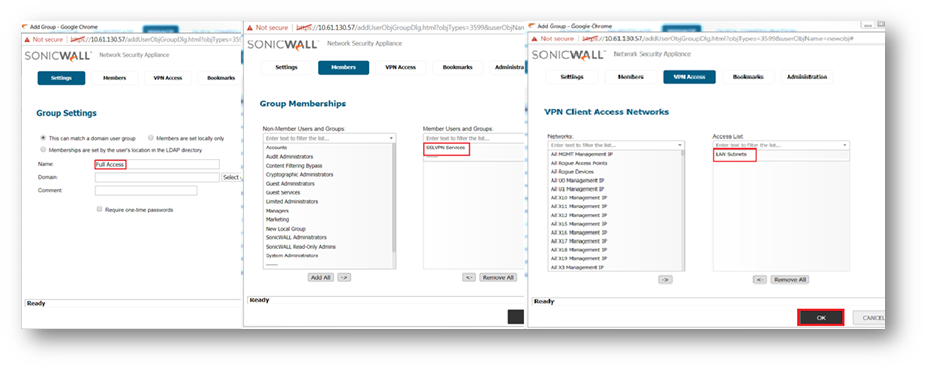
- For the "Restricted Access" user group under the VPN Access tab, select Server (address object that you had previously created for the restricted computers).
2) Restrict Access to Services (Example: Terminal Service) using Access rule
Login to your SonicWall Management page
- Navigate to the Manage | Rules | Access Rules page.
- Select From SSLVPN To LAN
- Click Add to create a rule
Create the following access rules.
- Creating an access rule to block all traffic from SSLVPN users to the network with Priority 2.
- Creating an access rule to allow only Terminal Services traffic from SSLVPN users to the network with Priority 1.
Note: If you have other zones like DMZ, create similar rules From SSLVPN to DMZ.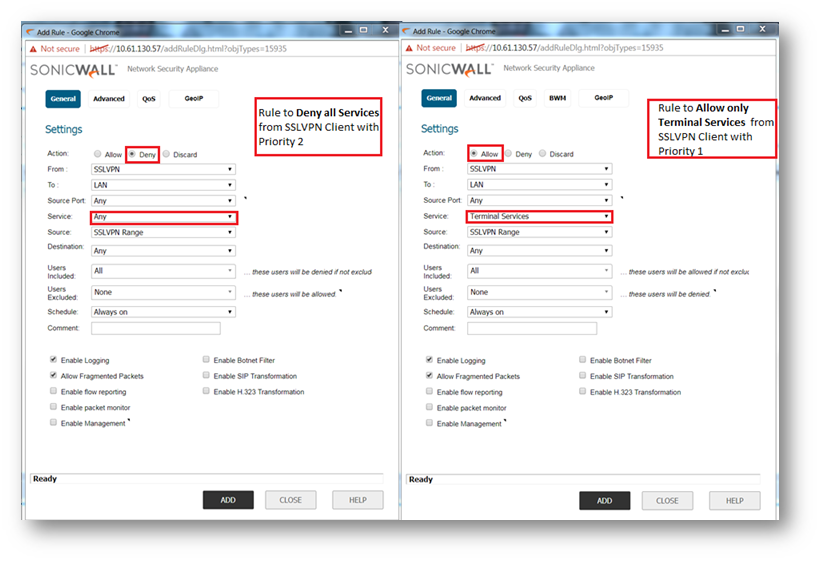

3) Restrict Access to Destination host behind SonicWall using Access Rule
In this scenario, SSLVPN users' access should be locked down to one host in the network, namely a Terminal Server on the LAN. It is assumed that SSLVPN service, User access list has already configured and further configuration involves:
- Create an address object for the Terminal Server
- Create 2 access rule from SSLVPN | LAN zone
|| Creating an address object for the Terminal Server
- Login to the SonicWall management page.
- Navigate to Manage | Objects | Address Objects, create the following address object.

|| Create 2 access rule from SSLVPN to LAN zone
- Creating an access rule to block all traffic from remote VPN users to the network with Priority 2.
- Creating an access rule to allow all traffic from remote VPN users to the Terminal Server with Priority 1.
Resolution for SonicOS 6.2 and Below
The below resolution is for customers using SonicOS 6.2 and earlier firmware. For firewalls that are generation 6 and newer we suggest to upgrade to the latest general release of SonicOS 6.5 firmware.
1) Restrict Access to Network behind SonicWall based on Users
While Configuring SSLVPN in SonicWall, the important step is to create a User and add them to SSLVPN service group. So the Users who is not a member of SSLVPN Services Group cannot be able to connect using SSLVPN. You have option to define access to that users for local network in VPN access Tab.
When a user is created, the user automatically becomes a member of Trusted Users and Everyone under the Users | Local Groups page. To use that User for SSLVPN Service, you need to make them as member of SSLVPN Services Group.
If you click on the configure tab for any one of the groups and if LAN Subnet is selected in VPN Access Tab, every user of that group can access any resource on the LAN. Following are the steps to restrict access based on user accounts.
Adding Address Objects:
Login to your SonicWall Management page
Navigate to Network | Address objects, under Address objects click Add to create an address object for the computer or computers to be accessed by Restricted Access group as below.?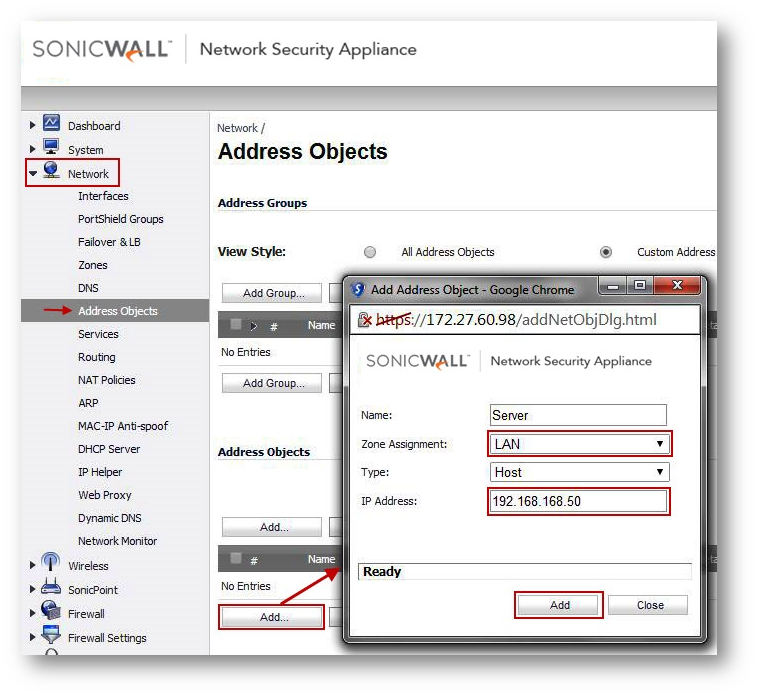
Adding and Configuring�User Groups:
1) Login to your SonicWall Management Page
2) Navigate to Users | Local Groups, Click the Configure button of SSLVPN Service Group. Click the VPN Access tab and remove all Address Objects from the Access List.
3) Navigate to Users | Local Groups | Add Group, create two custom user groups such as "Full Access and Restricted Access". Also make them as member of SSLVPN Services Group.
- For the "Full Access" user group under the VPN Access tab, select LAN Subnets.

- For the "Restricted Access" user group under the VPN Access tab, select Server (address object that you had previously created for the restricted computers).

2) Restrict Access to Services (Example: Terminal Service) using Access rule
Login to your SonicWall Management page
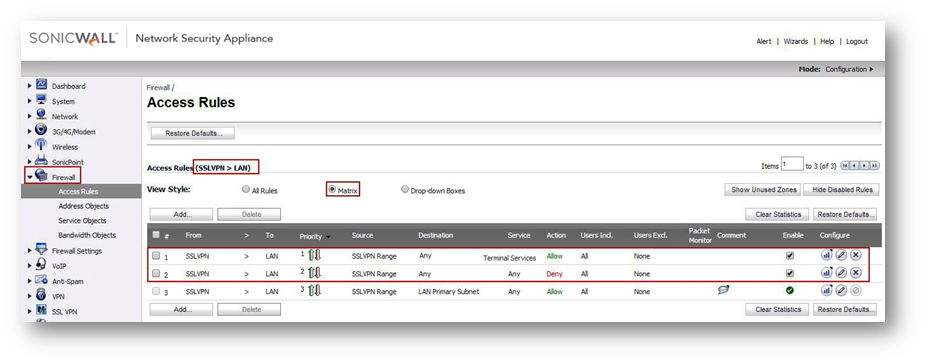
- Navigate to the Firewall | Access Rules page, on the right side click Matrix Radio Button
- Select From SSLVPN To LAN in the matrix.
Create the following access rules.
- Creating an access rule to block all traffic from SSLVPN users to the network with Priority 2.
- Creating an access rule to allow only Terminal Services traffic from SSLVPN users to the network with Priority 1.
Note: If you have other zones like DMZ, create similar rules From SSLVPN to DMZ.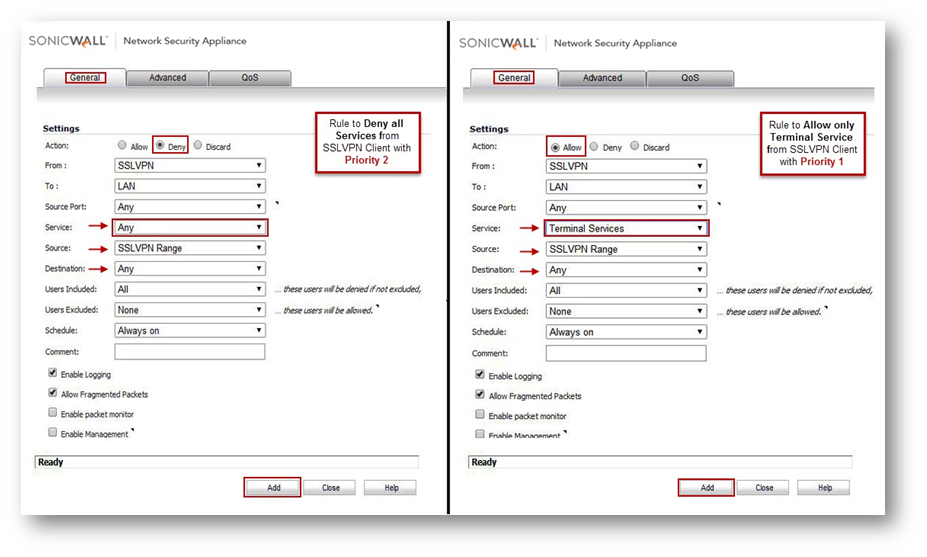
3) Restrict Access to Destination host behind SonicWall using Access Rule
In this scenario, SSLVPN users' access should be locked down to one host in the network, namely a Terminal Server on the LAN. It is assumed that SSLVPN service, User access list has already configured and further configuration involves:
- Create an address object for the Terminal Server
- Create 2 access rule from SSLVPN | LAN zone
|| Creating an address object for the Terminal Server
- Login to the SonicWall management page.
- Navigate to Network | Address Objects, create the following address object.

|| Create 2 access rule from SSLVPN | LAN zone
- Creating an access rule to block all traffic from remote VPN users to the network with Priority 2.
- Creating an access rule to allow all traffic from remote VPN users to the Terminal Server with Priority 1.