Accessing Safemode when firewall is not reachable via CLI or GUI
Description
This article describes how to put a SonicWall into safe mode through the GUI or through the command line interface (CLI).
You may require to follow this article for the following:
- Firewall not accessible any longer due to configuration issues or other causes
- Perform a firmware upgrade when it fails via normal means.
- Perform a ROM/Safemode version upgrade.
- Viewing the bootlogs or other diagnostic information.
 NOTE: Factory Reset via safemode is a required step when the device turns on but it is not reachable. A backup of the settings will be required after the factory reset or the firewall has to be reconfigured from scratch.
Resolution
ACCESSING SAFEMODE WHEN FIREWALL IS NOT REACHABLE VIA CLI/UI:
- Using a paperclip or similarly sized object, press and hold down the RST button located in the small hole on the front or back of the device (depending on the appliance) for at least 60 Seconds. Once the test light on the device becomes solid or begins to blink then the SonicWall is in safe mode.
 NOTE: On an NSsp 13700 or NSa Series appliance, press the button, but you do not need to hold it down.
 - Connect a computer directly to the following Interface, depending on what model SonicWall you have, via an ethernet cable.
- Manually assign a static IP / subnet mask and Gateway (gateway will be the safemode firewall IP) on the connected computers NIC depending on the SonicWall appliance.
- Open the browser on the client connected to the firewall and go to: http://Enterherethe_Safemode_Firewall_IP
Generation/Model Interface to be used while in Safemode Safemode Firewall IP Recommended IP to be set on client Generation 5 X0 192.168.168.168 192.168.168.10 | 255.255.255.0 Generation 6 & 7 | SOHO & TZ Devices X0 192.168.168.168 192.168.168.10 | 255.255.255.0 Generation 6 & 7 | NSa/SM/NSsp Devices MGMT Interface 192.168.1.254 192.168.1.10 | 255.255.255.0  CAUTION: Safemode is only available via HTTP so you have to manually type http:// otherwise the browser will automatically take you to https://.
 NOTE: For new safe mode options on Gen7, please refer: Safemode options on SonicWall Gen 7 devices
ACCESSING SAFEMODE VIA CLI
 NOTE: There is an E-CLI command safemode that restarts the firewall in SafeMode for Generation 7 (NSsp 13700 or NSa).
- If you're unfamiliar with how to access the SonicWall management using CLI please reference How to login to the appliance using the Command Line Interface (CLI).
- Once logged into the CLI, input the following commands.
Safemode
yes - The SonicWall will reboot and enter safe mode.

- Reference the steps above to login to the safe mode GUI, beginning with "Connect a computer directly to the following Interface..."
Below you can find some additional information about what you can do in SafeMode:
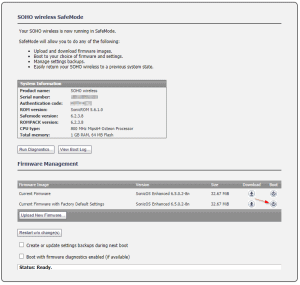
Reset your firewall to Factory Default
- Select Current Firmware with Factory Default Settings and confirm.
- Your firewall will restart to factory default.
- After the reboot, login to the SonicWall management GUI via X0 Interface on the default firewall IP (192.168.168.168).
 NOTE: Make sure to modify the NIC Settings of the client connected to X0 to match the new firewall default settings (Gateway: 192.168.168.168 and NetMask: 255.255.255.0).

Upgrading the Gen 6 Firmware or ROM Version from Safe Mode
- Download the desired firmware version from MySonicWall.com or have the desired ROM Version on hand. ROM Packs are only available via SonicWall technical support.
 NOTE: Upgrading the ROM version only applies to Generation 6 NSA SonicWalls - 2600, 3600, 4600, 5600, and 6600. Unless you have been requested to upgrade the ROM version by SonicWall technical support do not attempt to do so.
 - Select Upload New Firmware and follow the prompt in the pop-up window to upload the firmware or ROM version to the SonicWall.
- You should now see the New Firmware or Uploaded ROM Pack on the safe mode GUI. You can boot to the new firmware or ROM by clicking the boot icon on the far right.
 NOTE: Booting to a new firmware or ROM version will reboot the SonicWall and exit safe mode. Make sure you're completely finished with the SonicWall's safe mode before selecting boot.
 - After the reboot, login to the SonicWall management GUI as you normally would. Navigate to Monitor | Current Status | System Status.
- On the Status screen you should see the new firmware version listed under Firmware Version or the new ROM version listed under Safemode Version.
Gen 7 (Using SafeMode to Upgrade Firmware):
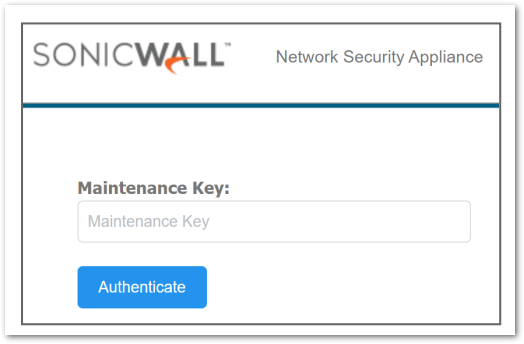
- Once we enter the url in the web browser to get to the safe mode page on SonicWall Gen 7 devices, we need to authenticate using Maintenance Key.
- In the Maintenance Key prompt, type in or paste the key you got from MySonicWall and then click Authenticate. If your appliance is running SonicOS 7.0.1 and is not yet registered, use its Auth Code as the key. (To find the Maintenance key, please refer to: Safemode options on SonicWall Gen 7 devices)

- Safe mode page is displayed

- Click Upload Image, and then browse to the location where you saved the SonicOS firmware image, select the file, and click Upload.
- Click the Boot button in the row for Available Image Version and select one of the following:
- Boot Available Image with Current Configuration: Use this option to restart the appliance with your current configuration settings.
- Boot Available Image with Factory Default Configuration: Use this option to restart the appliance with factory default configuration settings. The configuration settings revert to default values, but logs and local backups remain in place.
- Boot Available Image with Backup Configuration: Use this option to restart the appliance with saved backup configuration settings. You can choose which backup to use.

- In the confirmation dialog, click Boot to proceed.
- Wait while the firmware is installed, then booted.
- Login to the SonicWall management GUI as you normally would.