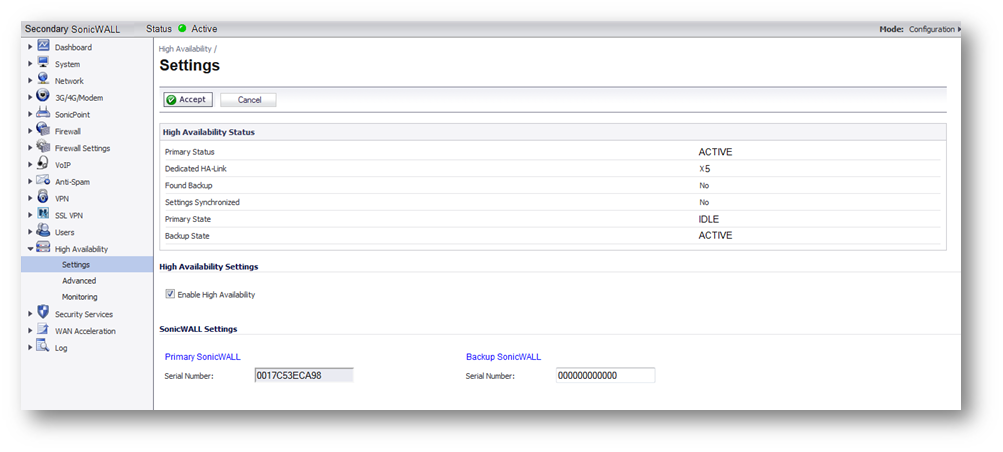
How can I upgrade firmware on a High Availability (Hardware Failover) Pair?
Description
How to upgrade Firmware on a High Availability (Hardware Failover) Pair
Resolution for SonicOS 6.5
This release includes significant user interface changes and many new features that are different from the SonicOS 6.2 and earlier firmware. The below resolution is for customers using SonicOS 6.5 firmware.
Network Setup

Monitoring IP Details
Primary SonicWall | Secondary SonicWall | |
| X0 IP | 192.168.169.5 | 192.168.169.6 |
| X1 IP | 0.0.0.0 | 0.0.0.0 |
LAN Management IP of SonicWall : 192.168.169.1
The monitoring IP is configured so that we could access the primary and the backup SonicWall individually .
Prerequisites
 NOTE: Before upgrading your SonicOS Firmware, please consult the Support Matrix to understand the supported upgrade paths. The following article provides additional information regarding this topic: Can I Import the settings from one SonicWall UTM device to another? (Support Matrix).
Backing up Your Settings
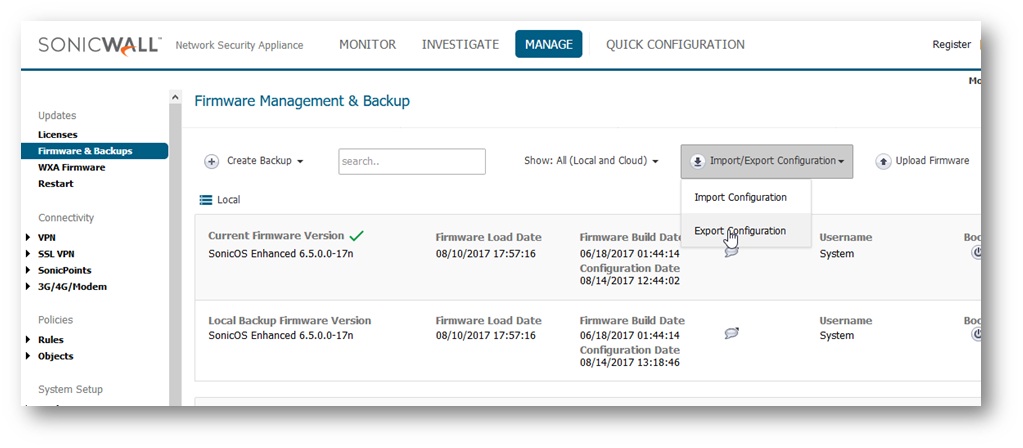
- Click Manage in the top navigation menu. Navigate to Updates | Firmware & Backups. Select the Import/Export Configuration option and save the .EXP File to a safe location.
- On the same page, click Create Backup | Local Backup. This will save a copy of the existing Settings to the SonicWalls non-volatile memory.
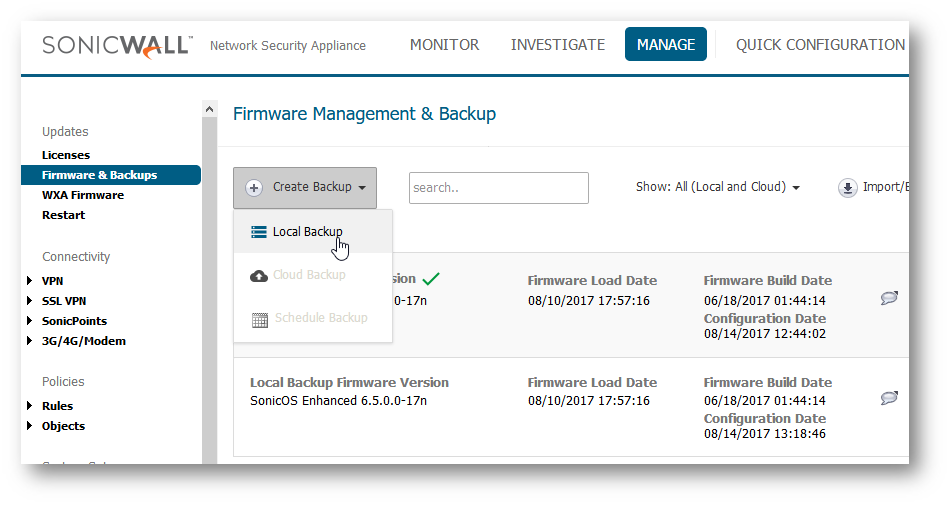
 CAUTION: Make sure you're completely satisfied with the state of your Settings before creating a Backup. A SonicWall can only hold one Backup Image at a time so creating one will erase any existing versions.
Configuring the Monitoring IP Addresses on the SonicWall
- Login to your SonicWall management page and click Manage tab on top of the page.
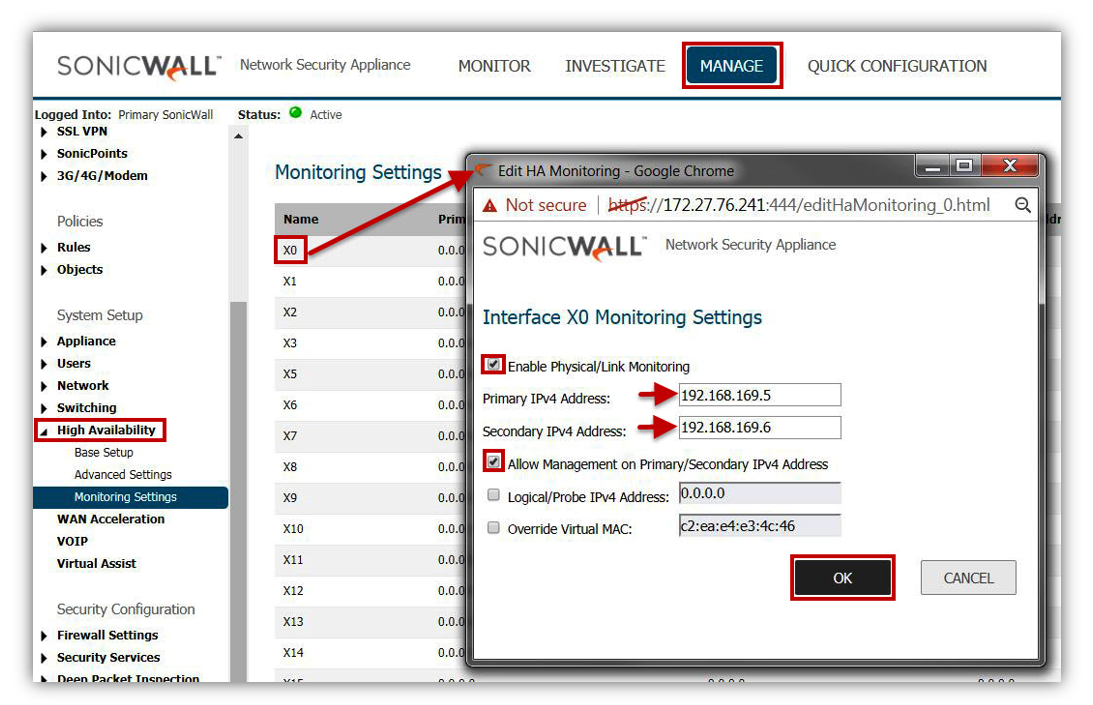
- Navigate to High Availability | Monitoring Settings page. Configure X0 interface to get Edit HA Monitoring window and configure it as below.
- Select Enable Physical/link Monitoring check box.
- Primary IPv4 Address: 192.168.169.5
- Secondary IPv4 Address: 192.168.169.6
- Enable Allow Management on Primary/Secondary IPv4 Address checkbox.
- Click OK.

- For accessing the SonicWall's web management GUI from the LAN, you can use the X0 IP address [Here 192.168.169.1] on the Network |Interfaces screen under Manage tab.

 NOTE:In an HA Pair of any kind, the firewall which responds on this IP address which is the Active unit of the HA pair, which is usually the Primary unit but sometimes it is the Backup unit. You can always tell which unit is active (and which is using the X0 IP address) by looking in the top right corner, which has an indicator which reads: Logged Into: Primary SonicWall (or Logged Into: Backup SonicWall). Watch for this in the screenshots above.
Upgrading Firmware on a UTM High Availability Pair
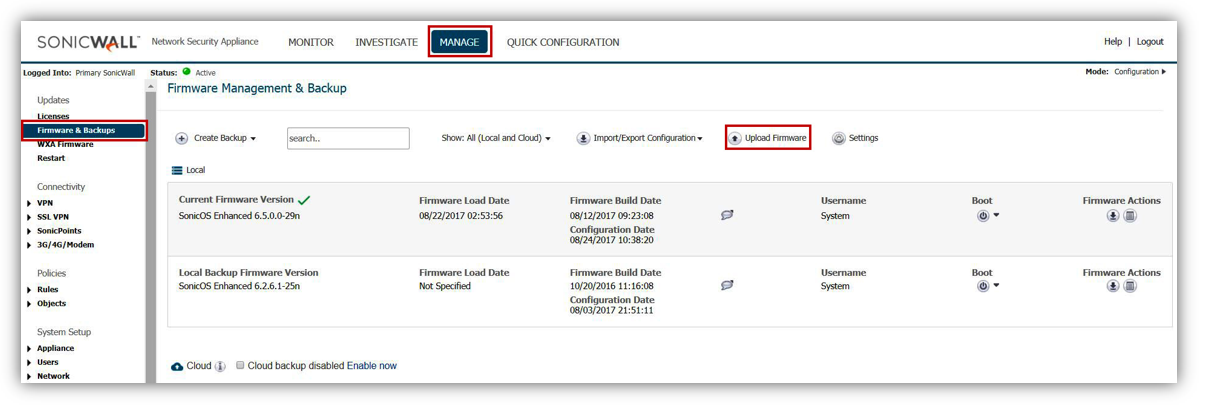
- Login to your SonicWall management page and click Manage tab on top of the page.
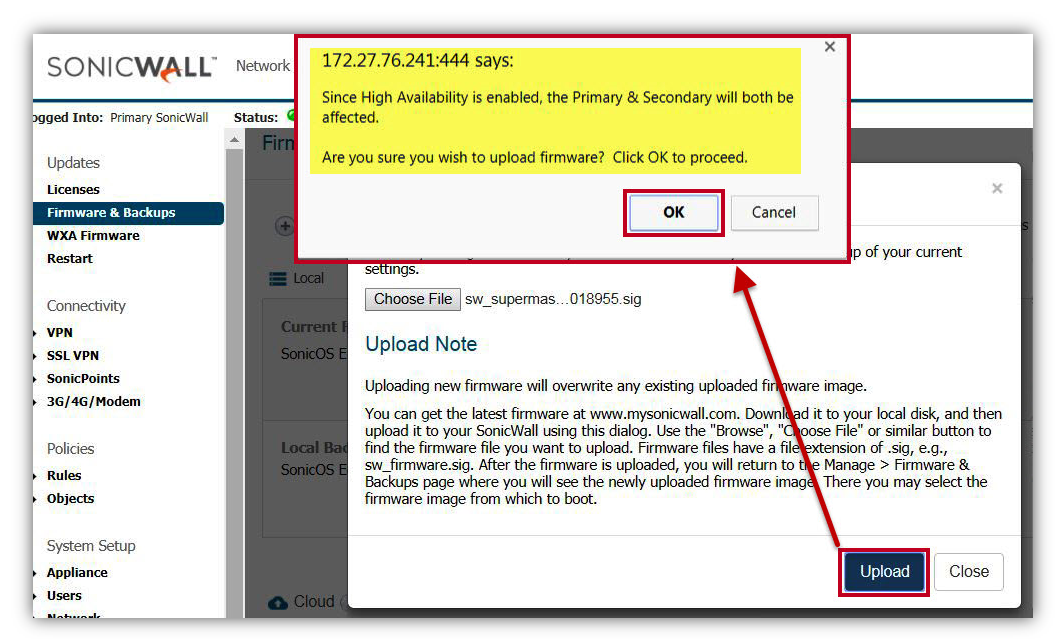
- Navigate to Firmware & Backups page, click Upload Firmware button as below.
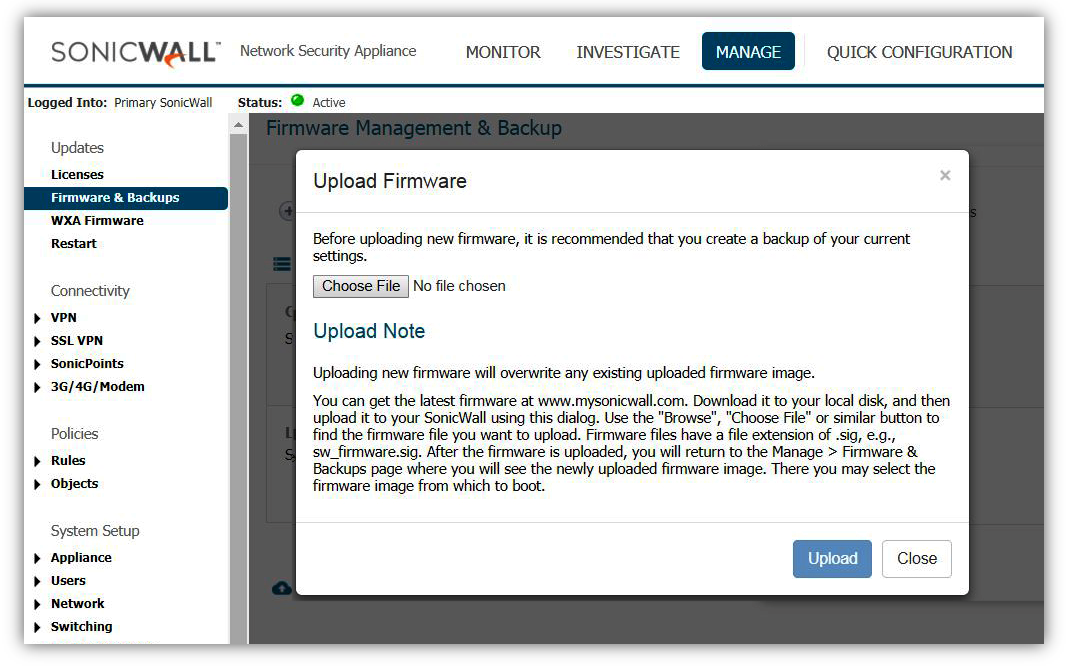
- Upload Firmware window will pop-up as below.
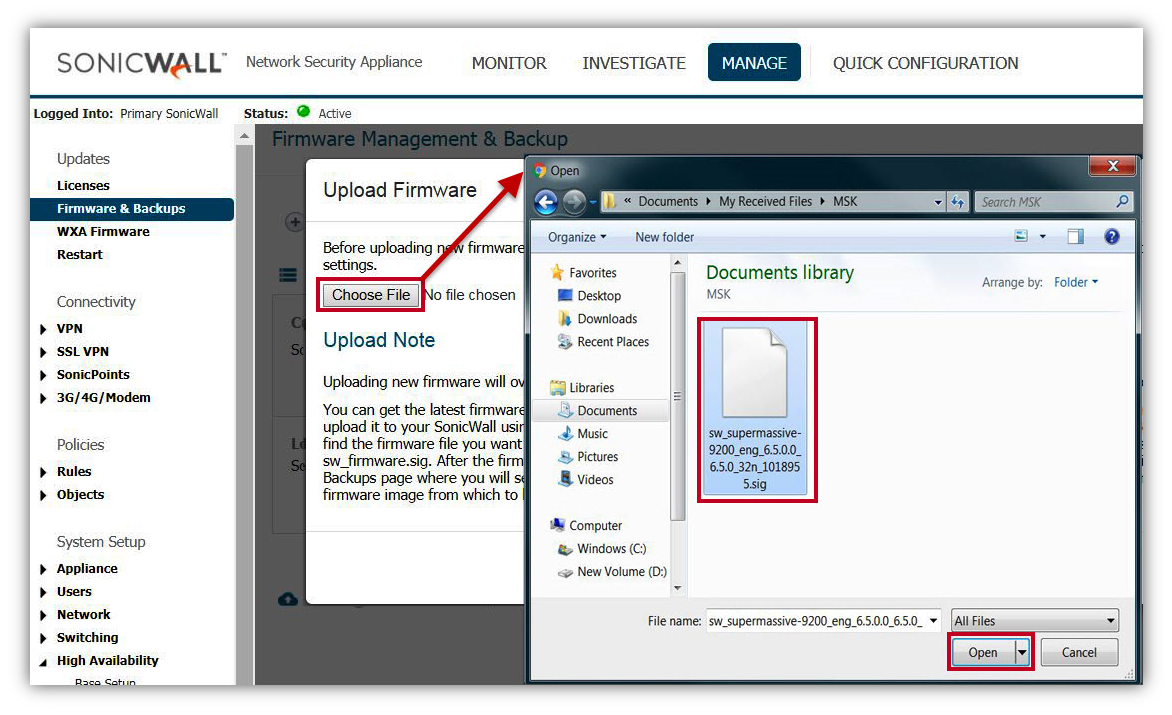
- Click Choose File button to get Open windows, navigate to folder where you have firmware in .sig format and click Open.
- You will see the file name near Choose File as below.
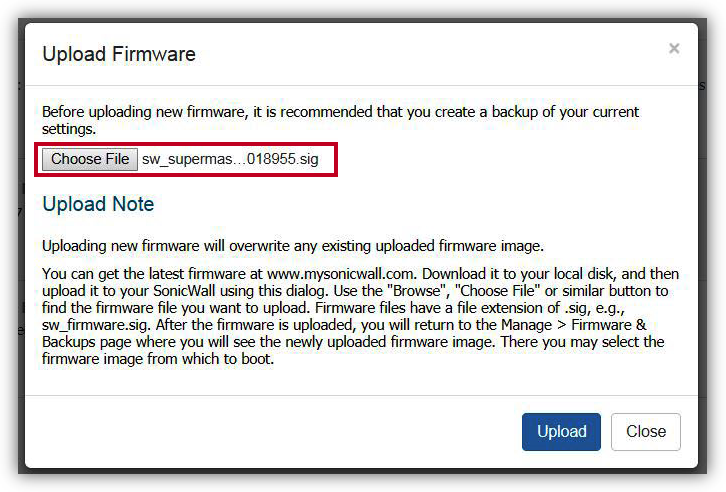
- Click Upload button to get pop-up as below.Click OK. (Since High Availability is enabled, the Primary & Secondary will both be affected. Are you sure you wish to upload firmware? Click OK to proceed).
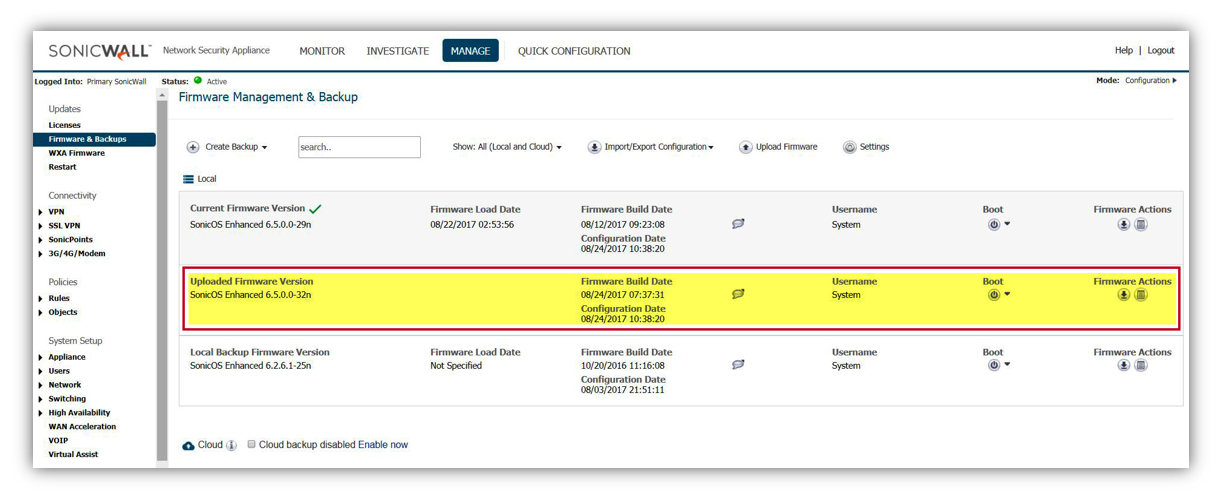
- Firmware will upload to GUI as below with name Uploaded Firmware Version under Local section.
- Click Boot button near Uploaded Firmware Version, to see 2 option as.
- Boot Uploaded Firmware (SonicOS Enhanced 6.5.x.x-xn) with Current Configuration. (Recommended to click this option).
- Boot Uploaded Firmware (SonicOS Enhanced 6.5.x.x-xn) with Factory Default Configuration.
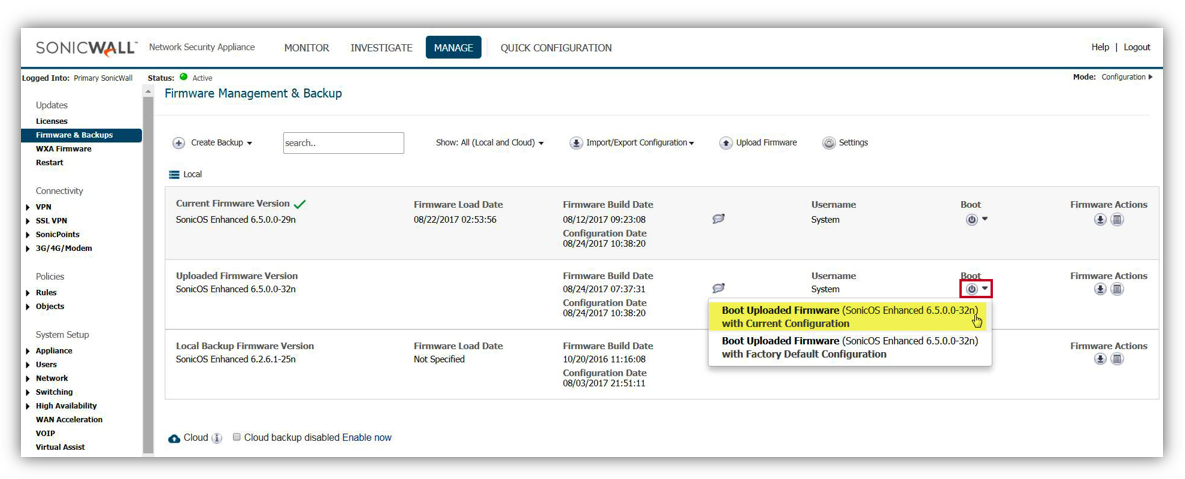
- Click Boot Uploaded Firmware (SonicOS Enhanced 6.5.x.x-xn) with Current Configuration to get pop-up as below. Click OK.(Since High Availability is enabled, the Primary & Secondary will both be affected. Are you sure you which to boot the firmware? Click OK to Proceed).

- The Secondary SonicWall will be the first unit to upgrade and will reboot automatically. High Availability Status screen shows .
- Primary State as ACTIVE.
- Secondary State as REBOOT.
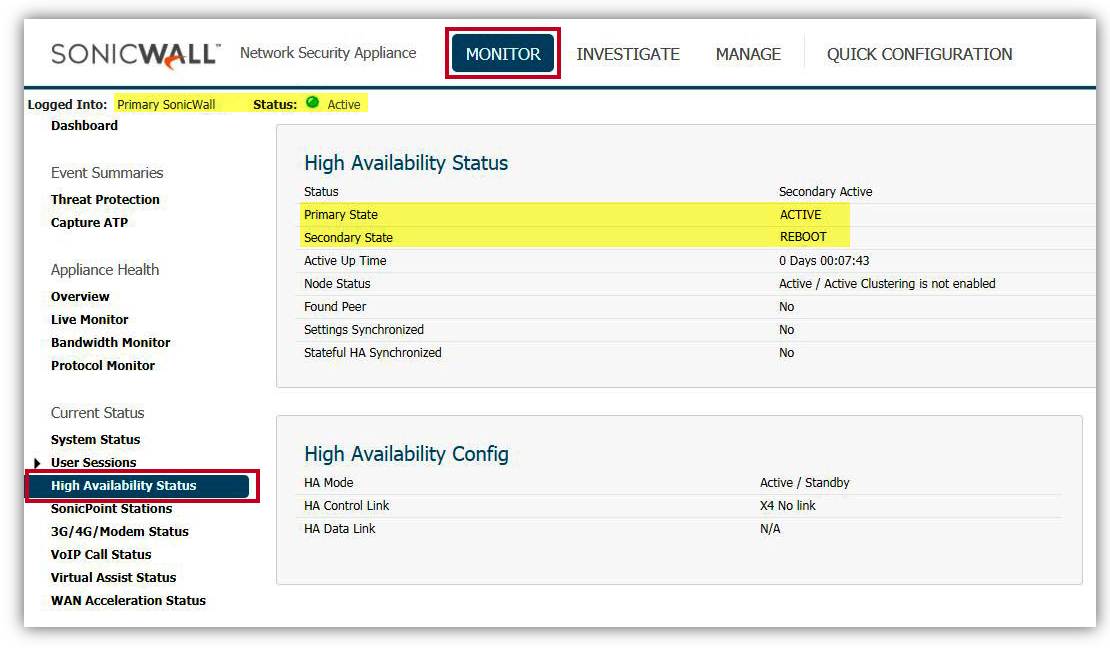
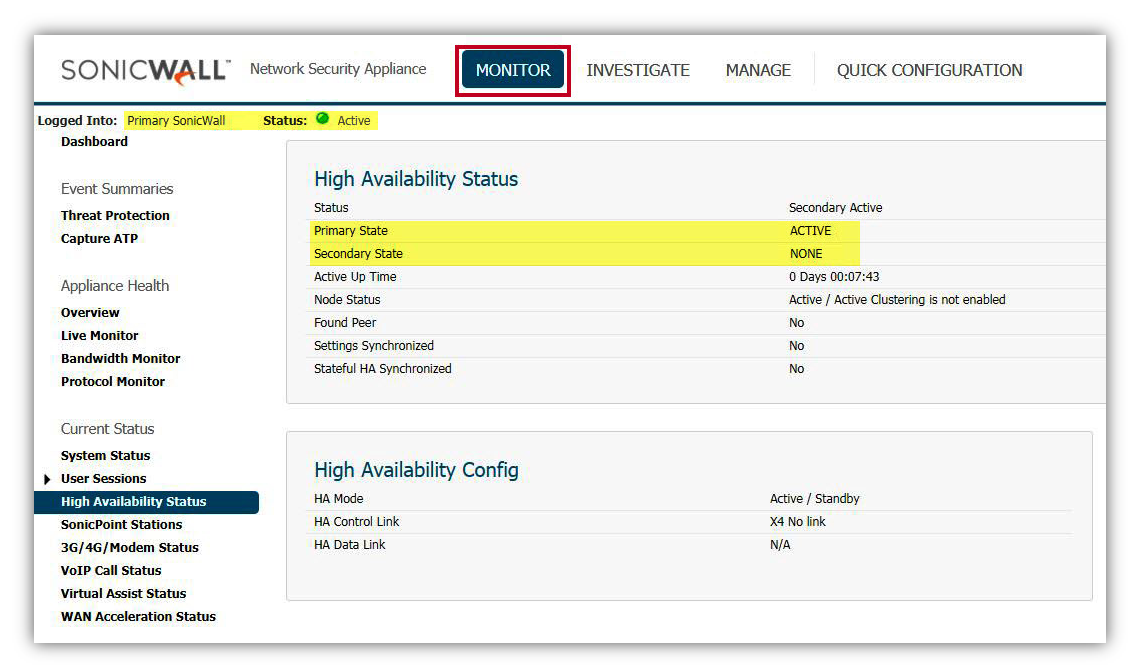
- The Secondary SonicWall is unavailable during its reboot. High Availability Status screen shows .
- Primary State as ACTIVE.
- Secondary State as NONE.
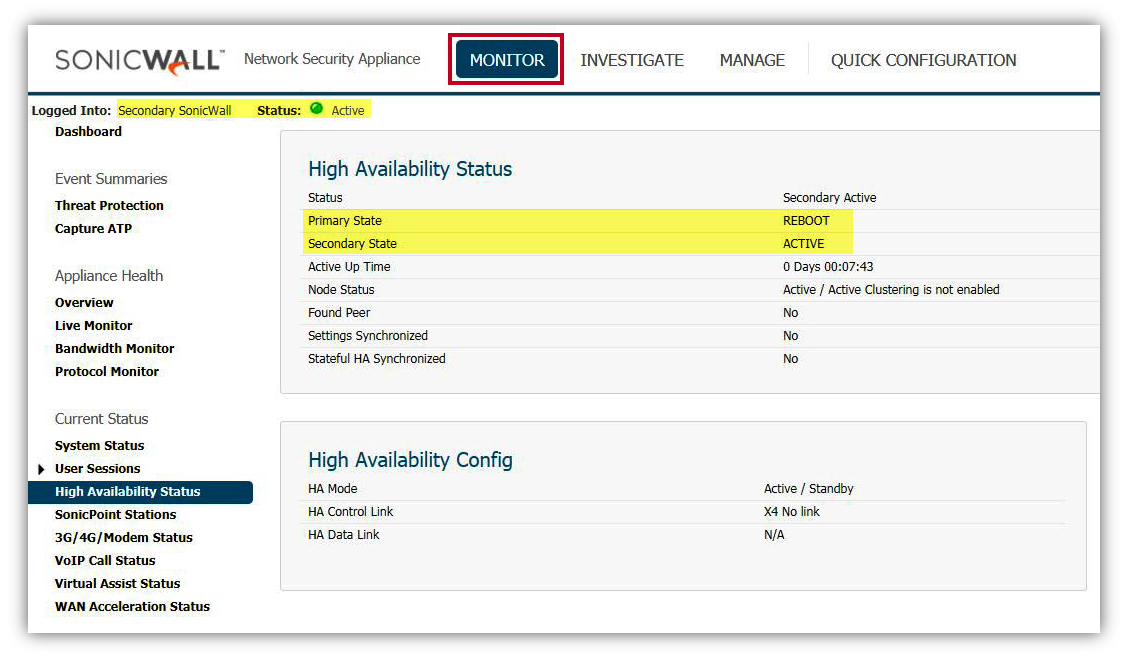
- After the Secondary SonicWall finishes loading the upgraded firmware, it will become ACTIVE .Primary unit will undergo its upgrade and reboot, while traffic would pass through the Secondary SonicWall. High Availability Status screen shows .
- Primary State as REBOOT.
- Secondary State as ACTIVE.
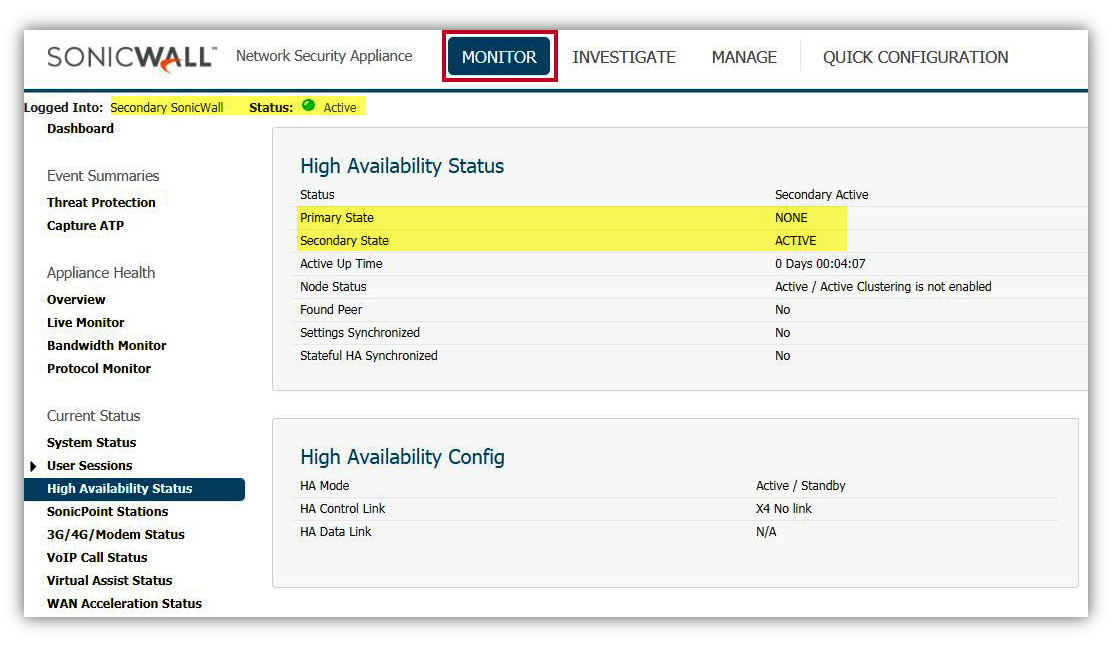
- While the Primary SonicWall reboots the Primary unit becomes unavailable as it restarts. High Availability Status screen shows.
- Primary State as NONE.
- Secondary State as ACTIVE.
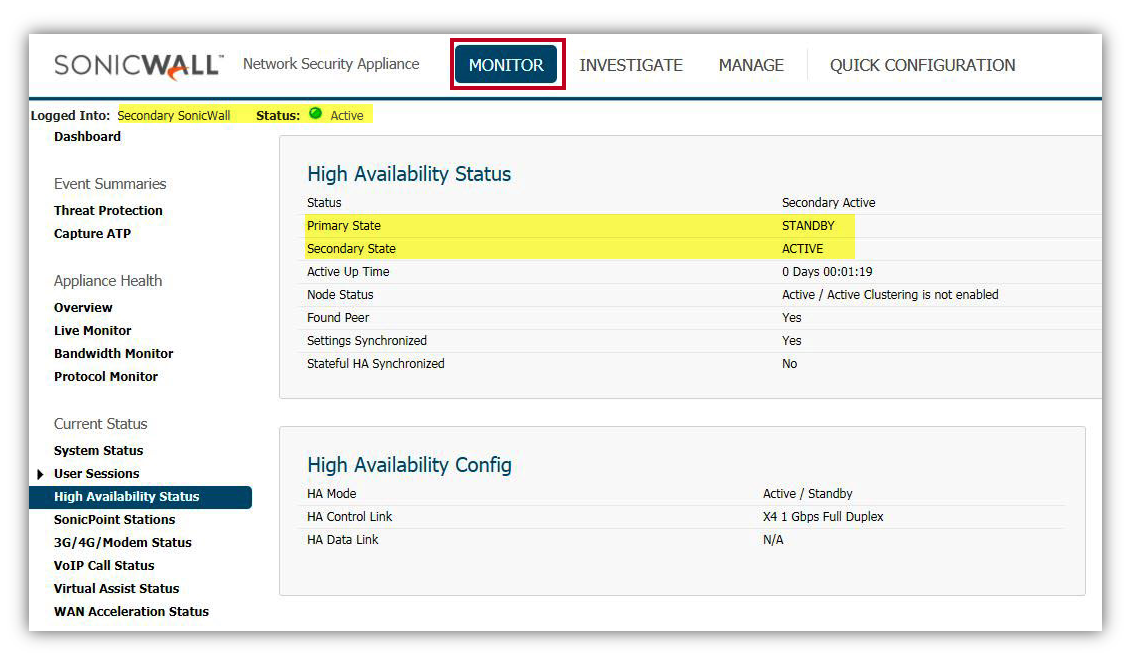
- When the Primary SonicWall comes back up, it becomes the STANDBY unit and traffic again passes through the Secondary SonicWall as Enable Preempt Mode checkbox under HA General page is disabled by default-. High Availability Status screen shows
- Primary State as STANDBY.
- Secondary State as ACTIVE.
Behavior of Preempt Mode Option
- With Stateful Synchronization setup, it recommend to disable Preempt Mode option. Default Enable Preempt Mode option is unchecked and the behavior of this option is explained below.
| Preempt Mode | Before Firmware Upgrade | After Firmware Upgrade |
| Disabled | Primary Unit: Active Secondary Unit: STANDBY | Primary Unit: STANDBY Secondary Unit: Active |
| Enabled | Primary Unit: Active Secondary Unit: STANDBY | Primary Unit: Active Secondary Unit: STANDBY |
Resolution for SonicOS 6.2 and Below
The below resolution is for customers using SonicOS 6.2 and earlier firmware. For firewalls that are generation 6 and newer we suggest to upgrade to the latest general release of SonicOS 6.5 firmware.
 NOTE: In the Gen5 UTM products, the screens in the web management GUI are in the High Availability Section. In Gen4 UTM products (pictured in some of the below screenshots), the section is named Hardware Failover, but the functionality is the same.

Monitoring IP Details
Primary SonicWall | Secondary SonicWall | |
X0 IP | 10.10.10.96 | 10.10.10.97 |
X1 IP | 0.0.0.0 | 0.0.0.0 |
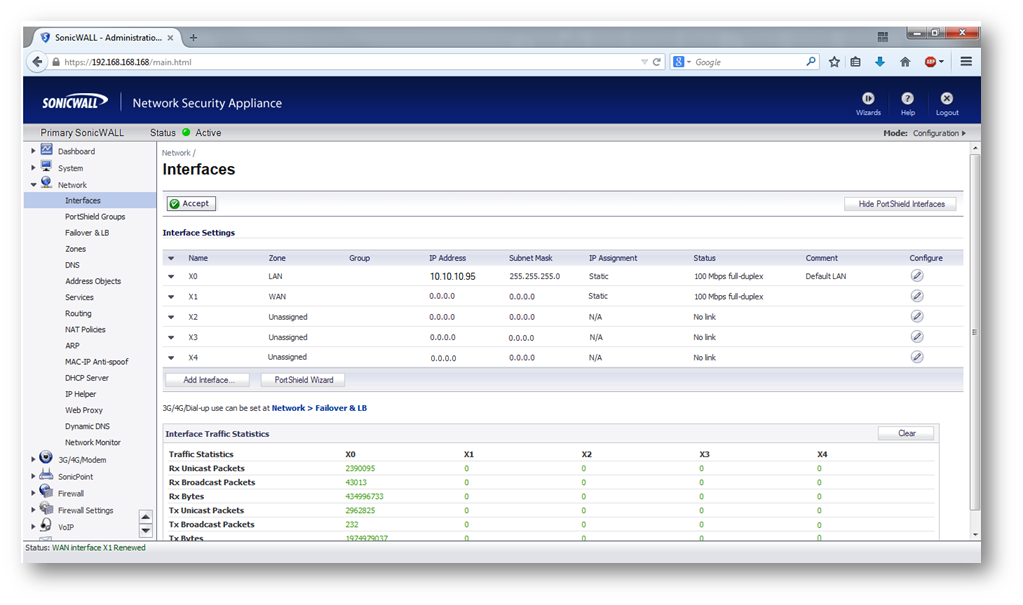
LAN Management IP of SonicWall : 10.10.10.95
The monitoring IP is configured so that we could access the primary and the backup SonicWall individually .The monitoring IP addresses are configured from Hardware Failover | Monitoring screen (Gen4) or the High Availability | Monitoring screen (Gen5).
Configuring the Monitoring IP Addresses on the SonicWall
- Log in the SonicWall and navigate to Hardware Failover | Monitoring screen. Assign two IP addresses in the X0 Subnet that are not in use.
 NOTE: You can also assign monitoring IP addresses for other interfaces like X1, if you have other IP addresses available in the X1 subnet.
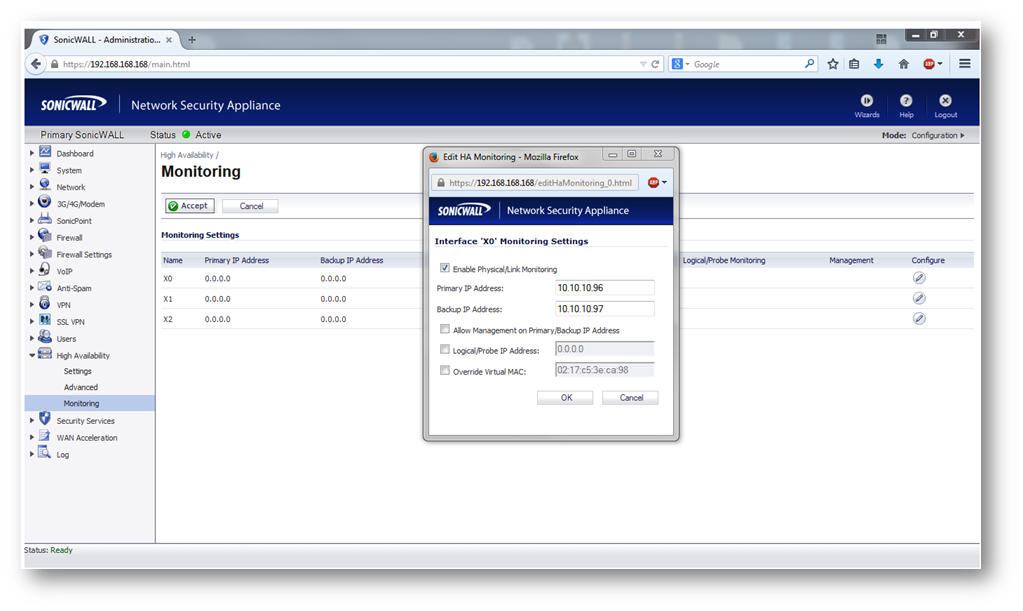
- For accessing the SonicWall's web management GUI from the LAN, you can use the X0 IP address [Here 10.10.10.95] on the Network | Interfaces screen. In an HA Pair of any kind, the firewall which responds on this IP address is the Active unit of the HA pair, which is usually the Primary unit, but sometimes it is the Backup unit. You can always tell which unit is active (and which is using the X0 IP address) by looking in the top right corner, which has an indicator which reads: Logged Into: Primary SonicWall (or Logged Into: Backup SonicWall). Watch for this in the screenshots below.
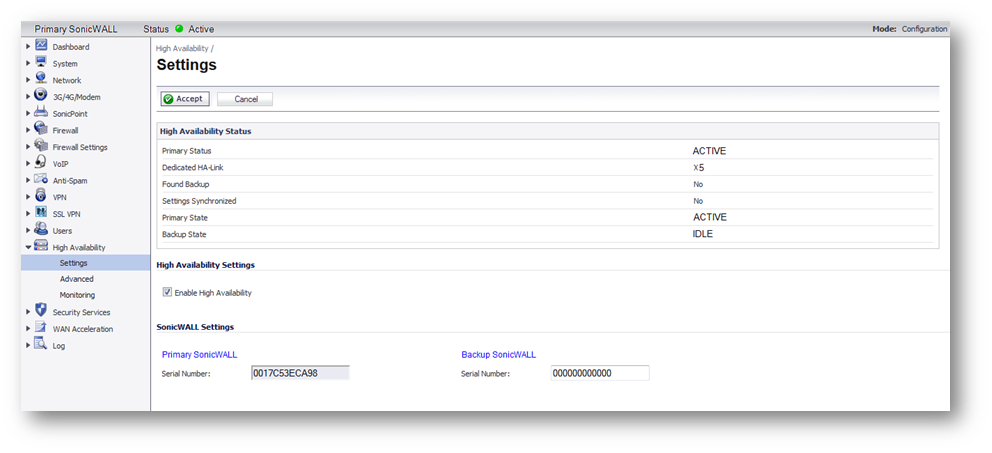
 NOTE: Preempt Mode (see screenshot below) is a feature in SonicWall Hardware Failover | High Availability pairs, and is the reason for the difference in behavior between the two examples A and B below. Preempt is the behavior of the Primary unit taking back active status from the Backup unit after a reboot, even if the Backup unit is functioning properly. Preempt mode cannot be enabled with Stateful Synchronization enabled.
 EXAMPLE: A
- Upgrading Firmware on a UTM High Availability Pair, when Stateful Synchronization is disabled (and Preempt Mode is enabled)
- Access the SonicWall using the X0 IP [here: 10.10.10.95].

- Navigate to System | Settings screen and click Upload New Firmware. When the firmware is uploaded, a warning appears, saying that both units will be affected.
- After the firmware is uploaded we will get two new firmware options. You will want to click on the boot icon for Uploaded Firmware – NEW (this choice preserves your existing settings during the upgrade). You will get a second warning that the boot of the firmware will affect both units of the HA Pair.
- The Backup unit will be the first unit to upgrade and will reboot automatically. The Hardware Failover screen (or High Availability screen) shows the status of the Backup Unit as REBOOT.

- The Backup is unavailable during its reboot. The Hardware Failover screen (or High Availability screen) shows the status of the Backup Unit as NONE.

- After the Backup unit finishes loading the upgraded firmware, the Primary unit will undergo its upgrade and reboot, while traffic would pass through the Secondary unit.

- While the Primary unit reboots the Primary unit becomes unavailable as it restarts.

- Because Preempt Mode is enabled, when the Primary unit comes back up, it becomes the active unit, and traffic again passes through the Primary unit. The Backup unit moves to the idle state, as it was before the firmware upgrade.
Example B
- Upgrading Firmware on a UTM High Availability Pair, When Stateful Synchronization is enabled (and Preempt Mode is disabled)
- Access the SonicWall using the X0 IP [here: 10.10.10.95].

- When Stateful synchronization is enabled we cannot have Preempt mode enabled. When the firmware is uploaded, it will come up with a warning saying that both units will be affected.
- After the firmware is uploaded we will get two new firmware options. You will want to click on the boot icon for Uploaded Firmware – NEW (this choice preserves your existing settings during the upgrade).
- The Backup unit will be the first unit to upgrade and will reboot automatically. The Hardware Failover screen (or High Availability screen) shows the status of the Backup Unit as REBOOT.

- The backup becomes unavailable when it restarts.
- After the Backup unit finishes loading the upgraded firmware, the Primary unit will undergo its upgrade and reboot. While the Primary unit is rebooting, traffic would pass through the Backup unit, which is now the active unit of the pair.

- The Backup unit becomes ACTIVE and traffic between the internal network and the Internet now would pass through it. The primary remains idle because preempt cannot be enabled when the HA pair uses Stateful Synchronization.
