How can I open PPTP traffic to a PPTP server behind the SonicWall?
Description
The Point-to-Point Tunneling Protocol (PPTP) is a method for implementing virtual private networks. PPTP uses a control channel over TCP and a GRE tunnel operating to encapsulate PPP packets. A PPTP tunnel is instantiated by communication to the peer on TCP port 1723. This TCP connection is then used to initiate and manage a second GRE tunnel to the same peer.
 NOTE: It is not necessary to add GRE (IP protocol 47) to the SonicWall in order to support PPTP pass-through (either for a client connecting to a server on the Internet, or clients on the WAN connecting to a server on the LAN side). GRE is handled automatically as needed whenever a PPTP connection is established. Currently,
Manually opening PPTP traffic from Internet to a server behind the SonicWall in SonicOS Enhanced involves the following steps:
- Creating the necessary Address Objects.
- Defining the appropriate NAT Policies (Inbound, Outbound and Loopback).
- Creating the necessary WAN Zone Access Rules for public access.
 TIP: The Public Server Wizard quickly configure your SonicWall to provide public access to an internal server. The Public Server Wizard is the most ambitious and functional wizard developed to date. It simplifies the complex process of creating a publicly and internally accessible server resource by automating above mentioned steps. Please refer How Can I Open Ports On The Firewall Using The Quick Configuration?
Scenario
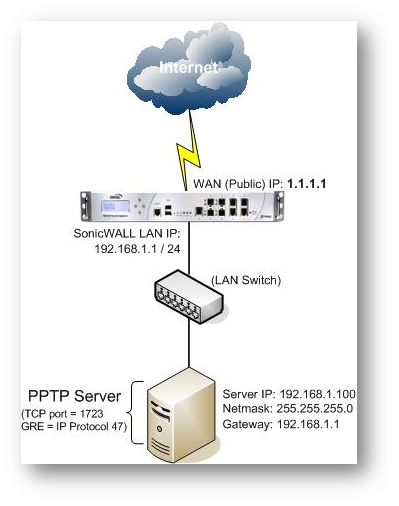
The following example covers allowing PPTP service from the Internet to a server on the LAN with private IP address as 192.168.1.100. Once the configuration is complete, Internet users can access the PPTP service behind the SonicWall UTM appliance through the WAN (Public) IP address 1.1.1.1.
Resolution for SonicOS 7.X
This release includes significant user interface changes and many new features that are different from the SonicOS 6.5 and earlier firmware. The below resolution is for customers using SonicOS 7.X firmware.
 EXAMPLE: In this example we have chosen to demonstrate using PPTP service, however the following steps apply to any service you wish to use (like HTTPS, SMTP, FTP, Terminal Services, SSH, etc).
Creating the necessary Address Objects
- Navigate to Object | Match Object| Addresses
- Click Add a new address object button and create two address objects one for Server IP on LAN and another for Public IP of the server.

Address Object for Server on LAN
Name: PPTP Server Private
Zone Assignment: LAN
Type: Host
IP Address: 192.168.1.10
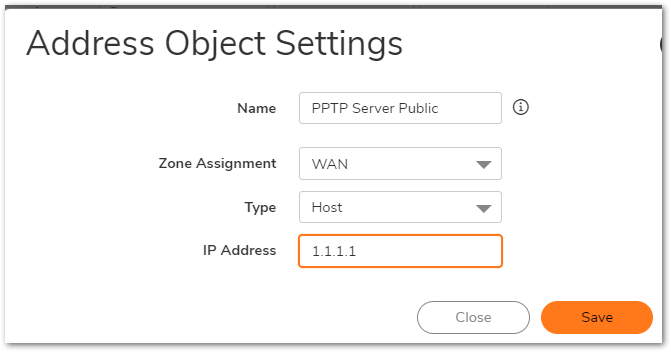
Address Object for Server's Public IP
Name: PPTP Server Public
Zone Assignment: WAN
Type: Host
IP Address: 1.1.1.1
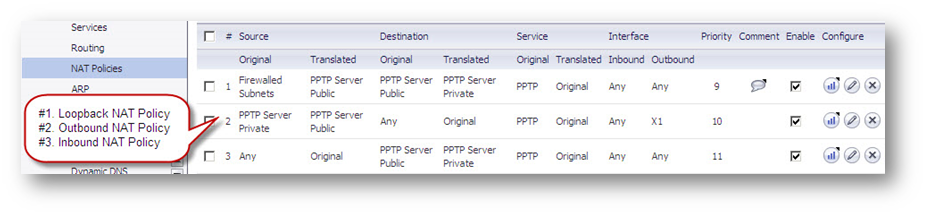
Defining the appropriate NAT Policies
- Navigate to Rules | NAT Policies.
- Click Add a new NAT Policy button and chose the following settings from the drop-down menu.
Understanding how to use NAT policies starts with the construction of an IP packet. Every packet contains addressing information that allows the packet to get to its destination, and for the destination to respond to the original requester. The packet contains (among other things) the requester’s IP address, the protocol information of the requester, and the destination’s IP address. The NAT Policies engine in SonicOS Enhanced can inspect the relevant portions of the packet and can dynamically rewrite the information in specified fields for incoming, as well as outgoing traffic.
Adding appropriate NAT Policies Original Source: Any |

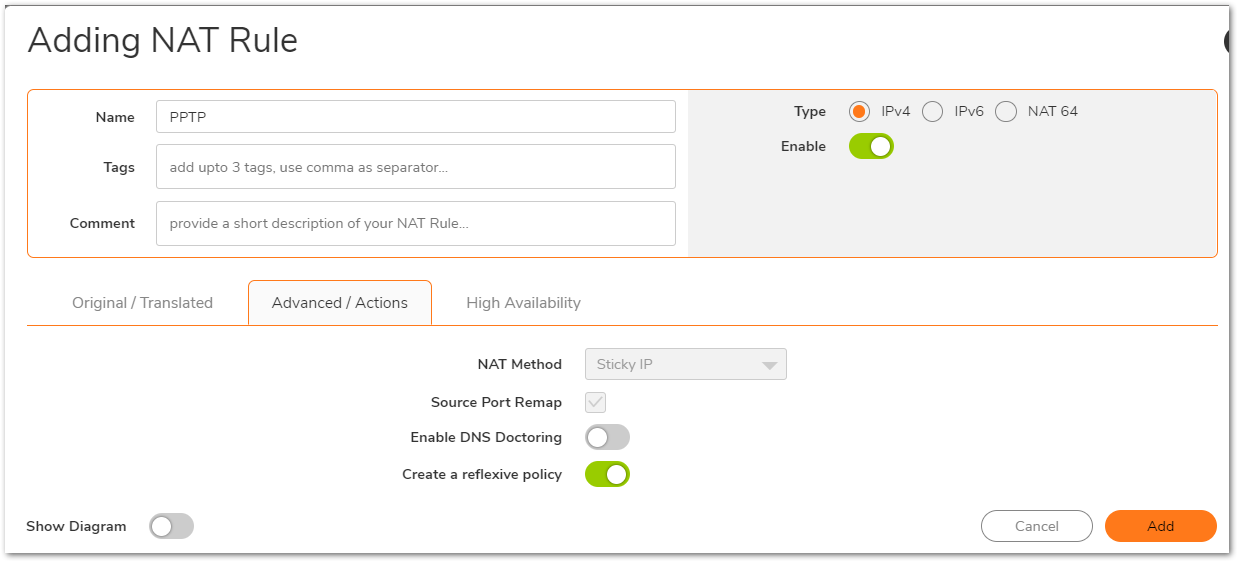
- NOTE: Create a reflective policy: When you check this box, a mirror outbound or inbound NAT policy for the NAT policy you defined in the Add NAT Policy window is automatically created.
- Click Add.
Loopback Policy
If you wish to access this server from other internal zones using the Public IP address Http://1.1.1.1 consider creating a Loopback NAT Policy else go to next step.
- Original Source: Firewalled Subnets
- Translated Source: PPTP Server Public
- Original Destination: PPTP Server Public
- Translated Destination: PPTP Server Private
- Original Service: PPTP
- Translated Service: Original
- Inbound Interface: Any
- Outbound Interface: Any
- Comment: Loopback policy
- Enable NAT Policy: Checked
- Create a reflexive policy: unchecked

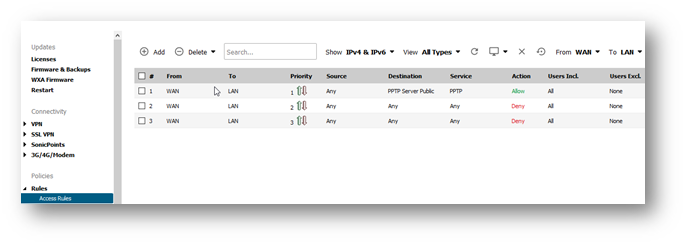
Creating Firewall Access Rules
- Navigate to Rules | Access Rules tab.
- Select the type of view in the View Style section and go to WAN to LAN access rules.
- Click Add and create the rule by entering the following into the fields.
 CAUTION:The ability to define network access rules is a very powerful tool. Using custom access rules can disable firewall protection or block all access to the Internet. Use caution when creating or deleting network access rules.
Action: Allow |

Resolution for SonicOS 6.5
This release includes significant user interface changes and many new features that are different from the SonicOS 6.2 and earlier firmware. The below resolution is for customers using SonicOS 6.5 firmware.
ddress objects one for Server IP on LAN and another for Public IP of the server.
Address Object for Server on LAN Name: PPTP Server Private |
|

Address Object for Server's Public IP |  |
- Click OK .
Defining the appropriate NAT Policies
- Navigate to Rules | NAT Policies.
- Click Add a new NAT Policy button and chose the following settings from the drop-down menu.
Understanding how to use NAT policies starts with the construction of an IP packet. Every packet contains addressing information that allows the packet to get to its destination, and for the destination to respond to the original requester. The packet contains (among other things) the requester’s IP address, the protocol information of the requester, and the destination’s IP address. The NAT Policies engine in SonicOS Enhanced can inspect the relevant portions of the packet and can dynamically rewrite the information in specified fields for incoming, as well as outgoing traffic.Adding appropriate NAT Policies
Original Source: Any
Translated Source: Original
Original Destination: PPTP Server Public
Translated Destination: PPTP Server Private
Original Service: PPTP
Translated Service: Original
Inbound Interface: Specify WAN interface if possible
Outbound Interface: Any
Comment: PPTP Server behind SonicWall.
Enable NAT Policy: Checked
Create a reflexive policy: Checked NOTE: Create a reflective policy: When you check this box, a mirror outbound or inbound NAT policy for the NAT policy you defined in the Add NAT Policy window is automatically created.
 - Click Add.
Loopback Policy
If you wish to access this server from other internal zones using the Public IP address Http://1.1.1.1 consider creating a Loopback NAT Policy else go to next step.
- Original Source: Firewalled Subnets
- Translated Source: PPTP Server Public
- Original Destination: PPTP Server Public
- Translated Destination: PPTP Server Private
- Original Service: PPTP
- Translated Service: Original
- Inbound Interface: Any
- Outbound Interface: Any
- Comment: Loopback policy
- Enable NAT Policy: Checked
- Create a reflexive policy: unchecked
Creating Firewall Access Rules
- Navigate to Rules | Access Rules tab.
- Select the type of view in the View Style section and go to WAN to LAN access rules.
- Click Add and create the rule by entering the following into the fields. CAUTION:The ability to define network access rules is a very powerful tool. Using custom access rules can disable firewall protection or block all access to the Internet. Use caution when creating or deleting network access rules.
Action: Allow
From Zone: WAN
To Zone: LAN
Service: PPTP
Source: Any
Destination: PPTP Server Public
Users Allowed: All
Schedule: Always on
Enable Logging: checked
Allow Fragmented Packets: checked
- Click OK.
Troubleshooting:
- Ensure that the Webserver is able to access the Internet.
- Ensure you do not have overlapping NAT Policies or Firewall Access Rules for your webserver.
- For further troubleshooting go to SonicWall Logs under Investigate | Event Logs page and check for Alerts, Denied IP's, Dropped messages, etc.
Resolution for SonicOS 6.2 and Below
The below resolution is for customers using SonicOS 6.2 and earlier firmware. For firewalls that are generation 6 and newer we suggest to upgrade to the latest general release of SonicOS 6.5 firmware.
EXAMPLE: In this example we have chosen to demonstrate using PPTP service, however the following steps apply to any service you wish to use (like HTTPS, SMTP, FTP, Terminal Services, SSH, etc).
Creating the necessary Address Objects
TIP: For complete information on creating Address Objects refer: Address Object.
- Navigate to Network | Address Objects.
- Click Add a new address object button and create two address objects one for Server IP on LAN and another for Public IP of the server.
Address Object for Server on LAN
Name: PPTP Server Private
Zone Assignment: LAN
Type: Host
IP Address: 192.168.1.100
Address Object for Server's Public IP
Name: PPTP Server Public
Zone Assignment: WAN
Type: Host
IP Address: 1.1.1.1
- Click the OK button to complete creation of the new address objects.
Defining the appropriate NAT Policies
- Navigate to Network | NAT Policies.
- Click Add a new NAT Policy button and chose the following settings from the drop-down menu.
Understanding how to use NAT policies starts with the construction of an IP packet. Every packet contains addressing information that allows the packet to get to its destination, and for the destination to respond to the original requester. The packet contains (among other things) the requester’s IP address, the protocol information of the requester, and the destination’s IP address. The NAT Policies engine in SonicOS Enhanced can inspect the relevant portions of the packet and can dynamically rewrite the information in specified fields for incoming, as well as outgoing traffic. NOTE: To Add custom port in SonicOS Enhanced refer Service Objects.Adding appropriate NAT Policies
Original Source: Any
Translated Source: Original
Original Destination: PPTP Server Public
Translated Destination: PPTP Server Private
Original Service: PPTP
Translated Service: Original
Inbound Interface: Any
Outbound Interface: Any
Comment: PPTP Server behind SonicWall.
Enable NAT Policy: Checked
Create a reflexive policy: Checked TIP: Create a reflective policy: When you check this box, a mirror outbound or inbound NAT policy for the NAT policy you defined in the Add NAT Policy window is automatically created.
 - Click Add.
Loopback Policy
If you wish to access this server from other internal zones using the Public IP address Http://1.1.1.1 consider creating a Loopback NAT Policy else go to next step
- Original Source: Firewalled Subnets
- Translated Source: PPTP Server Public
- Original Destination: PPTP Server Public
- Translated Destination: PPTP Server Private
- Original Service: PPTP
- Translated Service: Original
- Inbound Interface: Any
- Outbound Interface: Any
- Comment: Loopback policy
- Enable NAT Policy: Checked
- Create a reflexive policy: unchecked
Creating Firewall Access Rules
- Navigate to Firewall | Access Rules tab.
- Select the type of view in the View Style section and go to WAN to LAN access rules.
- Click Add a new entry and create the rule by entering the following into the fields. CAUTION: The ability to define network access rules is a very powerful tool. Using custom access rules can disable firewall protection or block all access to the Internet. Use caution when creating or deleting network access rules.
Action: Allow
From Zone: WAN
To Zone: LAN
Service: PPTP
Source: Any
Destination: PPTP Server Public
Users Allowed: All
Schedule: Always on
Enable Logging: checked
Allow Fragmented Packets: checked
- Under the Advanced tab, you can leave the “Inactivity Timeout in Minutes” at 15 minutes. Some protocols, such as Telnet, FTP, SSH, VNC and RDP can take advantage of longer timeouts where increased values like 30 or 60 minutes can be tried with caution in those cases. Longer timeout values will not help at all for HTTP or HTTPS.
- Click OK.
Troubleshooting
- Ensure that the PPTP Server's Default Gateway IP address is SonicWall's LAN IP address.
- Ensure that the Webserver is able to access the Internet.
- Try to reduce the MTU value on your SonicWall appliance. Refer How to change the MTU size on the SonicWall UTM appliance?
- Ensure you do not have duplicate NAT Policies and Firewall Access Rules for your webserver.
- For further troubleshooting go to SonicWall Logs under Log > View page and check for Alerts, Denied IP's, Dropped messages, etc.
