CFS Upgrading (2): Upgrade from CFS 3.0 Zones and Users Mode to CFS 4.0
Description
This article will provide an example to discuss the differences in policy settings between CFS 3.0 and CFS 4.0 and describes upgrading from CFS 3.0 for Zones and Users mode to CFS 4.0.
Note: there are no significant changes for Websense between CFS4.0 and the previous releases, the upgrading process for Websense will not be discussed in these articles.
Cause
As there are big changes between the new 4.0 and the old 3.0 CFS (e.g. Users and Zones mode and App Rules mode are handled by CFS policies in CFS4.0), although the firmware will does its best to automatically migrate almost all the polices, the resulting policies may not exactly match the original policies when upgrading from CFS 3.0 to CFS 4.0.
- The complete objects are configured differently than when they were configured in CFS 3.0
- CFS 3.0 employed some settings that are no longer used and are discarded when migrating to CFS 4.0.
Resolution
Upgrading CFS 3.0 to 4.0 for Users and Zones mode
There are two sections will be discussed here:
- Merging Process for CFS 3.0 (Users and Zones Mode) to CFS 4.0
- Upgrading Steps for CFS 3.0 (Users and Zones Mode) to CFS 4.0
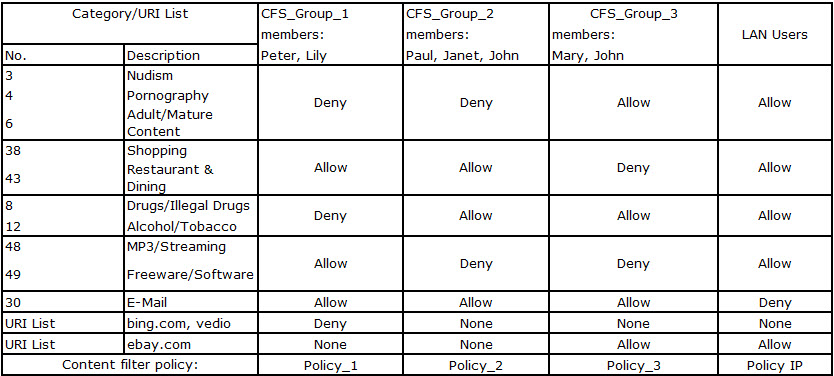
For CFS upgrading demonstration, here uses the following example (6 users configured with 3 different CFS Policies in 3 groups and a per IP policy):
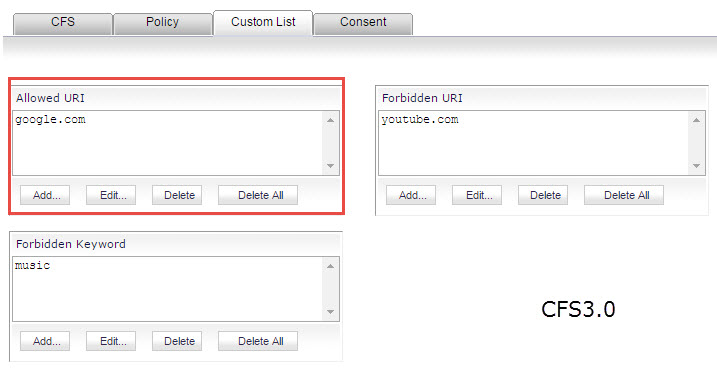
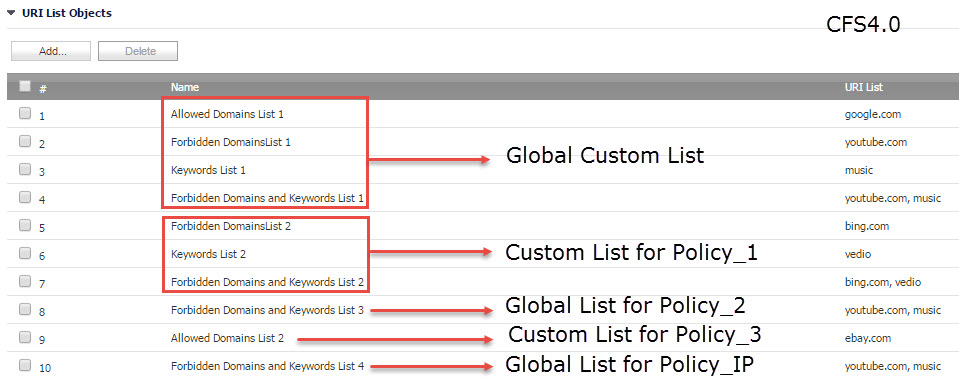
Global Custom Lists are defined as bellow:
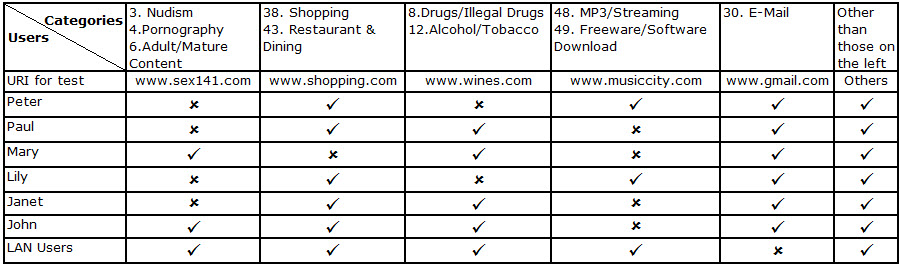
The Result can be tested as below when before and after upgrading.
1. Merging Process for CFS 3.0 (Users and Zones Mode) to CFS 4.0
Step 1. For each old CFS policy, CFS4.0 will:
- Generate a new CFS Profile Object.
- Migrate URI List Objects.
- Generate a new CFS Action Object.
- Generate a new CFS Profile Object.
In CFS 3.0, the policies are defined in Security Services | Content Filter page. Click the button Configure.. at Content Filter Type area and click tab Policy, defined policies are listed as below.
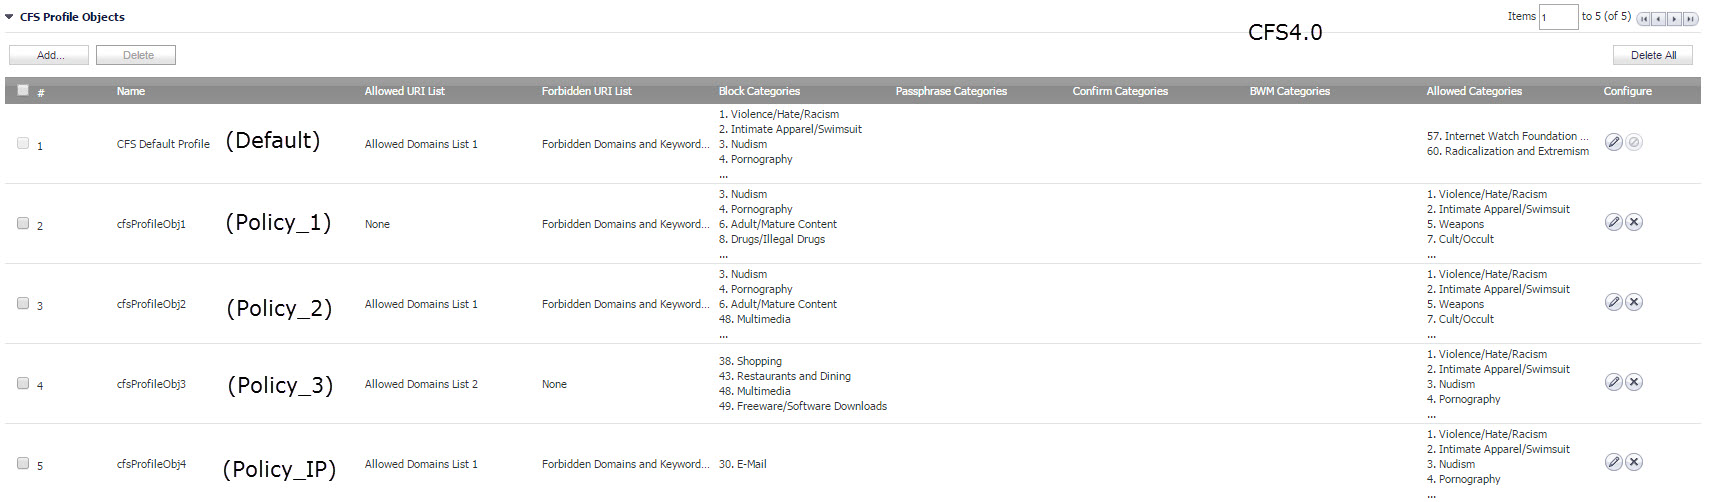
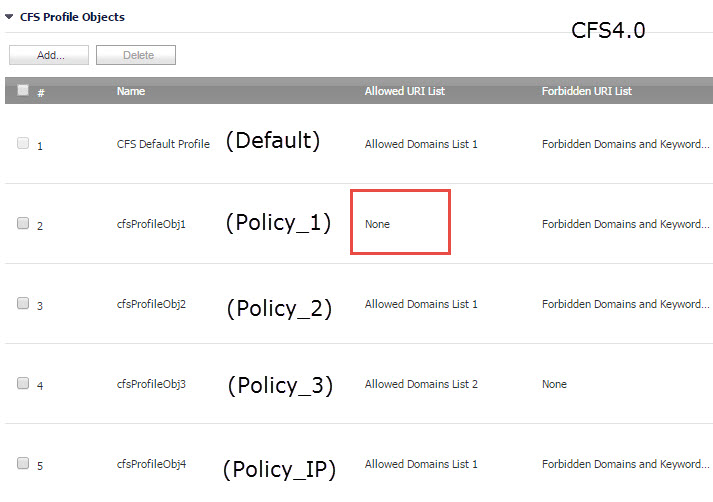
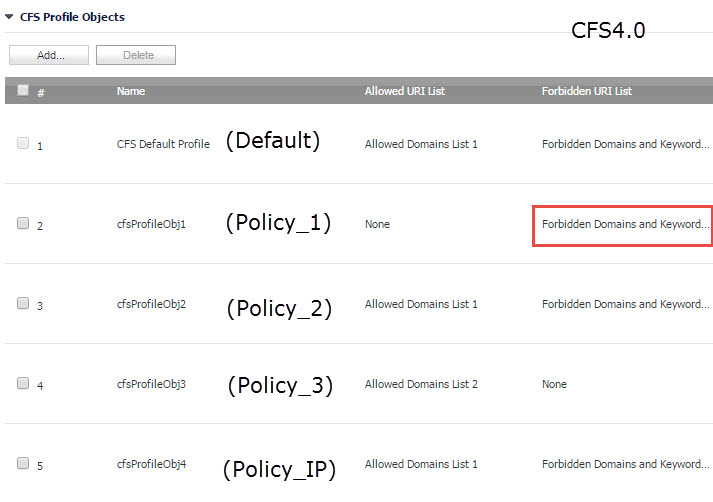
 In CFS 4.0, for each policy, CFS Profile Object is generated. Go to Firewall | Content Filter Objects page | Check the generated CFS Profile Objects as below.
Note: you may need to modify the name of the profile for better management.
- Migrate old URI List objects:
CFS 3.0 URI Lists definition in this demonstration example are as below pictures.
 CFS 4.0 will automatically generate the URI List Objects for each old CFS 3.0 URI List (Allowed, Forbidden, Keywords for each policy or global). For CFS 4.0 , go to Firewall | Content Filter Objects page, you can find the auto generated URI List Objects as following picture.
-
- If the Source of Allowed Domains of old policy is None, the Allowed URI List of the relevant Profile Object is also None.
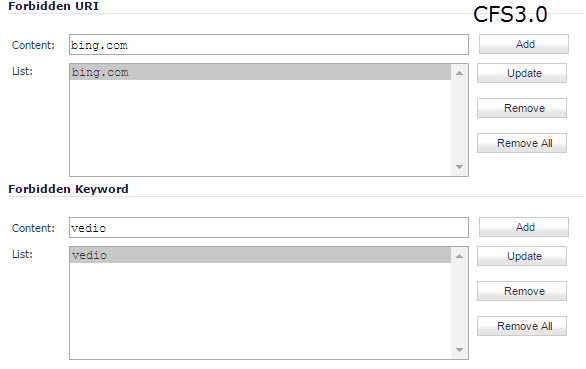
In CFS 3.0, go to Security Services | Content Filter page. Click the button Configure.. | Click tab Policy | Click the Edit button of Policy_1 | Click the tab Custom List in the pop-up window, the custom URI list can be configured here.
 In CFS 4.0, go to Firewall | Content Filter Objects page, you can find the merged URI list of Policy_1 at CFS Profile Objects area.
-
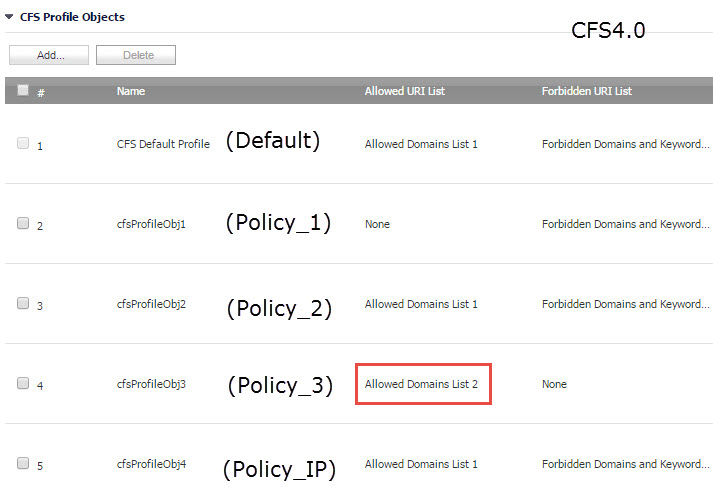
- If the Source of Allowed Domains of old policy is Per Policy, CFS 4.0 generates a new CFS URI List from the old custom allowed list and then assigns this new CFS URI List to the Allowed URI List of the Profile Object.
In CFS 3.0, go to Security Services | Content Filter page. Click the button Configure.. | Click tab Policy | Click the Edit button of Policy_3 | Click the tab Custom List in the pop-up window, the custom URI list can be configured here.
 In CFS 4.0, go to Firewall | Content Filter Objects page, you can find the merged URI list of Policy_3 at CFS Profile Objects area.
-
- Migrate old Forbidden Domains and Keywords. The logic follows that of Allowed Domains.
In CFS 3.0, go to Security Services | Content Filter page. Click the button Configure.. | Click tab Policy | Click the Edit button of Policy_1 | Click the tab Custom List in the pop-up window.
In CFS 4.0, go to Firewall | Content Filter Objects page, find Policy_1 at CFS Profile Objects area.
- Generate a new CFS Action Object. The old global blocking page is assigned to this new Action Object. Since previous CFS versions do not have Confirm, Passphrase and BWM options, the values inside new Action Object are the default values.
In CFS 3.0, go to Security Services | Content Filter page, the old CFS block page can be configured at Web Page to Display when Blocking area.
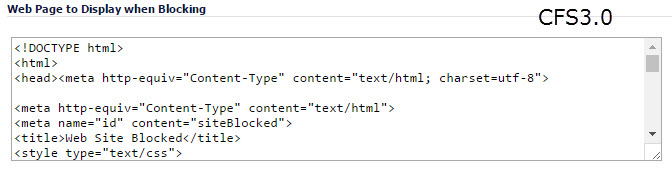
In CFS 4.0, for each auto generated action, the block page will use the old global block page. Click any action from CFS Action Objects area (Firewall | Content Filter Objects), the old block page will merge to the Block action area.
 After all the old polices have been migrated, new CFS URI List Objects, CFS Profile Objects and CFS Action Objects are generated and mapped to the old policy ID in order to keep their relationship.
Step 2. If the old CFS uses the CFS Policy per IP Address Range feature, generate a new CFS policy for each row inside the old CFS Policy per IP Address Range Table. For each new CFS policy:

Step 3. For each user group with CFS enabled, a new CFS Policy is generated. For each new CFS Policy:
- The Source Zone and Dest Zone are set to All.
- The Source Address is set to Any.
- The Users/Groups are the same CFS 3.0 user groups.
- The Schedule is the same value as in the CFS 3.0 policy.
- The CFS Profile Object is the Profile object generated in Step 1.
- The CFS Action Object is the Action object generated in Step 1.

NOTE: After upgrading, the user groups under the same policy as the group Everyone in CFS 3.0 are merged into one policy with the Everyone group.
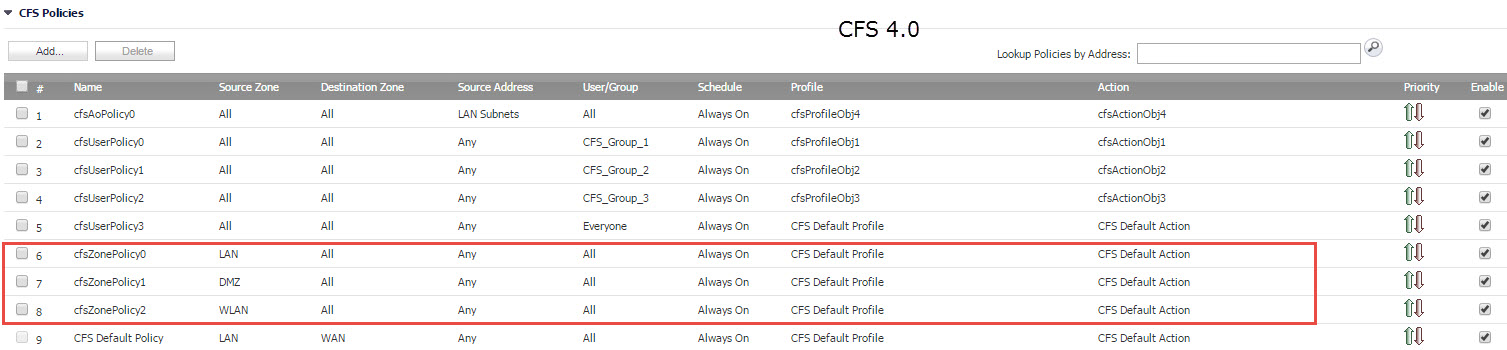
step 4. For each zone with CFS enabled, a new CFS Policy is generated. For each new CFS Policy:
- The Source Zone is set to the CFS 3.0 zone.
- The Destination Zone is set to All.
- The Source Address is set to Any.The Users/Groups are set to Any.
- The Schedule is the same value as in the CFS 3.0 policy.
- The CFS Profile Object is the Profile object generated in Step 1.
- The CFS Action Object is the Action object generated in Step 1.
2. Upgrading Steps for CFS 3.0 (Users and Zones Mode) to CFS 4.0
When going to upgrade from CFS 3.0 (Users and Zones Mode) to CFS 4.0, please follow the below steps.
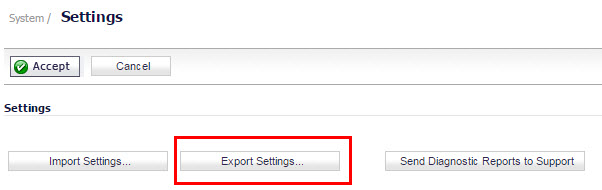
1. Navigate to System | Setting page | Export the original settings for backup.
2. Upgrade the firmware to CFS 4.0.
3. After upgrading, as some of the generated CFS objects and policies might be duplicated and the priority order of some new policies might be wrong. Administrators should clean and adjust the priorities. When go to Security Services | Content Filter page, automatically generated CFS policies are listed as below.
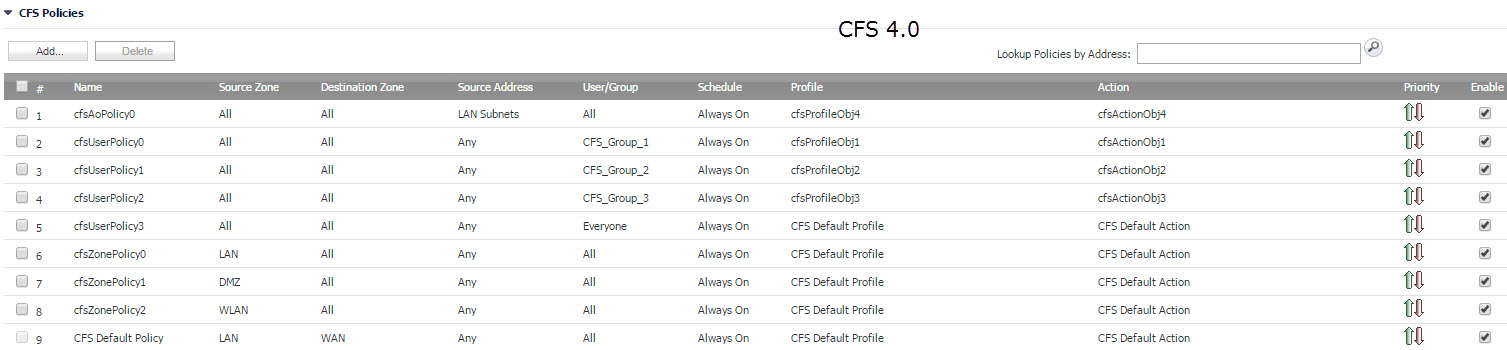
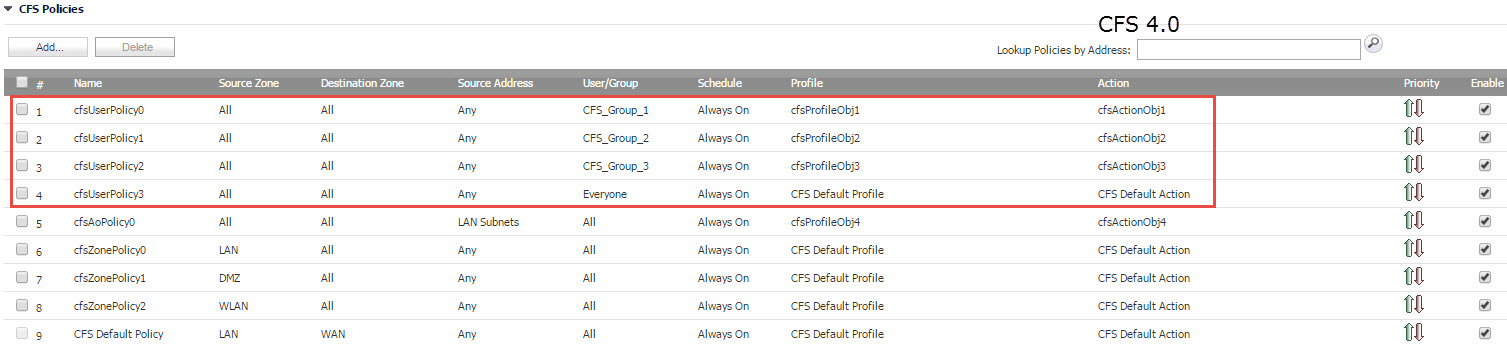
In this case, after upgrading, the policy for Users cannot be hit when users of CFS groups visit from LAN subnet. So administrator could adjust the priority of these policies higher to ensure these users' policies can be hit. Click the priority icon for policy cfsAoPolicy0, and input 5 to put the priority lower than users' policies cfsUserPolicy0 to cfsUserPolicy3.
Notes: 1. Before upgrading, please check your original firmware version, if you are using SonicOS 6.2.5, we recommend you to upgrade to 6.2.5.1 firstly then upgrade to the firmware with CFS 4.0.
2. If there are amount of CFS policies generated, to adjust the priority of these auto generated policies may take time. We also recommend that you can follow the below steps after upgrading.
- Keep the automatically generated CFS URI List Objects and CFS Action Objects.
- Remove the generated CFS Policies and CFS Profile Objects.
- Create the CFS Profile Objects and CFS Polices from scratch, providing descriptive names for each object.
3. SonicOS does not support downgrade from CFS 4.0 to CFS 3.0 so far.
