How can I configure a VPN between a SonicWall firewall and Microsoft Azure?
Description
The following networks will be used for demonstration purposes during this article. Your networks may be different.
Azure Side Resources
- Gateway subnet: 10.10.1.0/24
- LAN subnet: 10.10.2.0/24
- Public IP: 40.78.98.152
SonicWall Side Resources
- LAN subnet: 192.168.168.0/24
- Public IP: 60.78.112.45
This article covers how to configure a VPN between a SonicWall firewall and Microsoft Azure.
Azure Configuration
- Login to the Azure portal at https://portal.azure.com.
- Navigate to Virtual Networks and click Add to create a new network scheme.
- In this scenario we've defined the following network. Once filled out click Create.
Name: VNET-01
Address space: 10.10.0.0/16
Subnet name: LAN
Subnet address range: 10.10.2.0/24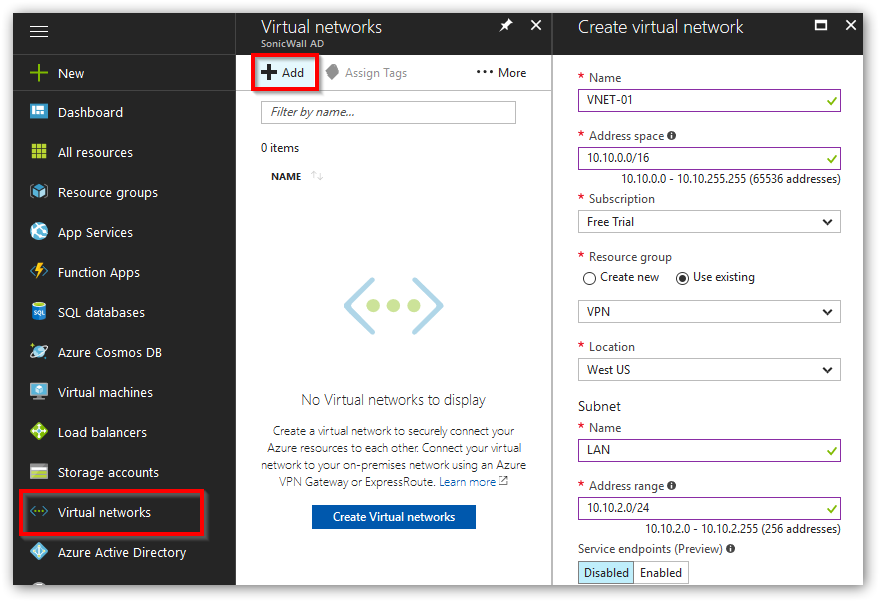
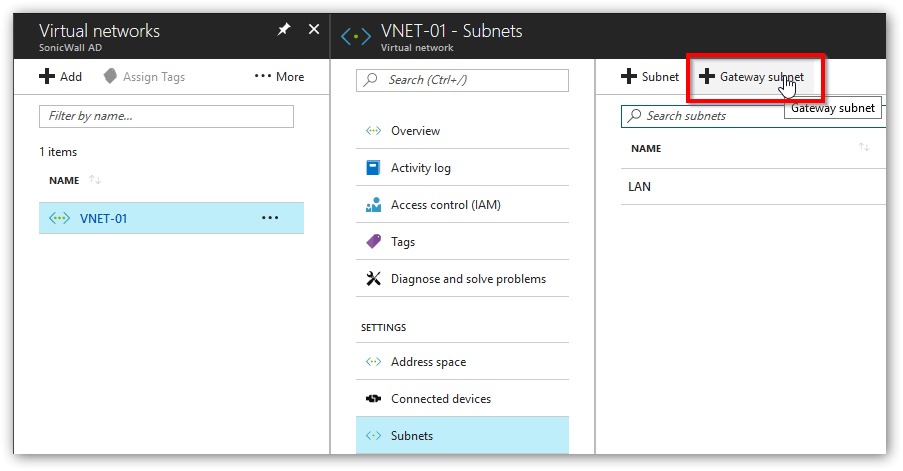
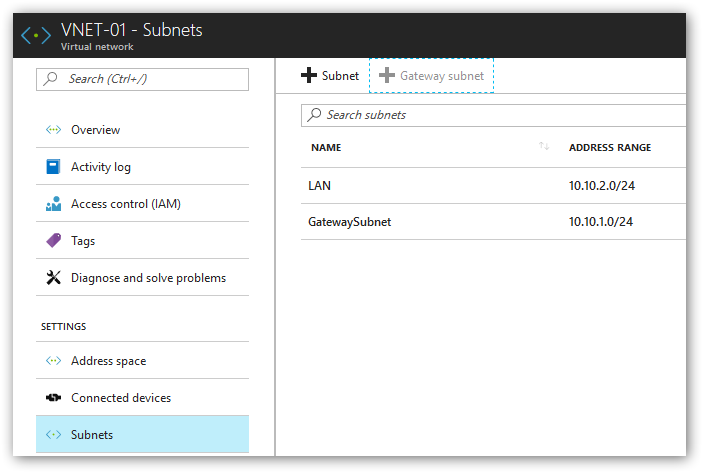
- Next, we'll define the gateway network inside of the virtual network we just created. In our case the virtual network is called VNET-01. Click back into VNET-01, select Subnets | Gateway Subnet. Define the gateway subnet (in our case 10.10.1.0/24) and click Create.
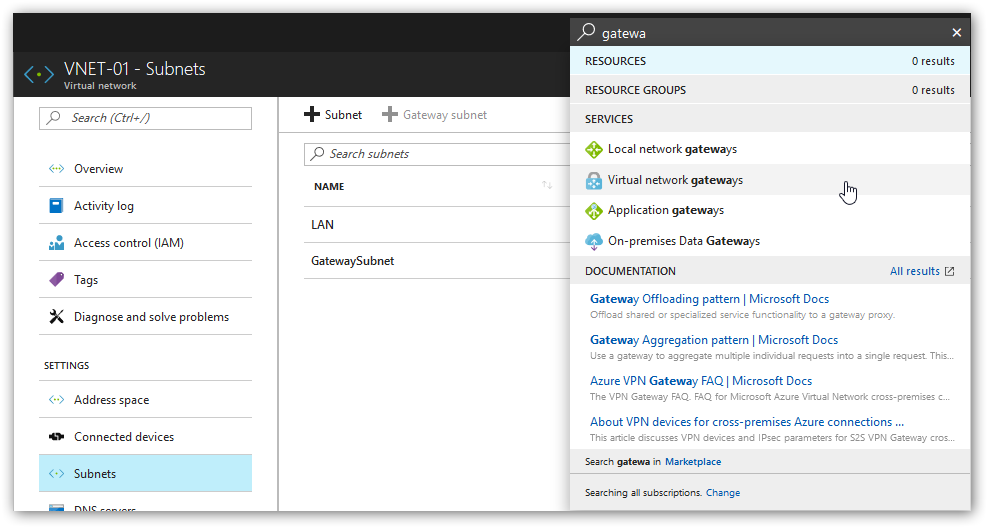
- Next, we'll create a virtual network gateway. In the search bar at the top of the page start typing gateway. Select Virtual network gateway.
- Create a new virtual network gateway. Give the gateway a name and define the VPN type. We'll select gateway type VPN and VPN type Route-based. Select the virtual network (in our case VNET-01) and create a new public IP address. We'll use this public IP address later on while configuring the VPN on the SonicWall. Click Create.
 NOTE: Provisioning a virtual network gateway may take up to 45 minutes.
 - Click on the newly created virtual network gateway. Select Connections | Add.

- Give the connection a name. Under connection type select Site-to-site (IPsec). Create a new local network gateway. This will be the public IP of the SonicWall and the local network. In our case the local network of the SonicWall is the default SonicWall subnet 192.168.168.0/24.
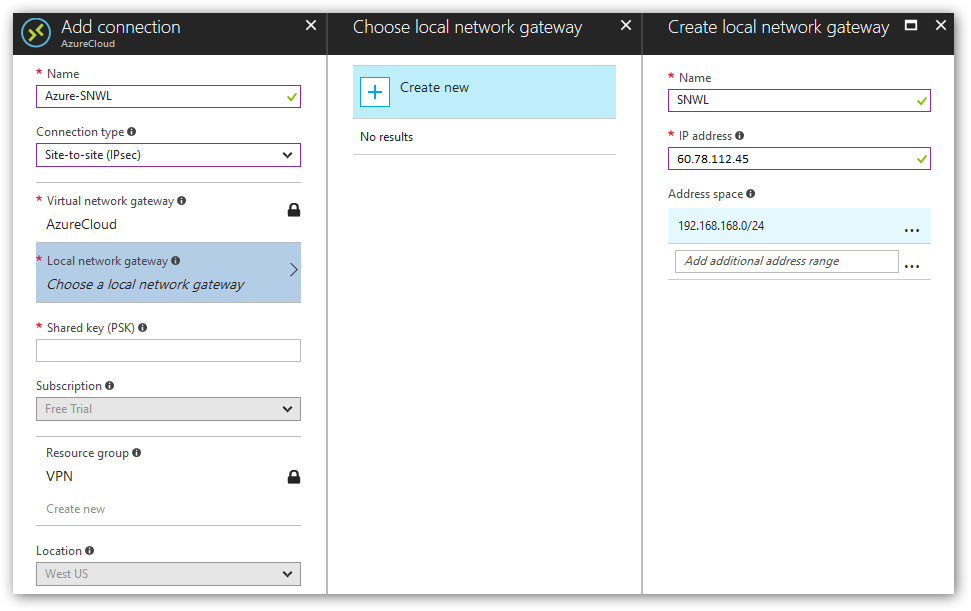
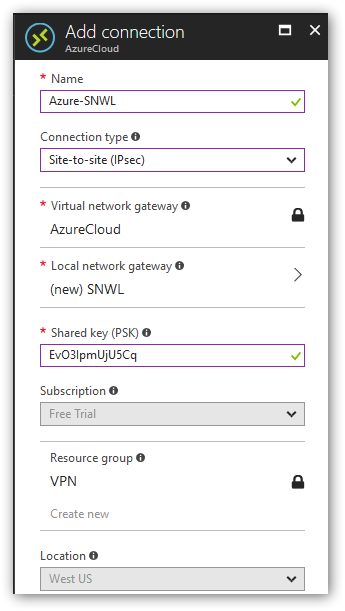
- Provide a secure shared key. This will also be used on the SonicWall. Click OK.
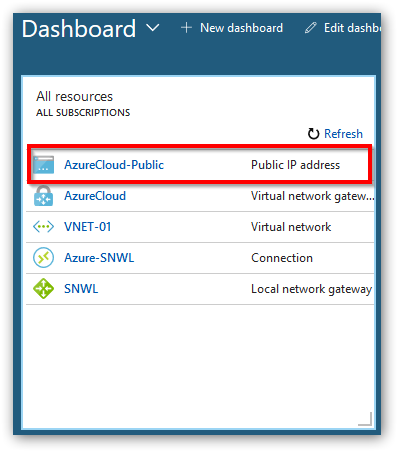
- We'll grab the public IP of Azure and use it in the SonicWall. Navigate to Dashboard and select the Public IP address resource. Take a note of the public IP for the next steps.
SonicWall Configuration
RESOLUTION FOR SONICOS 7.X
This release includes significant user interface changes and many new features that are different from the SonicOS 6.5 and earlier firmware. The below resolution is for customers using SonicOS 7.X firmware.
- Login to the SonicWall firewall.
- Navigate to the VPN policy tab. We're using the latest SonicOS 6.5 firmware. Click Network| IPsec VPN | Rules and Settings. Click Add.
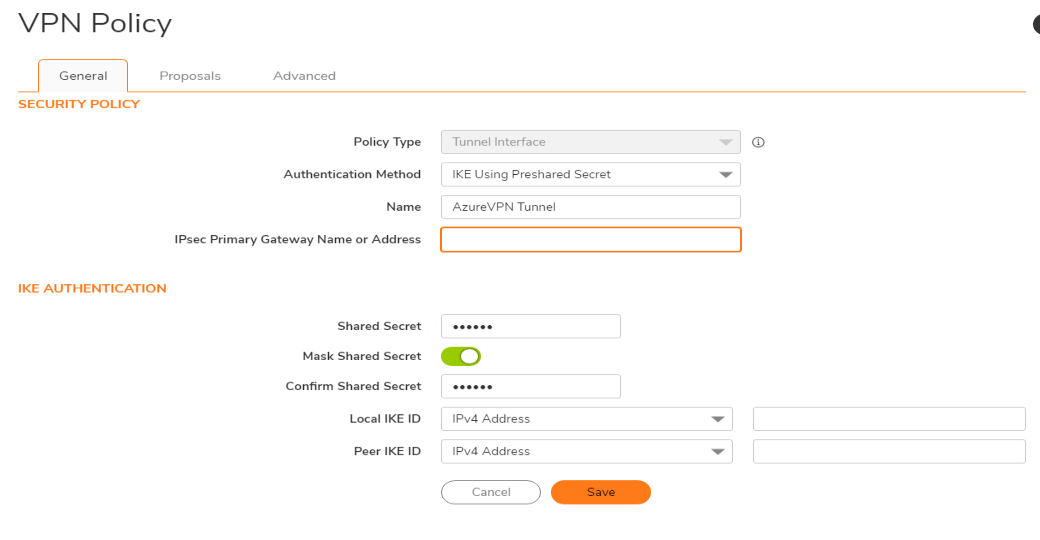
- Give the VPN policy a name. We'll use the following settings:
Policy Type: Tunnel Interface
Authentication Method: IKE using Preshared Secret
4.Next click the Proposals tab.Under Proposals select:
IKE (Phase 1) Proposal: Exchange - IKEv2 Mode, DH Group - 2, Encryption - AES-256, Authentication - SHA256, Life Time - 28800.
IKE (Phase 2) Proposal: Protocol - ESP, Encryption - AESGCM16-256, Life Time - 3600.
NOTE: The proposals used here are shown as an example. Please select the proposals as per your requirement. It is recommended to use AES instead of DES.

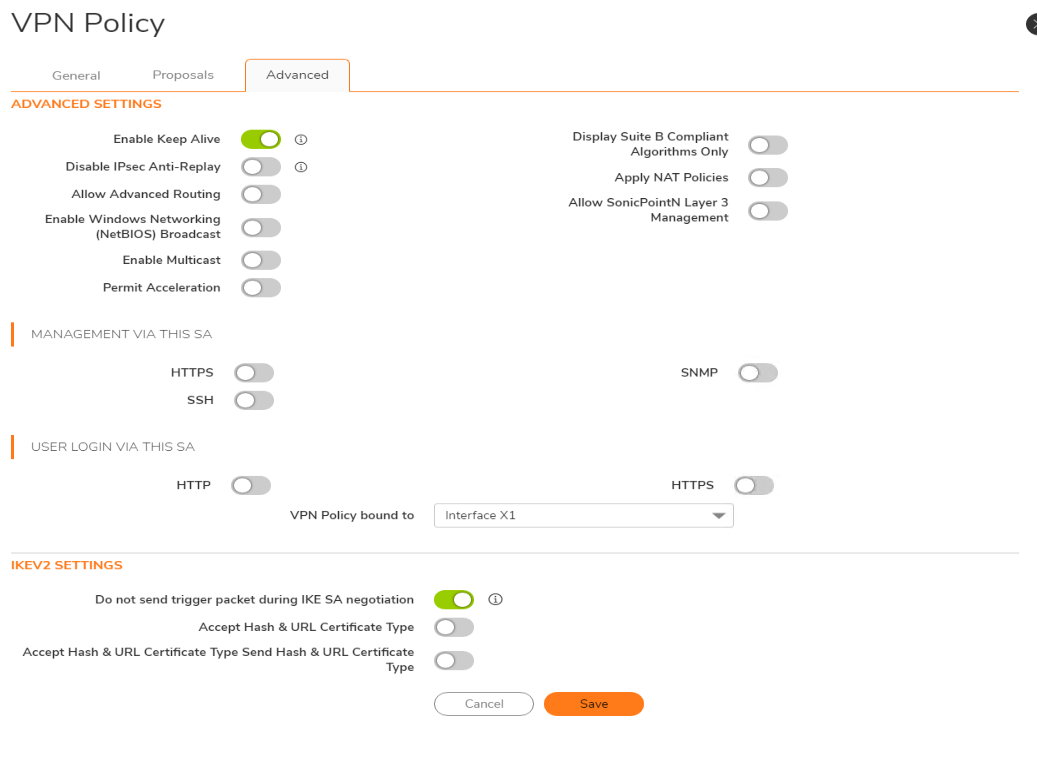
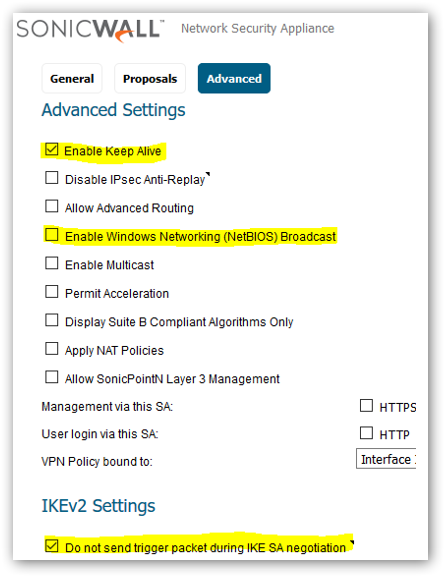
5. Select the Advanced tab. Select Enable Keep Alive. Deselect Enable Windows Networking. Select Do not send trigger packet during IKE SA negotiation.
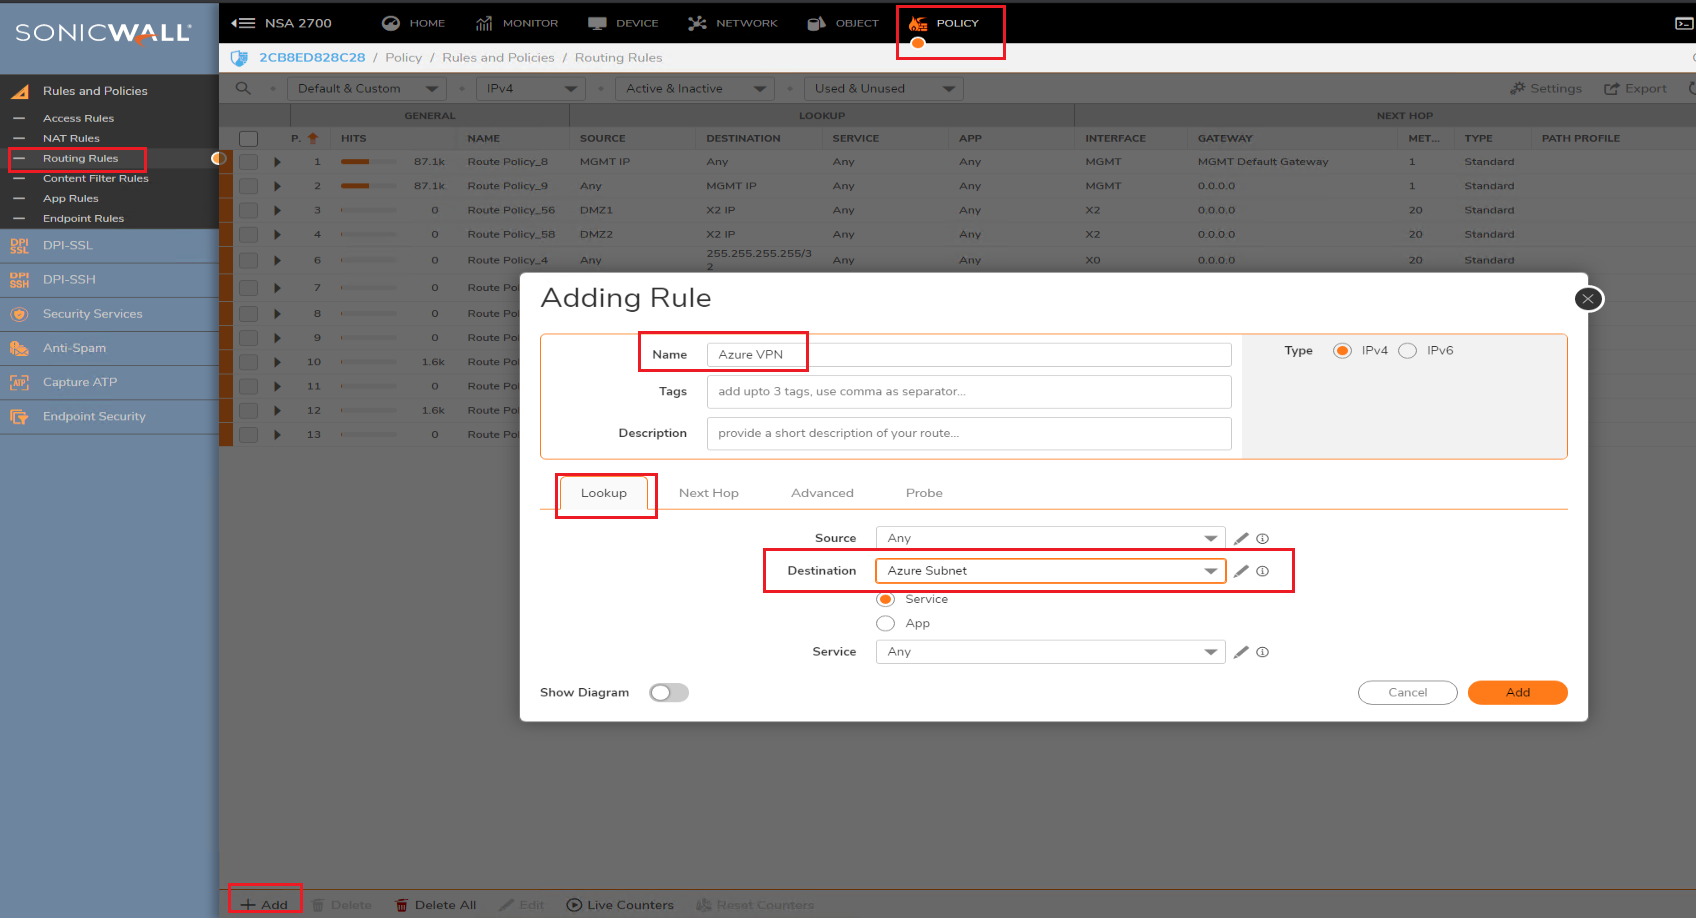
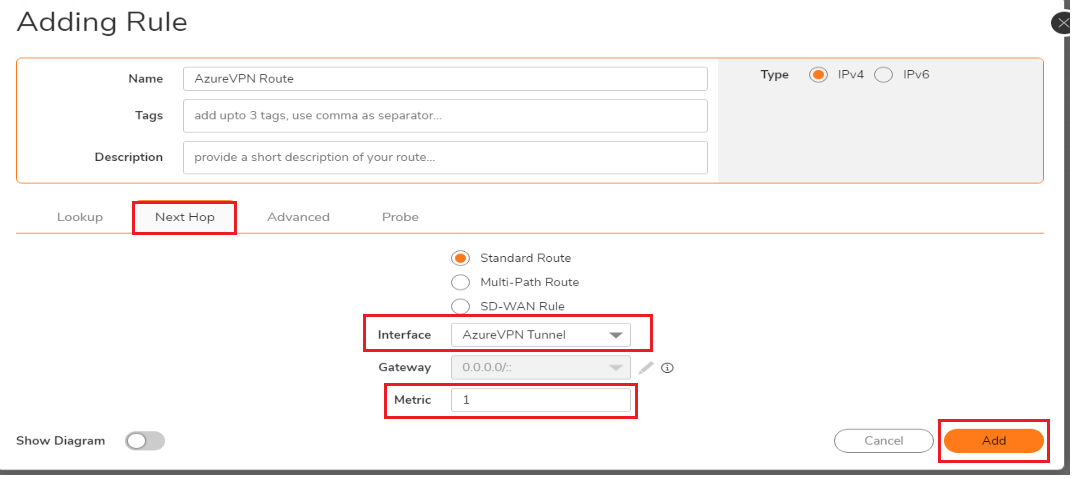
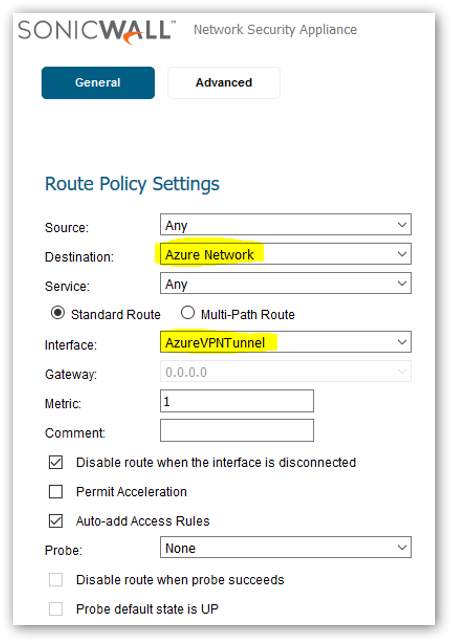
6. Next, navigate to Manage | Network | Routing. Select Route Policies and create a new policy. Set the destination network as the Azure network and select the interface as Azure VPN Tunnel interface created before.
NOTE: It takes 5-7 minutes for the VPN policy to come up. Once the VPN policy is up we see a green indicator and a new entry under Currently Active VPN Tunnels.
RESOLUTION FOR SONICOS 6.5
This release includes significant user interface changes and many new features that are different from the SonicOS 6.2 and earlier firmware. The below resolution is for customers using SonicOS 6.5 firmware.
- Login to the SonicWall firewall.
- Navigate to the VPN policy tab. We're using the latest SonicOS 6.5 firmware. Click Manage | VPN | Base Settings. Click Add.
- Give the VPN policy a name. We'll use the following settings:
Policy Type: Tunnel Interface
Authentication Method: IKE using Preshared Secret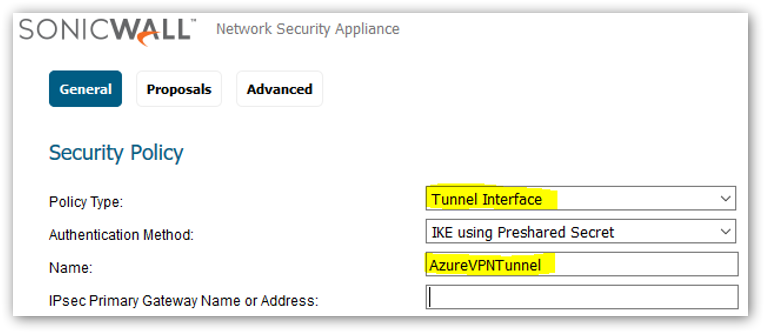
- Next click the Proposals tab.Under Proposals select:
IKE (Phase 1) Proposal: Exchange - IKEv2 Mode, DH Group - 2, Encryption - AES-256, Authentication - SHA256, Life Time - 28800.
IKE (Phase 2) Proposal: Protocol - ESP, Encryption - AESGCM16-256, Life Time - 3600. NOTE: The proposals used here are shown as an example. Please select the proposals as per your requirement. It is recommended to use AES instead of DES. 
- Select the Advanced tab. Select Enable Keep Alive. Deselect Enable Windows Networking. Select Do not send trigger packet during IKE SA negotiation.
- Next, navigate to Manage | Network | Routing. Select Route Policies and create a new policy. Set the destination for the Azure network and select the Azure interface.
NOTE: It takes 5-7 minutes for the VPN policy to come up. Once the VPN policy is up we see a green indicator and a new entry under Currently Active VPN Tunnels.