How to provision X-Series Switches on a SonicWall TZ High Availability pair
Description
How to provision X-Series Switches on a SonicWall TZ High Availability (HA) system?
Resolution for SonicOS 6.5
This release includes significant user interface changes and many new features that are different from the SonicOS 6.2 and earlier firmware. The below resolution is for customers using SonicOS 6.5 firmware.
For information on other SonicWall X-Series Solution related topics:
How to provision X-Series Switches on a SonicWall TZ series firewall
How to provision X-Series Switches on a SonicWall TZ High Availability (HA) system
SonicWall X-Series Solution - Support for SonicWall Virtual Interfaces (VLANs)
SonicWall integration with X-Series Switches FAQ
SonicWall X-Series Solution Overview
How to manage X-Series switch's admin credentials and management IP through the X-Switch's UI
SonicWall X-Series Solution: Which models of X-Switches has support for POE+
SonicWall X- Series Solution How to backup and restore X-Series switches
------------------------------------------------------------------------------------------------------------------------------------------------------------------------------------------------------------
How to provision a X-Switch on a SonicWall TZ series firewall in HA?
- Check and Upgrade SonicOS on SonicWall TZ firewall
- Prepare the X-Switch for SonicWall integration
- Configure X-Switch into factory default mode
- Configure X-Switch into mange mode
- Configure factory default SonicWall TZ firewalls in HA
- Remove PortShield configurations
- Enable SonicWall HA mode
- Provision a X-Switch on SonicWall in HA mode
Step 1: Check SonicWall TZ firewall SonicOS version and upgrade if needed
SonicWall X-Series Solution is only supported on SonicOS 6.2.5.0 or higher.
SonicWall X-Series Solution only supports SonicWall TZ series firewalls in SonicOS 6.2.5.0
Step 2: Prepare the X-Switch) for SonicWall integration:
- Configuring the X-Switch into factory default mode
- Configuring the X-Switch into manage mode
Note: A factory default X-Switch is recommended for the SonicWall X-Series Solution. It guarantees that the X-Switch's configurations are in a well known state and can be managed from SonicOS.
If you wish or need to modify the X-Switch basic parameters such as the management IP and credentials, you need to use the X-Switch User Interface. For details, see KB185479 (SonicWall X- Series Solution - How to mange X-Series switch's admin credentials and management IP through the X-Switch's UI).
Note: You cannot modify the X-Switch management IP and credentials from SonicOS
The factory default X-Switch parameters in manage mode are:
- The management IP address is 192.168.2.1
- The admin user name is: admin
- The admin password is: admin
- All switch ports are in the default vlan of "vlan1"
Step 2a: Configure X-Switch into factory default
Locate the RESET button and press the RESET button for at least 7 seconds and release. The X-Switch will reboot into factory default mode.

Step 2b: Configure X-Switch into manage mode
Locate the MODE button and press the MODE button for at least 7 seconds and release. The X-Switch will transition to manage mode. Locate the (Mgmt) LED, it will light up when in manage mode.

Note: If the X-Switch is not in manage mode then it cannot be manage from SonicOS
Step 3: Configure factory default SonicWall TZ firewalls into HA mode
Step 3a: Remove PortShield configurations
A factory default SonicWall TZ firewall has portshield functionality enabled with interfaces linked to X0, The number of interfaces that are portshield to X0 varies with the SonicWall TZ model. Portshield of interfaces on a SonicWall firewall in stand alone mode must be unconfigured before SonicWall HA configurations can proceed.
To disable Portshield in SonicOS:
Click Manage in the top navigation menu.
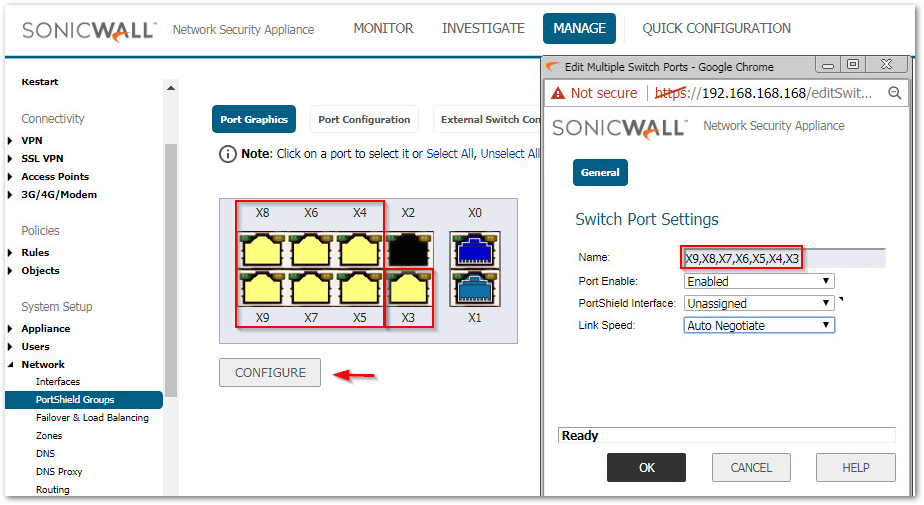
Go to Network | PortShield Groups | Port Graphics tab.
Select Interfaces that are Portshield (you may select multiple interfaces)
Click the Configure button to enter the Switch Port Setting menu.
In the Switch Port Setting menu enter the following options and click the OK button to accept
- Port Enable: Enable
- Portshield Interface: Unassigned
- Link Speed: Auto Negotiate
For example a factory default SonicWall TZ600 has X3 through X9 portshield to X0. Interfaces X3 - X9 must be unassigned from portshield group X0.
Step 3b: Enable SonicOS High Availability (HA)
In SonicOS, click Manage in the top navigation menu and go to High Availability | Base Setup | General tab.
For Mode: select Active / Standby

Next, setup the HA Control Link
The HA Control Link is for communication of HA information between the HA Primary and HA secondary.
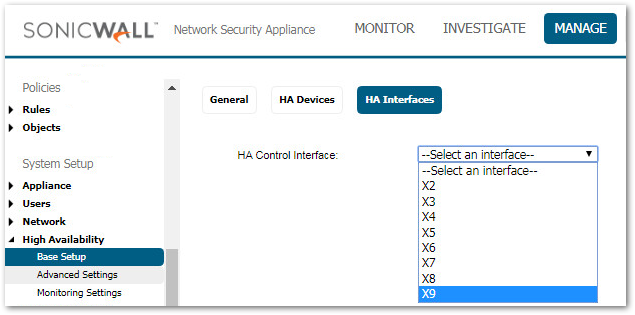
Go to High Availability | Base Setup | HA Interfaces and Select an interface as the HA Control Interface.
In the following example:
X9 is selected as the HA Control Interface. Connect a cable between X9 on the HA Primary and X9 on the HA Secondary to establish the HA Control Link.
Next, enter the serial number of the HA primary firewall and the serial number of the HA secondary firewall.
Go to High Availability | Base Setup | HA Devices tab.

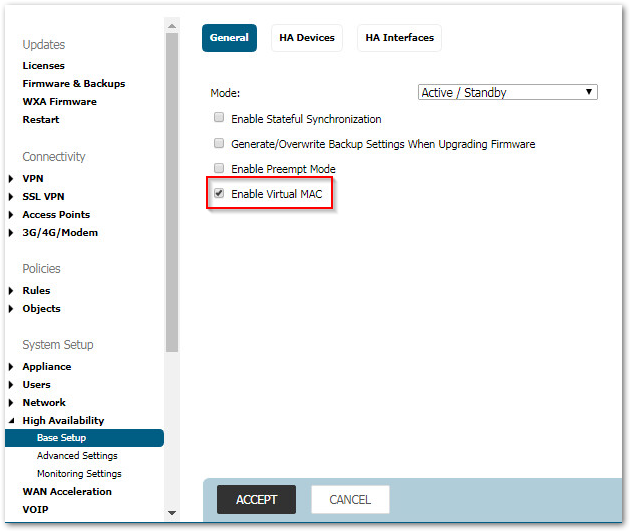
Next, Enable the "Virtual Mac" option and apply the HA setting.
Go to High Availability | Base Setup | General tab
Select check box "Enable Virtual Mac"
Click ACCEPT to apply the HA settings.
Next, check the HA status.
Click Monitor in the top navigation menu.
Go to High Availability Status
The HA Status Indicator is "green" when HA is active.
The HA mode is "Active / Standby"
Note: Basic Active/Standby HA provides stateless high availability and does not require a license. After a failover to the Secondary appliance, all the pre-existing network connections must be re-established, including the VPN tunnels that must be re-negotiated.
Resolution for SonicOS 6.2 and Below
The below resolution is for customers using SonicOS 6.2 and earlier firmware. For firewalls that are generation 6 and newer we suggest to upgrade to the latest general release of SonicOS 6.5 firmware.
For information on other SonicWall X-Series Solution related topics:
How to provision X-Series Switches on a SonicWall TZ series firewall
How to provision X-Series Switches on a SonicWall TZ High Availability (HA) system
SonicWall integration with X-Series Switches FAQ
SonicWall X-Series Solution Overview
How to manage X-Series switch's admin credentials and management IP through the X-Switch's UI
SonicWall X-Series Solution: Which models of X-Switches has support for POE+
SonicWall X- Series Solution How to backup and restore X-Series switches
------------------------------------------------------------------------------------------------------------------------------------------------------------------------------------------------------------
How to provision a X-Switch on a SonicWall TZ series firewall in HA?
- Check and Upgrade SonicOS on SonicWall TZ firewall
- Prepare the X-Switch for SonicWall integration
- Configure X-Switch into factory default mode
- Configure X-Switch into mange mode
- Configure factory default SonicWall TZ firewalls in HA
- Remove PortShield configurations
- Enable SonicWall HA mode
- Provision a X-Switch on SonicWall in HA mode
Step 1: Check SonicWall TZ firewall SonicOS version and upgrade if needed
SonicWall X-Series Solution is only supported on SonicOS 6.2.5.0 or higher.
SonicWall X-Series Solution only supports SonicWall TZ series firewalls in SonicOS 6.2.5.0
Step 2: Prepare the X-Switch) for SonicWall integration:
- Configuring the X-Switch into factory default mode
- Configuring the X-Switch into manage mode
Note: A factory default X-Switch is recommended for the SonicWall X-Series Solution. It guarantees that the X-Switch's configurations are in a well known state and can be managed from SonicOS.
If you wish or need to modify the X-Switch basic parameters such as the management IP and credentials, you need to use the X-Switch User Interface. For details, see KB185479 (SonicWall X- Series Solution - How to mange X-Series switch's admin credentials and management IP through the X-Switch's UI).
Note: You cannot modify the X-Switch management IP and credentials from SonicOS
The factory default X-Switch parameters in manage mode are:
- The management IP address is 192.168.2.1
- The admin user name is: admin
- The admin password is: admin
- All switch ports are in the default vlan of "vlan1"
Step 2a: Configure X-Switch into factory default
Locate the RESET button and press the RESET button for at least 7 seconds and release. The X-Switch will reboot into factory default mode.

Step 2b: Configure X-Switch into manage mode
Locate the MODE button and press the MODE button for at least 7 seconds and release. The X-Switch will transition to manage mode. Locate the (Mgmt) LED, it will light up when in manage mode.

Note: If the X-Switch is not in manage mode then it cannot be manage from SonicOS
Step 3: Configure factory default SonicWall TZ firewalls into HA mode
Step 3a: Remove PortShield configurations
A factory default SonicWall TZ firewall has portshield functionality enabled with interfaces linked to X0, The number of interfaces that are portshield to X0 varies with the SonicWall TZ model. Portshield of interfaces on a SonicWall firewall in stand alone mode must be unconfigured before SonicWall HA configurations can proceed.
To disable Portshield in SonicOS:
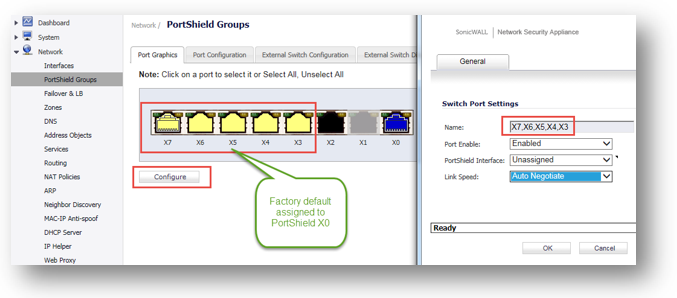
Go to Network | PortShield Groups | Port Graphics tab.
Select Interfaces that are Portshield (you may select multiple interfaces)
Click the Configure button to enter the Switch Port Setting menu.
In the Switch Port Setting menu enter the following options and click the OK button to accept
- Port Enable: Enable
- Portshield Interface: Unassigned
- Link Speed: Auto Negotiate
For example a factory default SonicWall TZ500 has X3 through X7 portshield to X0. Interfaces X3 - X7 must be unassigned from portshield group X0.
Step 3b: Enable SonicOS High Availability (HA)
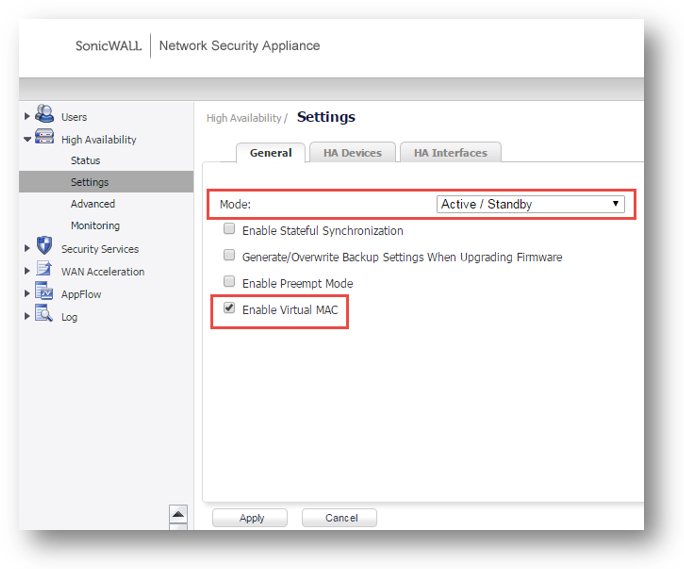
In SonicOS go to High Availability | Settings | General tab
For Mode: select Active / Standbyy

Next, setup the HA Control Link
The HA Control Link is for communication of HA information between the HA Primary and HA secondary.
Go to High Availability | Settings | HA Interfaces and Select an interface as the HA Control Interface.
In the following example:
X7 is selected as the HA Control Interface. Connect a cable between X7 on the HA Primary and X7 on the HA Secondary to establish the HA Control Link.

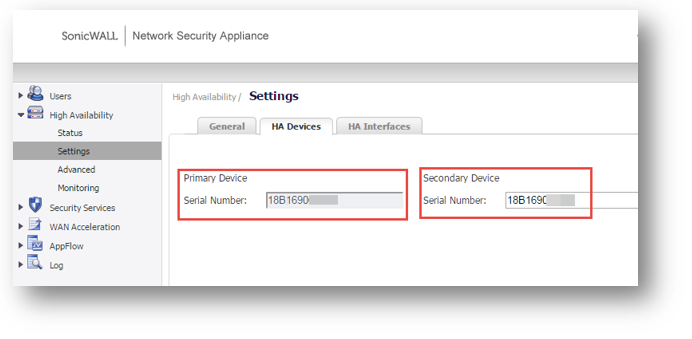
Next, enter the serial number of the HA primary firewall and the serial number of the HA secondary firewall.
Go to High Availability | Settings | HA Devices
Next, Enable the "Virtual Mac" option and apply the HA setting
Go to High Availability | Settings | General tab
Select check box "Enable Virtual Mac"
Click Apply to accept the HA settings
Next, check the HA status
Go to High Availability | Status
The HA Status Indicater is "green" when HA is active.
The HA mode is "Active / Standby"

Note: Basic Active/Standby HA provides stateless high availability and does not require a license. After a failover to the Secondary appliance, all the pre-existing network connections must be re-established, including the VPN tunnels that must be re-negotiated.