Configuring the DMZ / OPT Interface in NAT Mode
Description
You can configure the OPT interface in either Transparent Mode or NAT Mode
- NAT Mode translates the private IP addresses of devices connected to the OPT interface to a single, static IP address. By default, the OPT interface is configured in NAT Mode. When configuring the DMZ in NAT mode you must use a different subnet than the one specified for the LAN.
 EXAMPLE: LAN = 192.168.168.0, then DMZ = 10.1.1.1.
 - Transparent Mode enables the SonicWall security appliance to bridge the OPT subnet onto the WAN interface. It requires valid IP addresses for all computers connected to the OPT interface on your network, but allows remote access to authenticated users. You can use the OPT interface in Transparent mode for public servers and devices with static IP addresses you want visible outside your SonicWall security appliance-protected network.
Resolution for SonicOS 7.X
This release includes significant user interface changes and many new features that are different from the SonicOS 6.5 and earlier firmware. The below resolution is for customers using SonicOS 7.X firmware.
Here's how to Configure DMZ in NAT Mode
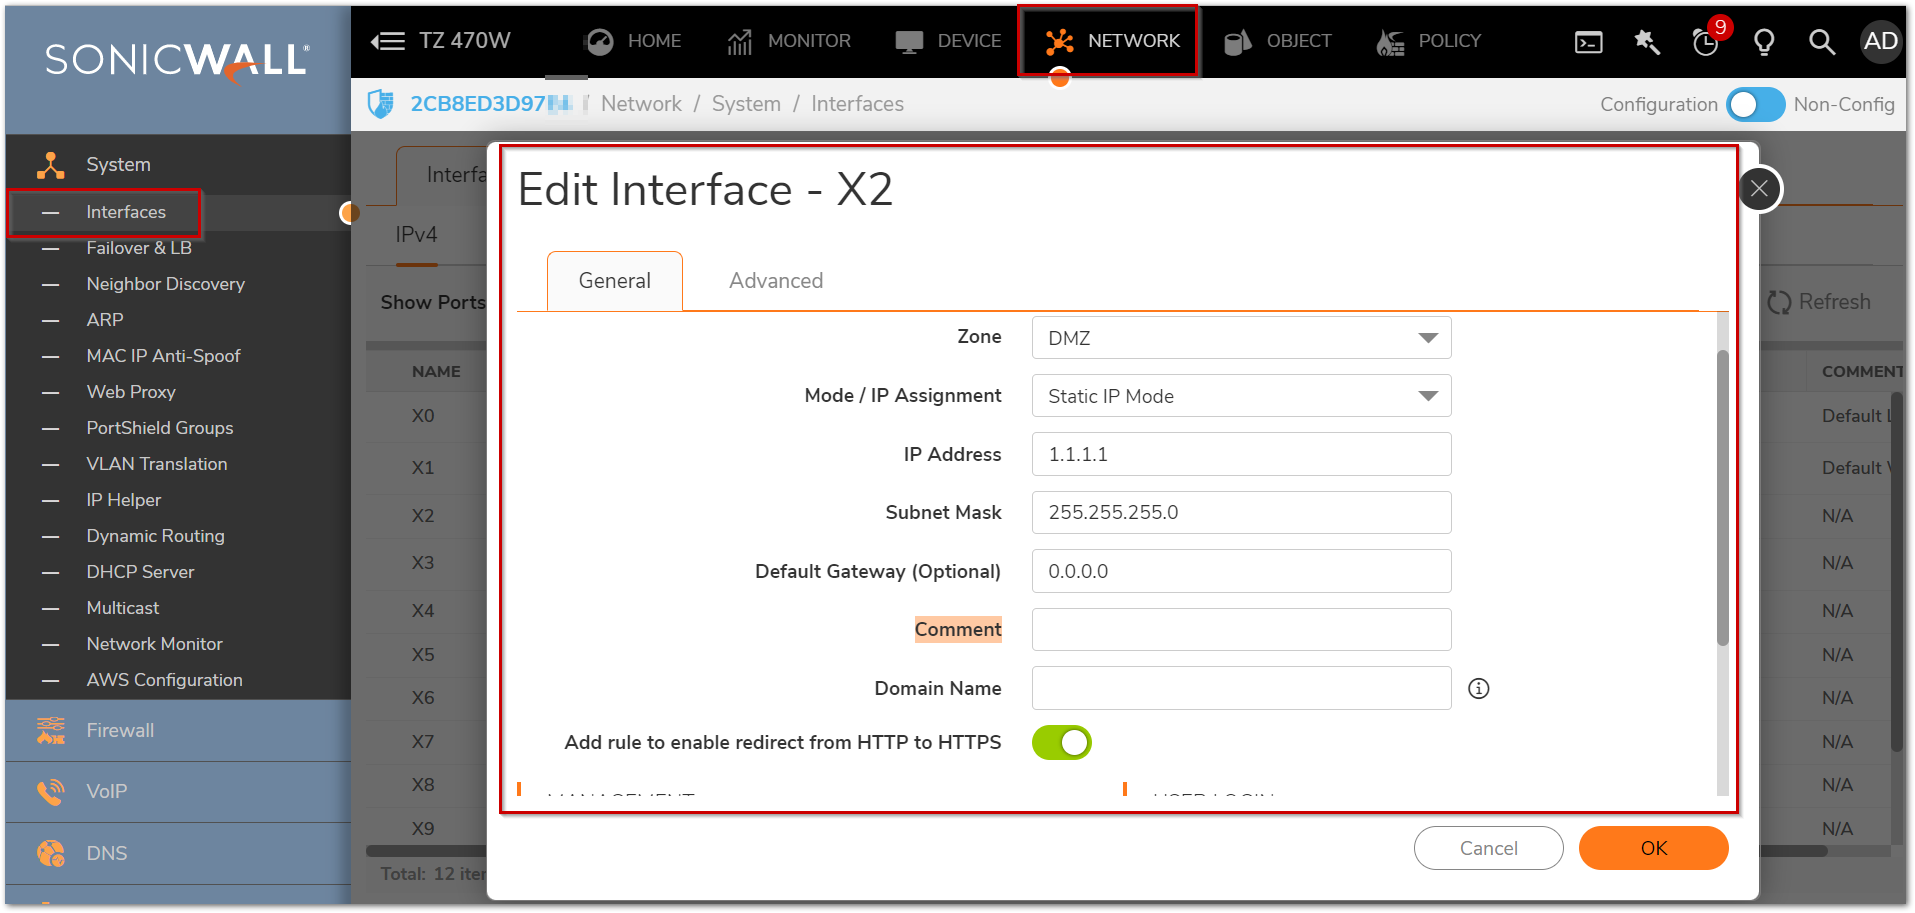
- Navigate to Network |Interfaces
- Click Notepad icon in the Configure column for the unassigned Interface you want to configure. The Edit Interface window is displayed.

3. Select the DMZ in the dropdown next to Zone.
4. Choose Static in the IP Assignment dropdown menu.
5. Type the Private IP address, which is in a different subnet than that of the LAN. The DMZ IP address should be the gateway for the computers connected to the DMZ.
6. Enter any optional comment text in the Comment field. This text is displayed in the Comment column of the Interface table.
7. If you want to enable remote management of the SonicWall from this interface, select the supported management protocol(s): HTTP or HTTPS (either or both). Ping, SNMP and/or SSH are optional protocols that can also be enabled.
8.If you want to allow selected users with limited management rights to log in to the security appliance, select HTTP and/or HTTPS in User Login.
9.Click OK to save changes.
Resolution for SonicOS 6.5
This release includes significant user interface changes and many new features that are different from the SonicOS 6.2 and earlier firmware. The below resolution is for customers using SonicOS 6.5 firmware.
Here's how to Configure DMZ in NAT Mode
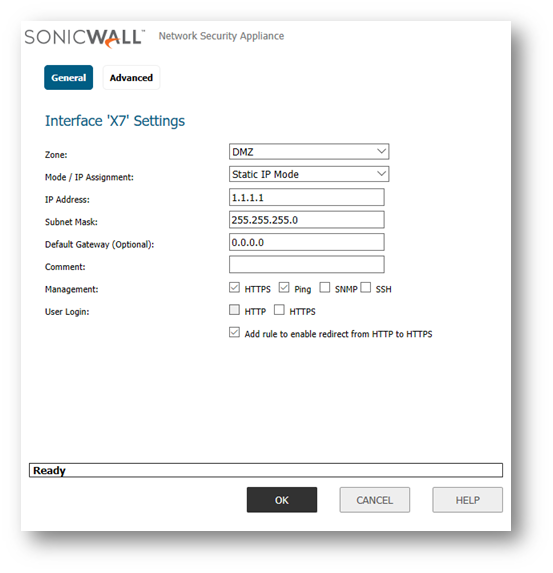
- Click Manage | System Setup | Nnetwork | Interfaces.
- Click Notepad icon in the Configure column for the unassigned Interface you want to configure. The Edit Interface window is displayed.

- Select the DMZ in the dropdown next to Zone.
- Choose Static in the IP Assignment dropdown menu.
- Type the Private IP address, which is in a different subnet than that of the LAN. The DMZ IP address should be the gateway for the computers connected to the DMZ.
- Enter any optional comment text in the Comment field. This text is displayed in the Comment column of the Interface table.
- If you want to enable remote management of the SonicWall from this interface, select the supported management protocol(s): HTTP or HTTPS (either or both). Ping, SNMP and/or SSH are optional protocols that can also be enabled.
- If you want to allow selected users with limited management rights to log in to the security appliance, select HTTP and/or HTTPS in User Login.
- Click OK to save changes.
Resolution for SonicOS 6.2 and Below
The below resolution is for customers using SonicOS 6.2 and earlier firmware. For firewalls that are generation 6 and newer we suggest to upgrade to the latest general release of SonicOS 6.5 firmware.
Here's how to Configure DMZ in NAT Mode
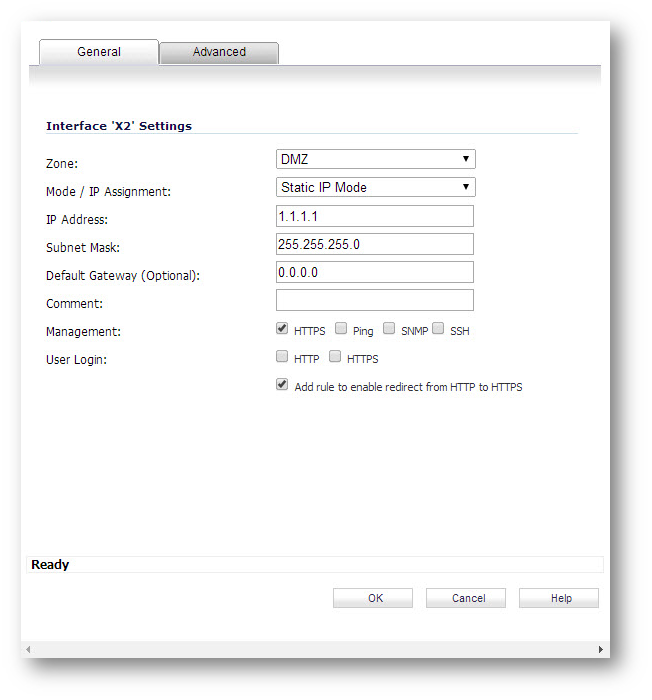
- Click Network | Interfaces.
- Click the Notepad icon in the Configure column for the unassigned Interface you want to configure. The Edit Interface window is displayed.

- Select the DMZ in the dropdown next to Zone.
- Choose Static in the IP Assignment dropdown menu.
- Type the Private IP address, which is in a different subnet than that of the LAN. The DMZ IP address should be the gateway for the computers connected to the DMZ.
- Enter any optional comment text in the Comment field. This text is displayed in the Comment column of the Interface table.
- If you want to enable remote management of the SonicWall from this interface, select the supported management protocol(s): HTTP or HTTPS (either or both). Ping, SNMP and/or SSH are optional protocols that can also be enabled.
- If you want to allow selected users with limited management rights to log in to the security appliance, select HTTP and/or HTTPS in User Login.
- Click OK to save changes.