How can I setup CFS to block internet access to a specific group?
Description
Assigning custom Content Filter policies to local users based on local group membership.
- This article gives step by step configuration that allows administrators to assign custom content filter polices to locally configured users based on group membership. In order for the SonicWall to differentiate between users, log in must be forced at the SonicWall so that when users initially try to access the Internet, they are redirected to a log in screen.
- The SonicWall also has the ability to determine usernames silently (with no secondary log in needed by users) by using the Single Sign On Agent (SSO).
- In order to assign custom content filter polices to locally configured users based on group membership, the SonicWall must have a premium content filter subscription.
Resolution for SonicOS 7.X
This release includes significant user interface changes and many new features that are different from the SonicOS 6.5 and earlier firmware. The below resolution is for customers using SonicOS 7.X firmware.
NOTE: CFS Premium version is required to create custom CFS policies.
Configuring Content Filter Policies
- Log into the SonicWall appliance.
- Click OBJECT in the top navigation menu.
- Navigate to Profile Objects| Content Filter and access the Profile Objects tab.
- Click configure icon next to the CFS Default Profile.
- Make the desired adjustments to the URI List Configuration and Category Configuration.
- Click OK .
- Create any additional profiles as needed by clicking the Add button and making the appropriate adjustments as Below.

- Navigate to Policy | Content Filter Rules and Click Edit this Entry next to the CFS Default Policy.

- Ensure the Default Policy is applied to the appropriate Source and Destination Zones, is applied to the appropriate users and/or IP addresses selected under the User/Group Included or Excluded list.
- Click OK .
 NOTE: If no local users or groups currently exist, refer to part 2 of this procedure to create local accounts. For LDAP accounts and CFS via LDAP, refer to Integration of LDAP and multiple/Custom CFS policies for different user groups - ULA + CFS + LDAP.
- Click ADD under CFS Policies to create new CFS policies as needed and link them to the appropriate CFS profile objects.
 TIP: To better understand the way in which Content Filtering 4.0 works, refer to the Content Filtering Service (CFS) 4.0 Overview - SonicOS 6.2.6 and above.
Configure Local Users and Groups
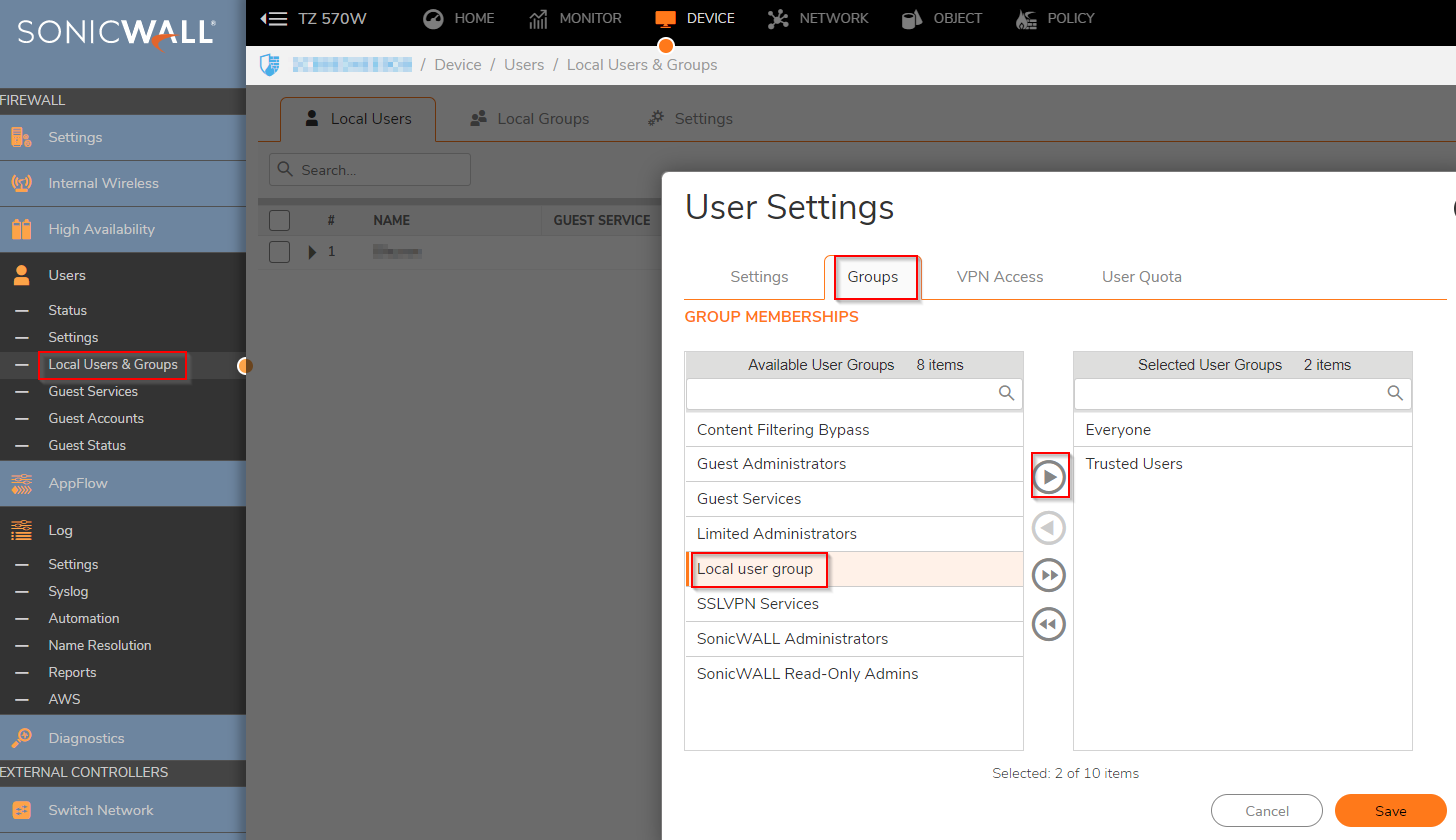
- Navigate to Users | Local Users & Groups. On the Local Groups tab, Click Add to create a Local Group.
- Enter the Name for the group.
- Click Save.

- Create additional groups as needed.
- On the Local Users tab, Click Add to create a new local user.
- Enter the Name and Password for the user. Complete additional fields as necessary.

- On the Groups tab, Add the appropriate group to the user's Member Of section.
- Click Save.
Configure ULA Settings
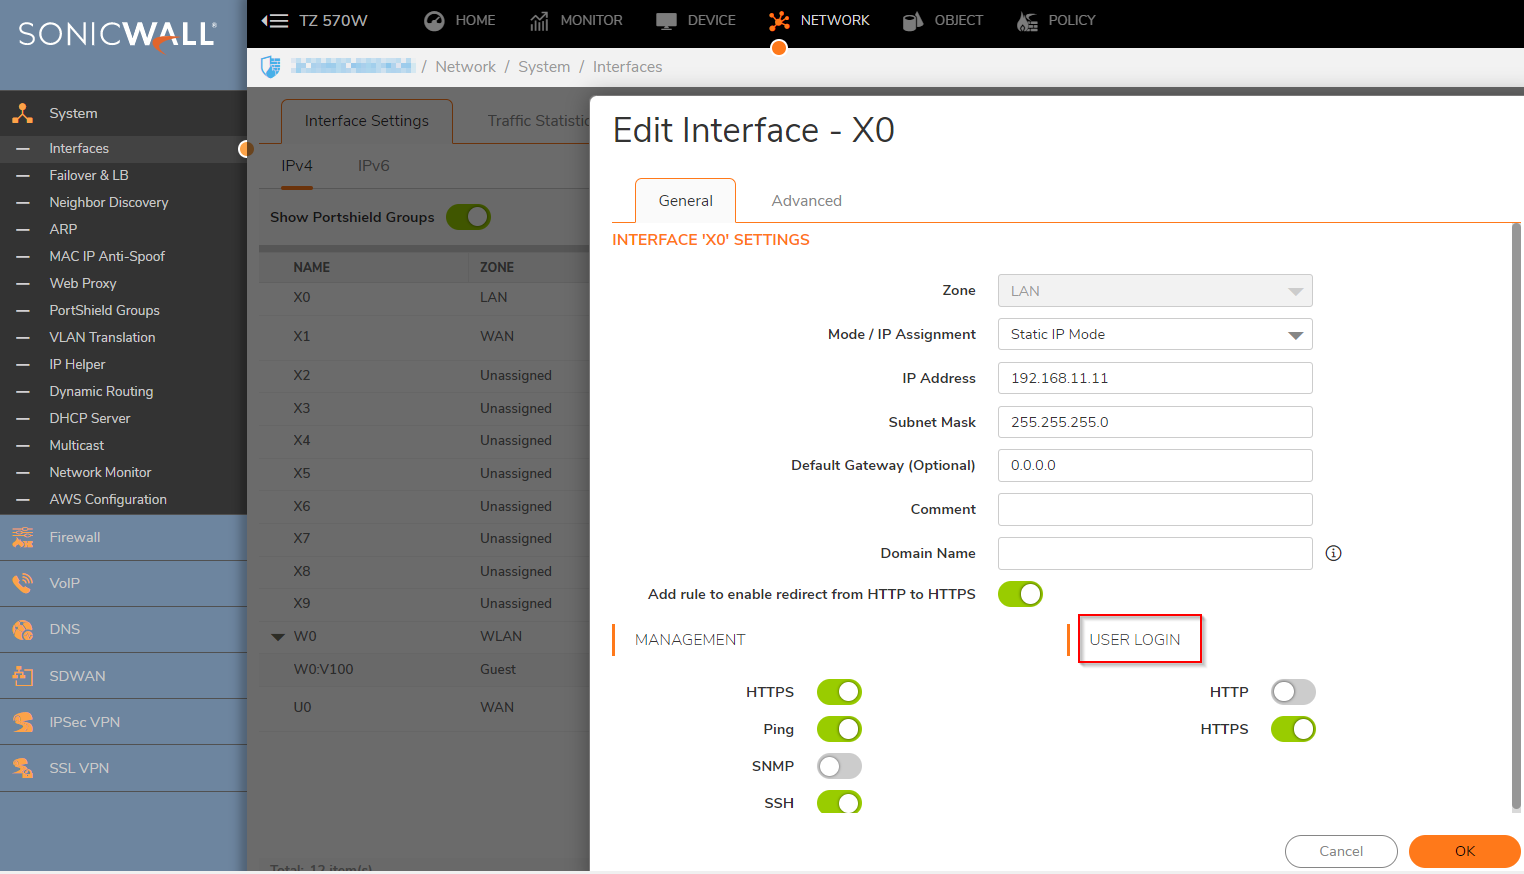
- Navigate to Network | Interfaces and Click Configure next to your Interface that users will be connecting to the SonicWall appliance with.
 EXAMPLE: If your users are located in the LAN off of X0, you will click configure next to the X0 Interface.
 - In the Interface configuration menu, enable User login for HTTP, HTTPS or both as this is required to allow users to login to the SonicWall appliance.
- Click OK to save the settings and close the window.
- Navigate to Policy|Rules and Policies| Access Rules and access the LAN to WAN rules via the matrix or the drop-down menus in the top of the screen.
 NOTE: LAN will need to be adjusted if your users are located in a different zone.
- Click Add to create a new access rule as follows:
Action: Allow, Service: HTTP/HTTPS ,
Source: Any,
Destination: Any,
Users Included: Trusted Users,
Schedule: Always on

 NOTE: By Specifying the Trusted Users group, you are forcing the SonicWall to determine if the user trying to access the web is a member of the trusted users group. (All users are members of the Trusted Users group, so it is a safe group too use in the Users Included field).
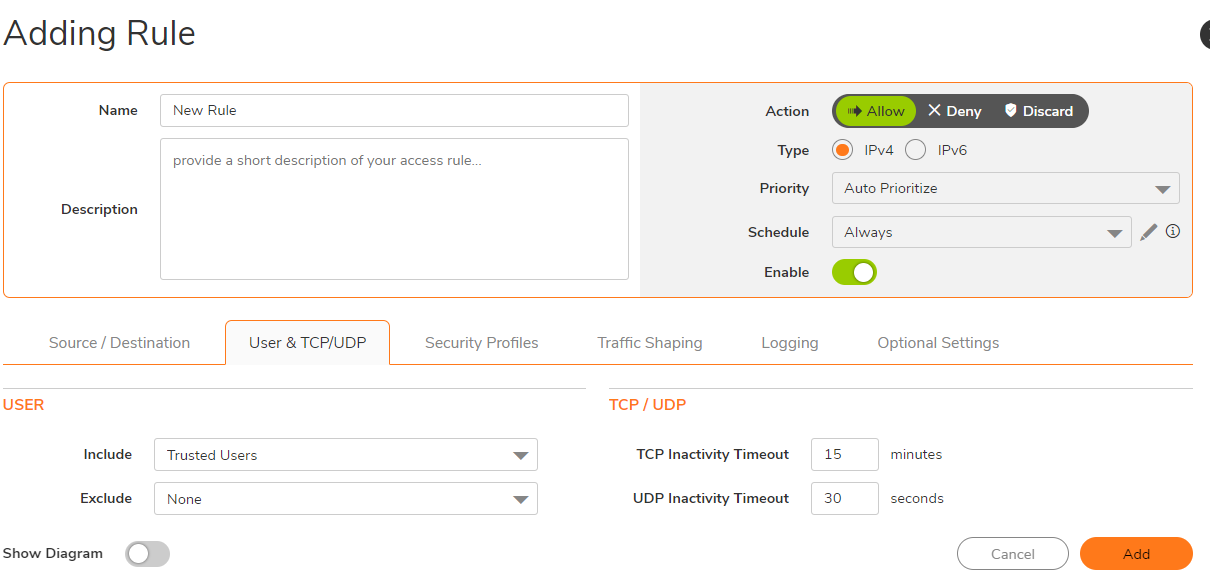
- Click On Add.
 CAUTION: Once you click on "Add", all users trying to access an HTTP based web page, will now be redirected to a SonicWall login page. If you want users to log in when accessing other web services such as FTP or https, you will need to create a service group in: Firewall Services and add any services you wish to have users log into the SonicWall when accessing. After said group is created, you would use it in place of "HTTP" for the service option in the rule shown above.
- Navigate to Network | Interfaces and Click Configure next to your Interface that users will be connecting to the SonicWall appliance with.
Resolution for SonicOS 6.5
This release includes significant user interface changes and many new features that are different from the SonicOS 6.2 and earlier firmware. The below resolution is for customers using SonicOS 6.5 firmware.
NOTE: CFS Premium version is required to create custom CFS policies.
Configuring Content Filter Policies
- Log into the SonicWall appliance.
- Click Manage in the top navigation menu.
- Navigate to Objects | Content Filter Objects and access the Profile Objects tab.
- Click configure icon next to the CFS Default Profile.
- Make the desired adjustments to the URI List Configuration and Category Configuration.
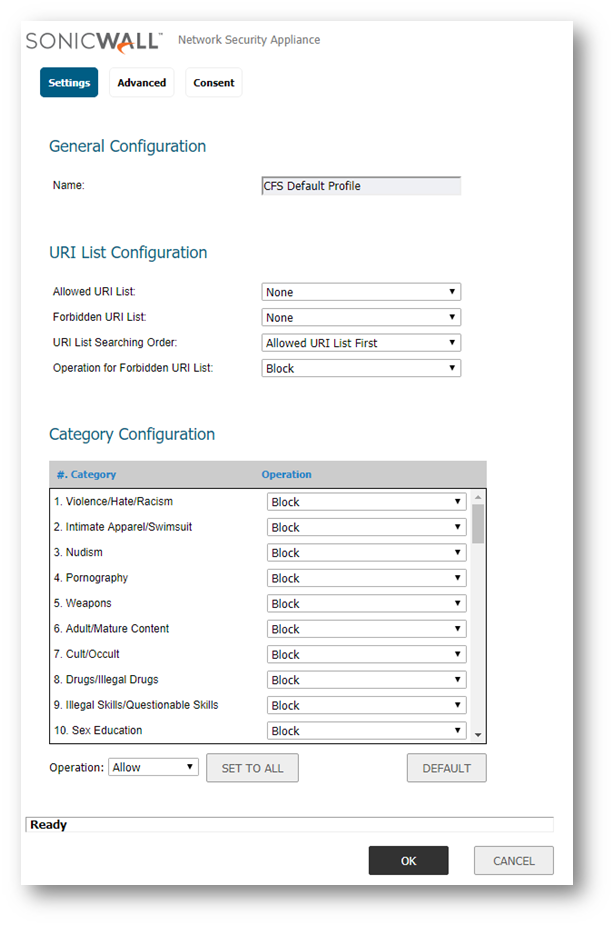
- Click OK .
- Create any additional profiles as needed by clicking the Add button and making the appropriate adjustments as above.
- Navigate to Security Services | Content Filter and Click Configure next to the CFS Default Policy.
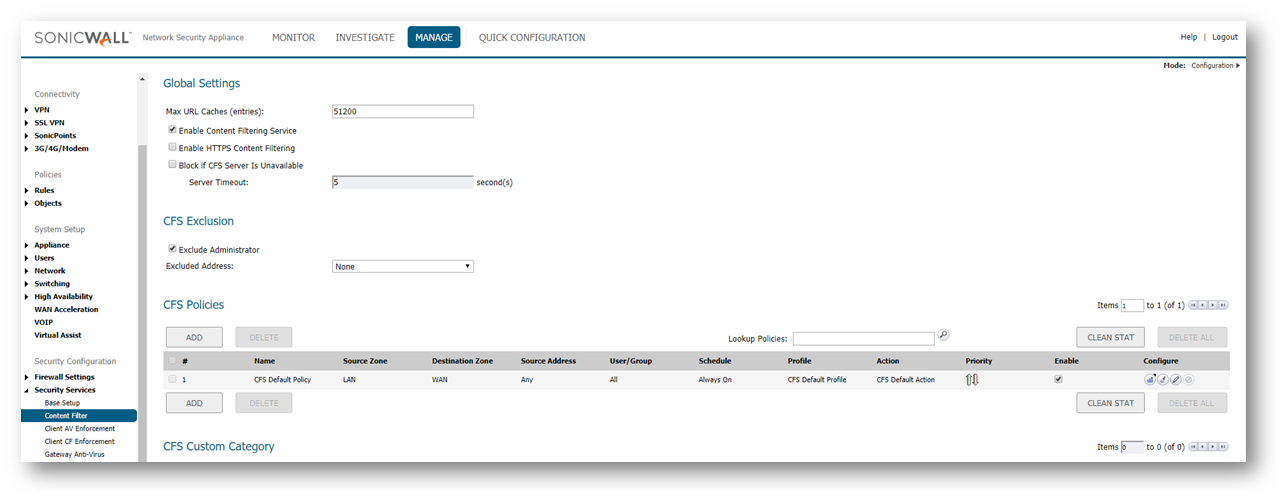
- Ensure the Default Policy is applied to the appropriate Source and Destination Zones, is applied to the appropriate users and/or IP addresses.
 NOTE: If no local users or groups currently exist, refer to part 2 of this procedure to create local accounts. For LDAP accounts and CFS via LDAP, refer to Integration of LDAP and multiple/Custom CFS policies for different user groups - ULA + CFS + LDAP.
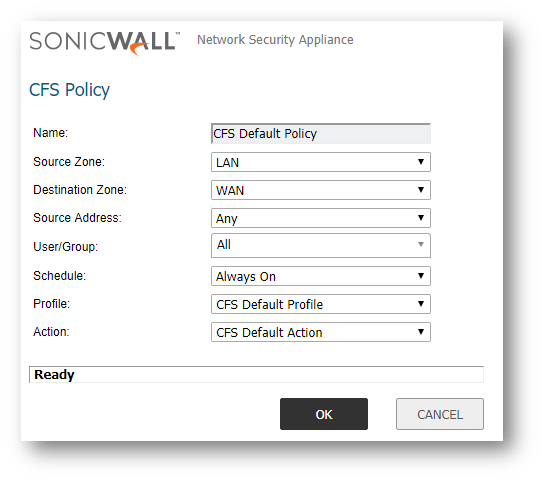
- Click OK .
- Click ADD under CFS Policies to create new CFS policies as needed and link them to the appropriate CFS profile objects.
 TIP: To better understand the way in which Content Filtering 4.0 works, refer to the Content Filtering Service (CFS) 4.0 Overview - SonicOS 6.2.6 and above.
Configure Local Users and Groups
- Navigate to Users | Local Users & Groups. On the Local Groups tab, Click Add to create a Local Group.
- Enter the Name for the group.

- Click OK .
- Create additional groups as needed.
- On the Local Users tab, Click Add to create a new local user.
- Enter the Name and Password for the user. Complete additional fields as necessary.
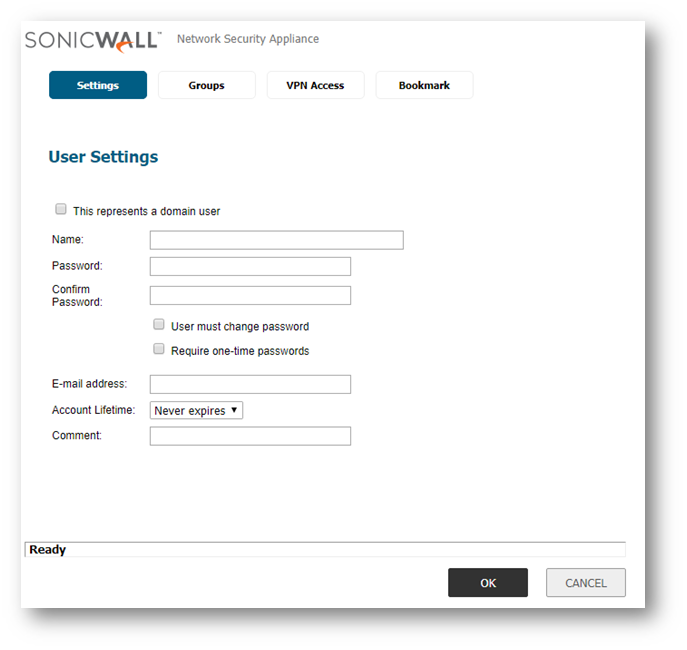
- On the Groups tab, Add the appropriate group to the user's Member Of section.

- Click OK .
Configure ULA Settings
- Navigate to Network | Interfaces and Click Configure next to your Interface that users will be connecting to the SonicWall appliance with.
 EXAMPLE: If your users are located in the LAN off of X0, you will click configure next to the X0 Interface.
 - In the Interface configuration menu, enable User login for HTTP, HTTPS or both as this is required to allow users to login to the SonicWall appliance.
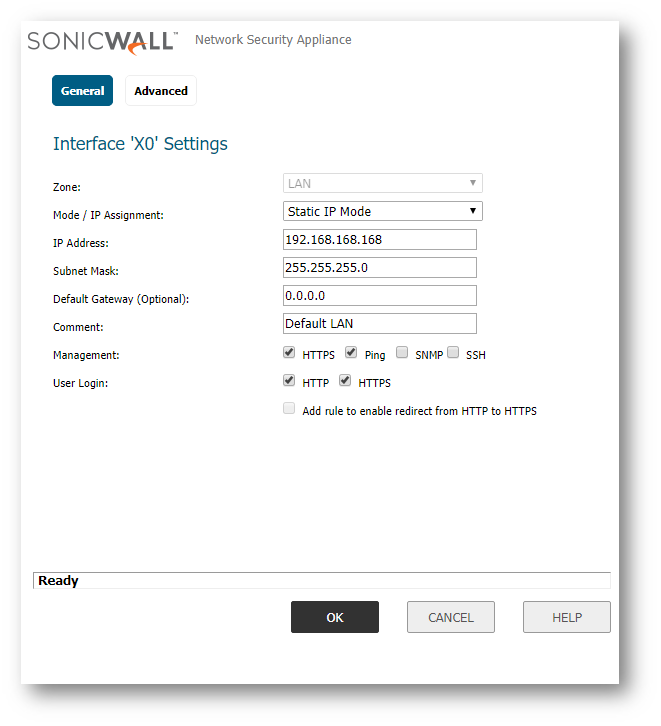
- Click OK to save the settings and close the window.
- Navigate to Rules | Access Rules and access the LAN to WAN rules via the matrix or the drop-down menus in the top-right corner of the screen.
 NOTE: LAN will need to be adjusted if your users are located in a different zone.
- Click Add to create a new access rule as follows:

Action: Allow
Service: HTTPSource: Any
Destination: Any
Users Included: Trusted Users
Schedule: Always on
 NOTE: By Specifying the Trusted Users group, you are forcing the SonicWall to determine if the user trying to access the web is a member of the trusted users group. (All users are members of the Trusted Users group, so it is a safe group too use in the Users Included field).
 - Click Add.
 CAUTION: Once you click on "Add", all users trying to access an HTTP based web page, will now be redirected to a SonicWall login page. If you want users to log in when accessing other web services such as FTP or https, you will need to create a service group in: Firewall Services and add any services you wish to have users log into the SonicWall when accessing. After said group is created, you would use it in place of "HTTP" for the service option in the rule shown above.