Wireless: SonicPoint Layer 3 Management using GRE Tunnel over the Internet
Description
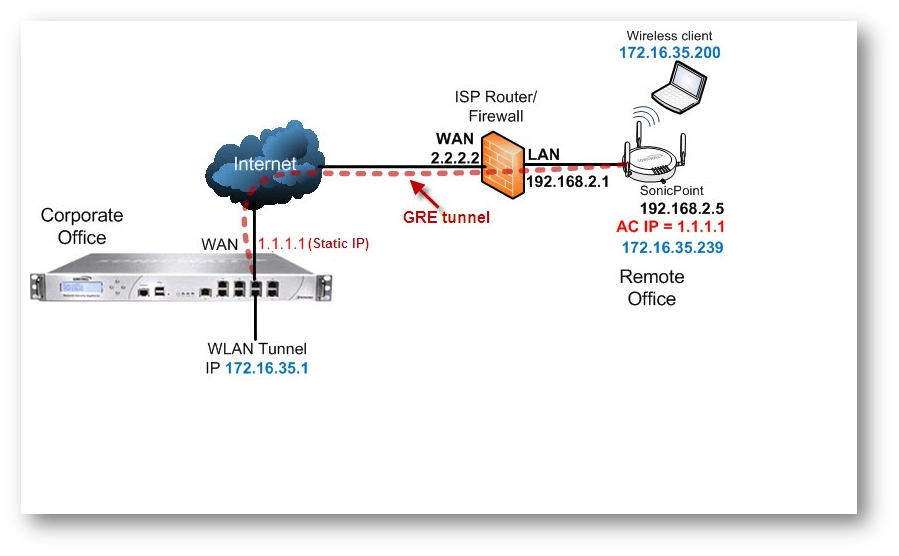
- With SonicOS 5.9 firmware the SonicWall UTM appliances are capable of discovering and managing SonicPoints over the Internet.
- SonicPoint will use the AC IP (Access controller) for discovery.
- GRE / DTLS (phase II) tunnel is established between the SonicWall UTM appliance and the SonicPoint device(s) to carry management and data traffic.
Resolution
Discovering and managing SonicPoints using the GRE Tunnel over the Internet / WAN.
Please Note: The settings shown in this technote are as per the scenario mentioned above, you must substitute the settings as per your setup.
Deployment Steps:
Part 1: Configuration on the SonicWall UTM appliance
Part 2: configuration on the Intermediate ISP Router/Firewall to allow GRE Protocol to the SonicPoint.
Part3: Configuration on the SonicPoint:
Step 2: Accessing the SonicPoint Management Interface in Standalone Mode
Step 3: Uploading the SonicOS 5.9 compatible firmware for SonicPoints
Step 4: Configuring the L3 Management Settings
Detailed configuration steps:
Part 1: Configuration on the SonicWall UTM appliance
- Login to the SonicWall Management Interface and go to Network > Interfaces page
- Select WLAN tunnel interface in the Add Interface drop down menu and configure as per your setup
Tunnel ID: 0 (zero)
Tunnel Source Interface: X1 / WAN (AC Interface)
Mode / IP Assignment: Static
IP Address: 172.16.35.1
Subnet Mask: 255.255.255.0
Please Note: A DHCP scope (172.17.35.1/24) will be automatically created in the Network > DHCP Server page for the wireless clients.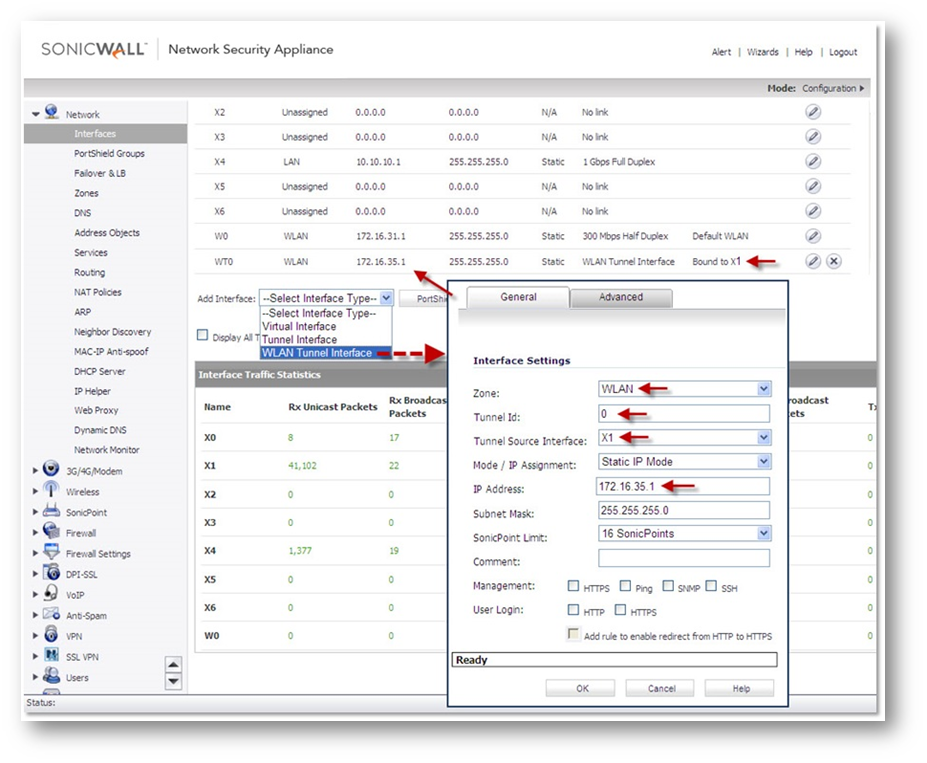
Part 2: configuration the Intermediate Router to perform DHCP Relay/IPHelper
Important:On the ISP Router/Firewall you must Allow/Forward the GRE Protocol to the SonicPoint IP address, please contact your ISP/Firewall support for assistance.
Part 3: Configuration on the SonicPoints
Step 1: Downloading the SonicOS 5.9 compatible firmware for SonicPoint
Method 1: Connecting the SonicPoint to SonicWall UTM appliance running SonicOS 5.9 and above
When the SonicPoints are connected to a SonicWall UTM appliance’s WLAN interface/Zone running SonicOS 5.9 and above, they will automatically be updated with the latest firmware.
Method 2: Manually updating SonicPoint firmware
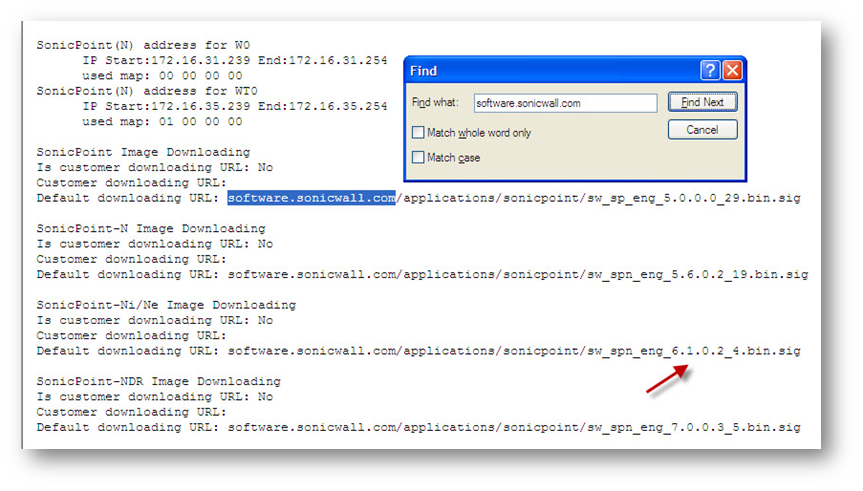
- Download the TSR from a SonicWall UTM appliance running 5.9 or above
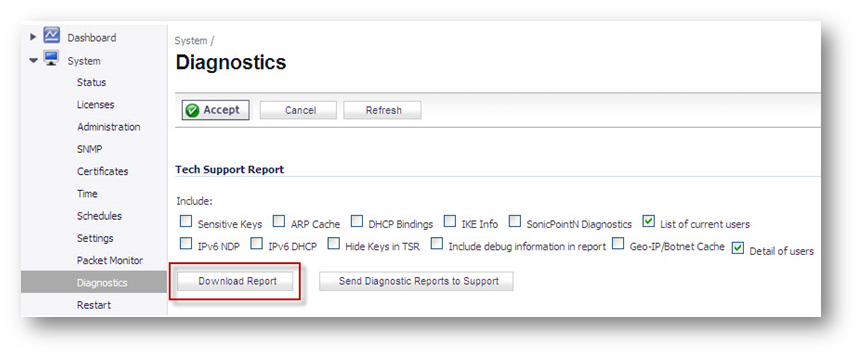
- Open the TSR in a Text reader/editor and find the SonicPoint download URL
- Copy-Paste the Download URL in a Web Browser and download the appropriate SonicPoint Image
Step 2: Accessing the SonicPoint Management Interface in Standalone Mode:
- The default management interface of the SonicPoint is 192.168.1.20
- If you are connecting to the LAN port on the SonicPoint directly from a PC or through only the PoE injector, you need to configure the Local Area Connection on the PC to be in the same subnet as the SonicPoint.
- IP address: 192.168.1.100.
- Netmask: 255.255.255.0.
- Connect directly to the LAN port of the SonicPoint with a crossover cable or regular cat. 5 Ethernet cable.
- Connect to the LAN port of the SonicPoint through the PoE injector with a regular cat. 5 Ethernet cable.
- If the SonicPoint is connected to a port in a SonicWall security appliance and the port is not in a Wireless zone, you can connect to it through the security appliance provided there are rules to allow HTTP management traffic between the zone your management station is in and the zone the SonicPoint is in.
- Start your Web browser and direct it to the default management IP address for the SonicPoint, 192.168.1.20
Troubleshooting Tip: If you are unable to access the SonicPoint you may press the Reset Button to access it in SafeMode and then follow the above step #2: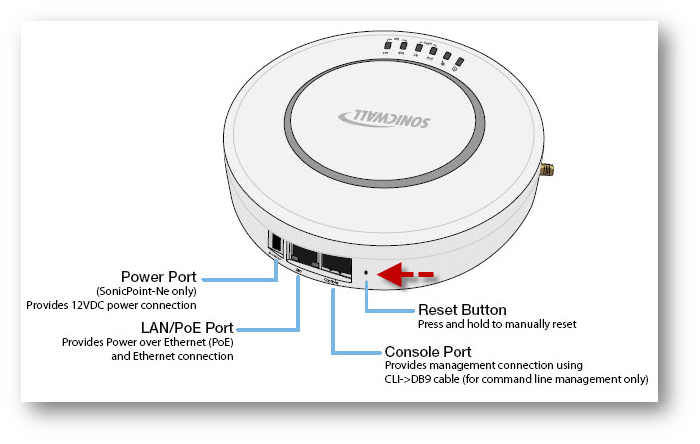
Step 3: Uploading the SonicOS 5.9 compatible firmware for SonicPoints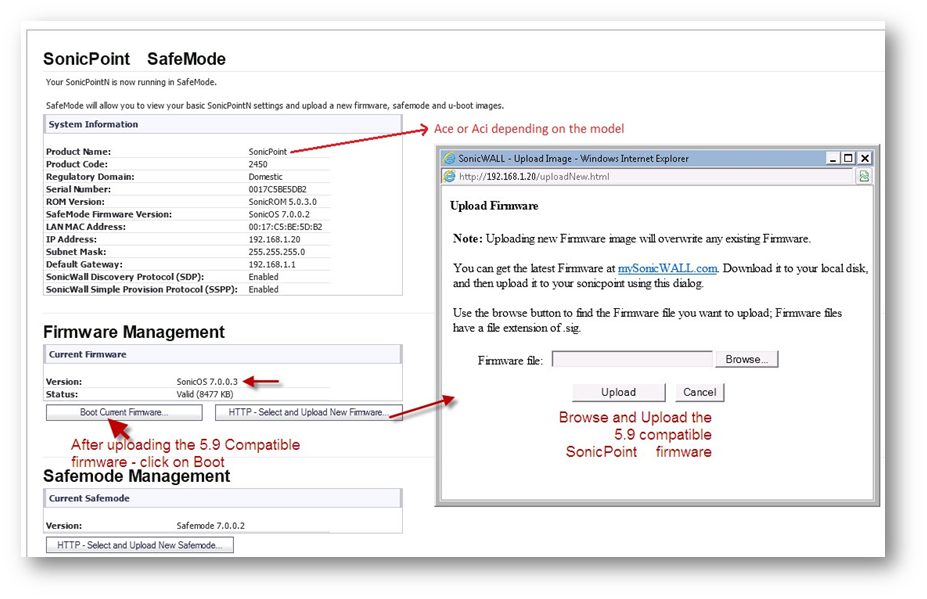
- Start your Web browser and direct it to the default management IP address for the SonicPoint, 192.168.1.20
- Login to the SonicPoint management interface with the default username "admin" and default password "password".
Step 4: Configuring the L3 Management Settings
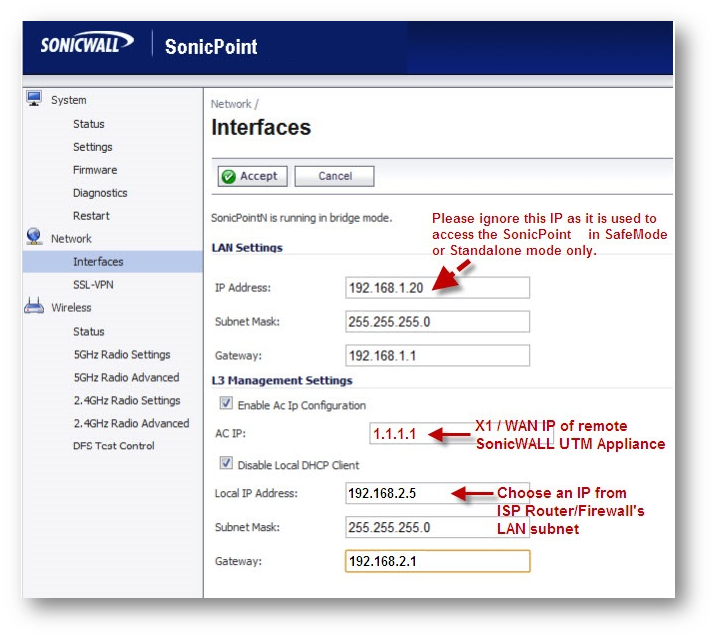
- Navigate to SonicPoints Network > Interfaces page
- Under L3 Management settings, enable the option/check “Enable AC IP configuration”.
- Enter the AC IP as: 1.1.1.1 (X1/WAN Interface of SonicWall UTM Appliance)
- Enable the Disable local DHCP Client option.
Subnet Mask: 255.255.255.0
Default Gateway: 192.168.2.1 (ISP Router/Firewall IP address)
- Click on Accept button on top.
- You will get a prompt at the bottom to Restart the SonicPoint, click on the link and restart the SonicPoint.
Please Note:After the reboot the SonicPoint will try to establish GRE/DTLS tunnel with CAPWAP settings to the IP address mentioned in the AC IP field to complete the SonicPoint provisioning.
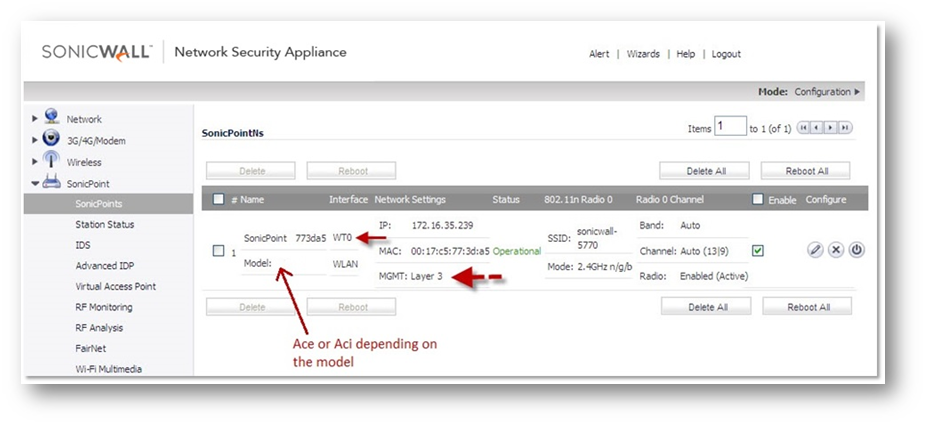
How to Test
Go to SonicPoint | Status page, you must see the remote SonicPoint labelled MGMT: Layer 3.