


How to disable NETBIOS using the SonicWall DHCP Server
 06/28/2023
  24 People found this article helpful
 458,967 Views

Description
How to disable NETBIOS using the SonicWall DHCP Server
Resolution
Resolution for SonicOS 7.X
This release includes significant user interface changes and many new features that are different from the SonicOS 6.5 and earlier firmware. The below resolution is for customers using SonicOS 7.X firmware.
You can disable NETBIOS name resolution on a Windows computer using two methods.
METHOD 1:
The first method involves disabling NETBIOS over TCP/IP using the network connections control panel configuration as shown below. Navigate to Properties > IPV4 Properties (TCP/IP) > Advanced TCP/IP Settings of network adapter in question.

METHOD 2:
The second method involves configuring DHCP option 43 within the SonicWall DHCP Server scope. First, set the NETBIOS over TCP/IP option on the computer to Default as shown below.

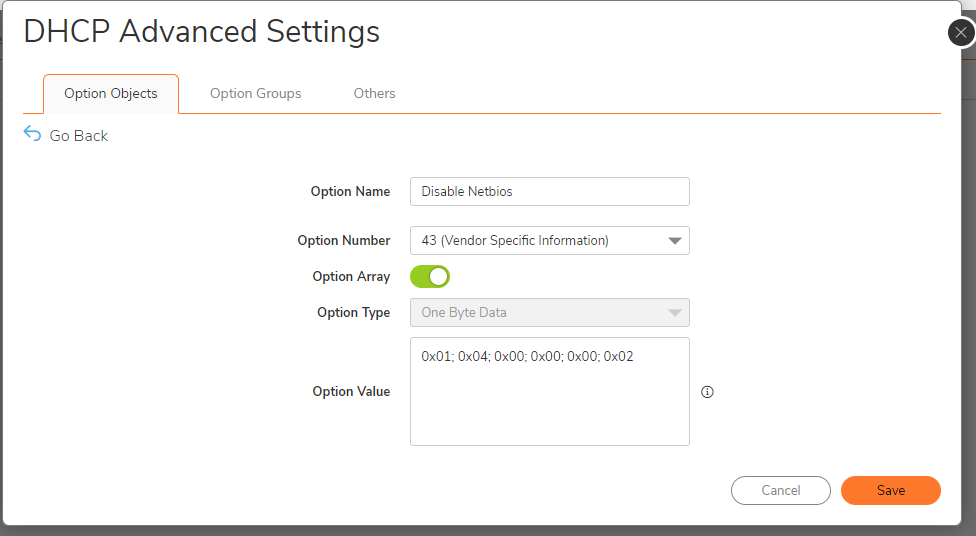
Next, create a DHCP Options Object within the SonicWall as shown below.
- Navigate to Network | System | DHCP Server, click on Advanced tab.

- Click Add to create the option object and enter the below details to save it.
- Add this new DHCP Options Object to the intended DHCP Server scope under DHCP Server Lease scopes | <Intended Lease Scope> | Advanced tab.

 NOTE: DHCP option 43 is for Vendor Specific Information. It is defined in RFC 2132. When these specific hex values are contained in DHCP option 43, a Windows computer under normal operation will disable NETBIOS over TCP/IP name resolution.
Resolution for SonicOS 6.5
This release includes significant user interface changes and many new features that are different from the SonicOS 6.2 and earlier firmware. The below resolution is for customers using SonicOS 6.5 firmware.
You can disable NETBIOS name resolution on a Windows computer using two methods.
METHOD 1:
The first method involves disabling NETBIOS over TCP/IP using the network connections control panel configuration as shown below. Navigate to Properties > IPV4 Properties (TCP/IP) > Advanced TCP/IP Settings of network adapter in question.

METHOD 2:
The second method involves configuring DHCP option 43 within the SonicWall DHCP Server scope. First, set the NETBIOS over TCP/IP option on the computer to Default as shown below.

Next, create a DHCP Options Object within the SonicWall as shown below.
- Navigate to Manage | Network | DHCP Server, click on Advanced tab.
- Click Add Option to create the option object and enter the below details to save it.


- Add this new DHCP Options Object to the intended DHCP Server scope under DHCP Server Lease scopes | <Intended Lease Scope> | Advanced tab.

NOTE: DHCP option 43 is for Vendor Specific Information. It is defined in RFC 2132. When these specific hex values are contained in DHCP option 43, a Windows computer under normal operation will disable NETBIOS over TCP/IP name resolution.
Related Articles
- Configuring split DNS over site to site VPN
- How to enable DNS Doctoring?
- Understanding TCP Handshake violation
Categories
- Firewalls > NSa Series > DHCP Server
- Firewalls > NSv Series > DHCP Server
- Firewalls > TZ Series > DHCP Server
 YES
YES NO
NO