-
Products
-
SonicPlatform
SonicPlatform is the cybersecurity platform purpose-built for MSPs, making managing complex security environments among multiple tenants easy and streamlined.
Discover More
-
-
Solutions
-
Federal
Protect Federal Agencies and Networks with scalable, purpose-built cybersecurity solutions
Learn MoreFederalProtect Federal Agencies and Networks with scalable, purpose-built cybersecurity solutions
Learn More - Industries
- Use Cases
-
-
Partners
-
Partner Portal
Access to deal registration, MDF, sales and marketing tools, training and more
Learn MorePartner PortalAccess to deal registration, MDF, sales and marketing tools, training and more
Learn More - SonicWall Partners
- Partner Resources
-
-
Support
-
Support Portal
Find answers to your questions by searching across our knowledge base, community, technical documentation and video tutorials
Learn MoreSupport PortalFind answers to your questions by searching across our knowledge base, community, technical documentation and video tutorials
Learn More - Support
- Resources
- Capture Labs
-
- Company
- Contact Us
MSS FW Best Practices: Registration & Firmware


Description
 CAUTION: These documents are intended to provide partners with firewall configuration recommendations ONLY. They contain examples and caution should be exercised when making changes to your firewall as unplanned changed could result in downtime based on the complexity of the environment and/or configuration.
MSS Recomended SonicWall Firewall Best Practices Index
Step 1. Registering in MySonicWall
SonicWall Secure Upgrade program
The SonicWall Customer Loyalty Program offers an upgrade path from current SonicWall products, and a trade-in path from competitors’ products, in addition to special pricing on a wide range of SonicWall products. This offer recognizes the past investments that customers have made and helps them maintain optimal security by letting them easily and affordably replace outdated security appliances.
![]() SonicWall Secure Upgrade program
SonicWall Secure Upgrade program
Highlights
- Special pricing on upgrades, SonicWall products or trade-ins of a competitive product.
- Provides a credit for your old appliance.
- Enables service transfers for subscription services and support services.
- Includes qualification for the Boundless Bundle.
- Provides a broader choice of qualifying solutions.
- Features flexible, simplified subscriptions.
- Only specific models are applicable and will support the license transfer. For more information, see: SonicWall Customer Loyalty Program
How it works
If the customer is replacing an older SonicWall, any perpetual licenses purchased and applied to the old unit can be transferred to the new one. This is done by registering the unit in the same MySonicWall account as the old one and selecting the old unit as the “trade in” unit. This will prompt you to complete the “transfer of services” which will strip the licenses off the old unit and transfer them to the new one.
DO NOT complete the transfer until the new unit is in production as it will strip the licenses off the old unit!
Issues with License Transfer
If the new unit is not registered as a SonicWall SUP, the incorrect unit is chosen during registration, or the licenses did not transfer to the new unit, the customer will need to contact License and Registration department of SonicWall Technical Support. They are the only ones that can correct backend licensing issues.
MySonicwall Registration
Registering in MySonicWall
- Go to www.MySonicWall.com, log in to your account.
- Under dashboard click Register.
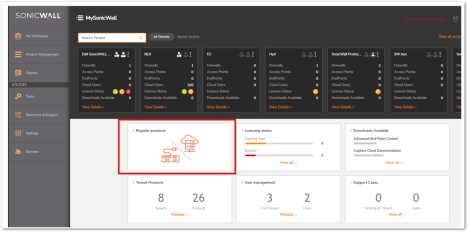
- Enter the serial number or activation key for the product you wish to register, click Confirm.
- Register a Product pop up will appear, please complete the fields and then click Register.
- Secure Upgrade Plus pop up will appear. If you are replacing an older SonicWall, select SonicWall Replacement. If you are replacing a competitors product, select Competitive Replacement.
- If SonicWall Replacement is selected, a list of the available devices that can be used as a replacement will populate. You need to select that SonicWall Trade-In unit to be replaced, click Register.
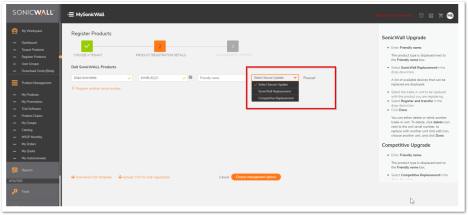
- NOTE: You will confirm if you want to Register Only or Register and Transfer licensing. Register Only registers the newer Upgrade unit, and gives you 60 days to complete the transfer on the older Trade-In unit. You can complete this action at any time from the additional options on the Product Page. Register and Transfer immediately transfers all applicable licensing to the Upgrade unit and removes the Trade-In unit from MySonicWall.
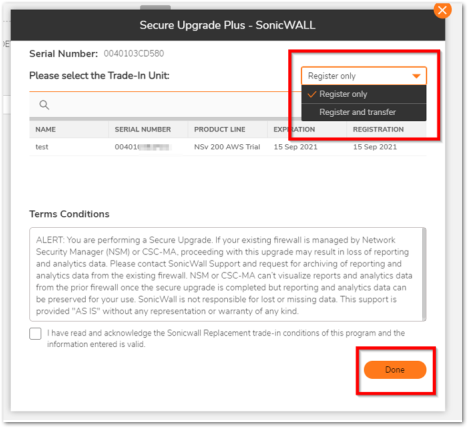
- CAUTION: If Register and transfer is selected OR the services are not transferred within sixty (60) days, SonicWall will automatically transfer such services after such time period. The Eligible SonicWall Product will be deactivated and may not be re-registered, updated, supported, returned or upgraded.
- NOTE: Any default licenses (services that come along with the devices) on the old trade-in unit are not transferable to new upgrade unit.
- Default services like:
- Global VPN Client
- Global VPN Client Enterprise
- SSL VPN/SSL-VPN Virtual Assist
- WAN Acceleration Client
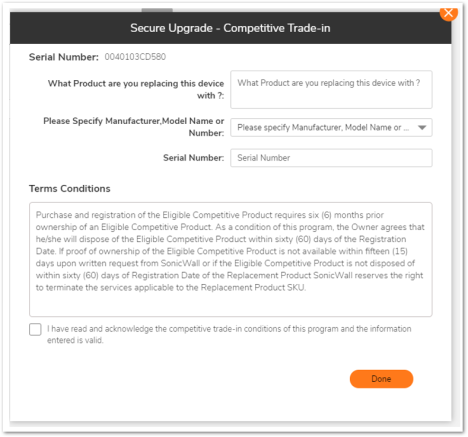
- If Competitive Replacement is selected complete all fields in the short survey (make, model, serial number). Click Register.
Step 2. Updating Registration on Firewall
2a. Connect Power

2b. Connect Interfaces

2c. Ensure the Firewall has Internet Access
Before completing this step, you will need to ensure the following:
- The firewall’s WAN (X1) interface must be plugged into a network handing out DHCP so it can get to the internet.
- You may also log into the firewall and configure a static IP on the X1 interface.
- Make sure the Time Zone and DNS settings are correct so that the firewall can reach the internet.
- Confirm this by logging into the firewall and going to the Check Network Setting page and making sure the firewall can reach the 3 SonicWall servers

2d. Synchronize the Firewall with MySonicWall
If the external (IDP) Identity Provider has been enabled on your MSW account, then you will be asked to authenticate while registering devices on the device interface. This is not the same password which you use to sign in to your MSW account. You will need to enter the Password found under Use External Identity Provider and this can be obtained within your MySonicWall account. For more info see: https://www.sonicwall.com/support/knowledge-base/idp-password-to-register-devices-and-services/240306135211603
- Login to your firewall. Navigate to Device → License and Click on Login with MySonicwall
- Fill in your MySonicwall username and password under which the device is registered and click on Register.

- You can now see that the license information will show up and will be in sync with your MySonicwall license details.
Step 3. Updating Firmware
- Backup the settings to the unit.
- Ensure GMS has a copy of the unit’s settings from within the last week.
- If the firewall is not in GMS, export a copy of the settings from the firewall to your local machine.
- Ensure GMS has a copy of the unit’s settings from within the last week.
- Follow the SonicWall KB on How can I upgrade SonicOS Firmware? | SonicWall
High Availability Pairs
When upgrading firmware for HA pairs, always confirm that the HA setup is solid as well as BOTH firewalls are in a state that will support a failover BEFORE rebooting the pair.
![]() High Availability Firmware Upgrade
High Availability Firmware Upgrade
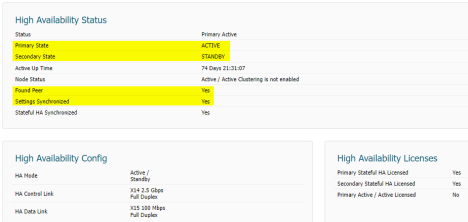
- Verify Unit Status of HA Members:
- On the High Availability Status page, ensure the following. See the below screenshot for an example.
- Both the Primary and Secondary are recognized. One should be active, and one should be passive.
- It really doesn’t matter which one is running as the “Active” unit.
- The Peer should be found.
- The settings should be synchronized.
- The High Availability Licenses should be synchronized.
- Verify Connected Interfaces:
- If there are Monitoring IPs configured, log into each firewall and verify both have the same interfaces connected.
- Sometimes this is not possible if monitoring IPs are not configured or the customer does have other public IPs to use as monitoring IPs.
- DO NOT PROCEED if one firewall has less connected interfaces as the other without confirming with the customer.
- Upload and boot the firmware like normal.
- If the Primary unit of the HA pair is the active unit, the Secondary firewall will be the first unit to upgrade and will reboot automatically.
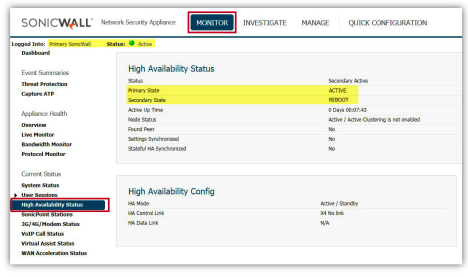
- The Secondary firewall will be unavailable during its reboot.
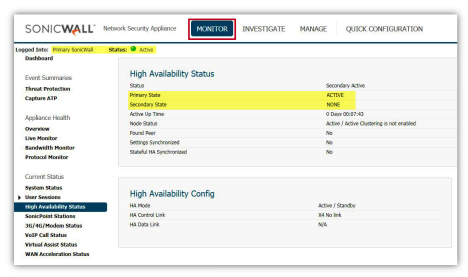
- After the Secondary firewall finishes loading the upgraded firmware, it will become ACTIVE. Then the Primary firewall will undergo its upgrade and reboot.
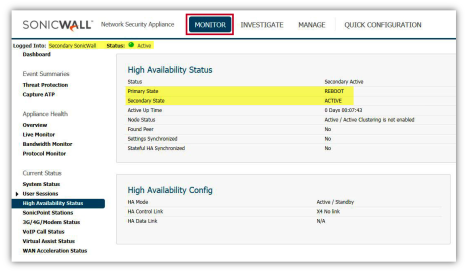
- The Primary firewall will be unavailable during its reboot.
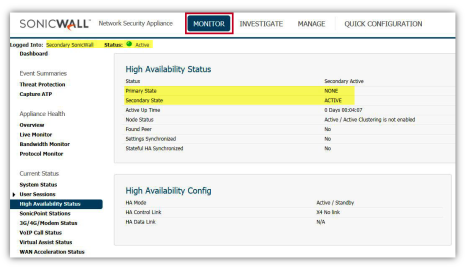
- When the Primary firewall comes back up, it becomes the STANDBY unit.
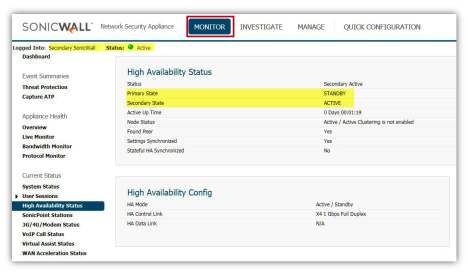
- You may fail the pair back over the primary unit if desired. This is not mandatory as both firewalls share the same configuration and connections.
Manual Firmware Upgrade for HA Pairs
Sometimes you might need to perform a manual upgrade of an HA pairs which requires breaking the HA. See below for the recommended procedure.
- It is recommended to upgrade the firmware on the primary unit first. This limits the amount of failover that you’ll have to do which will limit disconnections for network clients.
- If needed, you can upgrade the firmware on the HA unit first. You will still follow the below procedure, just swapping out primary/HA when applicable.
![]() Process for Manual Firmware Upgrade for HA Pair
Process for Manual Firmware Upgrade for HA Pair
Preparation
- Confirm which unit is the dedicated High Availability unit.
- NSa Series Units: The sticker with the serial number is located on the top of the units near the front panel on the right-hand side. If the units are rack mounted, the customer will need to pull out the units a couple of inches to see it.
- TZ Series Units: The sticker with the serial number is located on the bottom of the unit. If the units are rack mounted using rackmount kits, the customer will need to remove one of them from the rack AND the rackmount kit to see the sticker.
- In MySonicWall, confirm that the HA unit is correctly associated to the primary unit.
- Failover the HA pair so that the HA unit is running as the active unit.
Upgrade the Primary Unit’s Firmware
- With the network running on the HA unit, disconnect all network cables from the primary unit.
- Have the customer plug into the primary unit (X0 Interface for TZ Series or MGMT Interface for NSa Series).
- Upgrade the firmware on the primary unit.
- See Step 3 of this document for instructions.
- Once the primary unit is back online with the new firmware:
- Disconnect network cables from the HA unit (This will take down the network temporarily)
- Re-Connect all network cables to the Primary unit that you disconnected earlier. This should bring the network back online.
- Make sure and use the same network cables that you disconnected earlier.
Upgrade the HA Unit’s Firmware
- It is recommended to factory reset the HA unit so that there is no left over/cached configuration from previous firmware.
- This will also force the new reset HA unit to pull the latest configuration from the primary unit instead of trying to compare the previous configuration from the old firmware.
- Have the customer plug into the HA unit (X0 Interface for TZ Series or MGMT Interface for NSa Series).
- Have the customer configure their computer with a static IP address:
- For TZ Series: Use an IP on the 192.168.168.0/24 subnet, such as 192.168.168.20
- For NSa Series: Use an IP on the 192.168.168.1/24 subnet, such as 192.168.1.20
- Put the HA unit into safe mode.
- To force the appliance into Safe Mode, use a narrow, straight object, like a straightened paper clip or a toothpick, to press and hold the Reset button on the front of the SonicWall appliance for at least twenty seconds, until the Test light begins blinking.
- Access the Safe Mode management interface.
- For TZ Series: http://192.168.168.168
- For NSa Series: http://192.168.1.254
- Upload the same firmware that you just upgraded the primary unit to.
- Select the Boot icon in the row for Uploaded Firmware with Factory Default Settings- New!
- This will upgrade the unit as well as reset it back to factory defaults.
HA Unit Registration
- Since the unit is now factory defaulted, you will need to follow Step 2. Updating Registration on Firewall from above to get synchronize the unit with MySonicWall.
HA Unit Re-Installation
- Once the HA unit has been synchronized with MySonicWall, power it off.
- Connect the HA link between the Primary Unit and HA Unit.
- DO NOT connect the network cables at this time.
- Power on the HA unit.
- Monitor the HA status via the Primary unit and wait for the HA unit to be detected, and for it to pull down the configuration from the Primary unit.
- Once you see that the HA unit has an Idle status:
- Re-Connect all network cables to the HA unit that you disconnected earlier.
- Make sure and use the same network cables that you disconnected earlier.
- Re-Connect all network cables to the HA unit that you disconnected earlier.
At this point you are good to go. You may test the HA by forcing a failover from the GUI if the customer would like.
Related Articles
- Cloud Threat Analytics: SaaS Alerts Onboarding
- NDR: Integration Guide (Start Here)
- MSS CAS Migrations: Frequently Asked Questions (FAQs)
Categories
- Managed Security Services > Firewall Monitoring and Management > Firewall Configuration and Best Practices


 YES
YES NO
NO