-
Products
-
SonicPlatform
SonicPlatform is the cybersecurity platform purpose-built for MSPs, making managing complex security environments among multiple tenants easy and streamlined.
Discover More
-
-
Solutions
-
Federal
Protect Federal Agencies and Networks with scalable, purpose-built cybersecurity solutions
Learn MoreFederalProtect Federal Agencies and Networks with scalable, purpose-built cybersecurity solutions
Learn More - Industries
- Use Cases
-
-
Partners
-
Partner Portal
Access to deal registration, MDF, sales and marketing tools, training and more
Learn MorePartner PortalAccess to deal registration, MDF, sales and marketing tools, training and more
Learn More - SonicWall Partners
- Partner Resources
-
-
Support
-
Support Portal
Find answers to your questions by searching across our knowledge base, community, technical documentation and video tutorials
Learn MoreSupport PortalFind answers to your questions by searching across our knowledge base, community, technical documentation and video tutorials
Learn More - Support
- Resources
- Capture Labs
-
- Company
- Contact Us
How to Expand the Hard Drive of a GMS Virtual Appliance


Description
Learn how to expand the HDD on your GMS virtual appliance with this step-by-step guide. Ensure efficient storage management and system performance.
This article will explain how to expand the logical volume size of a Virtual appliance to grow beyond the 250 GB and 950 GB OVA templates provided on MySonicWall.com. This process does not overwrite the pre-existing data, it will add on more space to the pre-existing Hard Drive.
*This process should not be used to expand the volume of Flow Server agents, or GMS 9.0 deployments installed with Flow Based reporting.
**This process should not be used on GMS versions 8.1 or older. Please upgrade to minimum GMS version 8.2 prior to performing these steps.
Resolution
Add a new virtual Hard Drive
1. Turn off the Virtual Appliance
2. Log into the VMware Web Client or vSphere Client
3. Select Edit Settings for the Virtual Appliance
4. Click the Add button, and select the Hard Disk as the device type then select Next
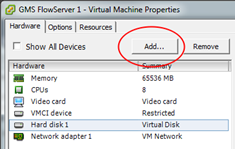
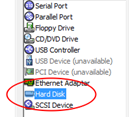
5. Input the size of the disk equal to the amount you would like to expand and select Thick Provision Lazy Zeroed then select next
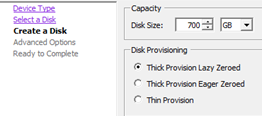
6. Check the radial for the appropriate drive type (match the drive type, SCSI or IDE, currently in use on the Virtual Appliance)

7. Select Finish and turn on the Virtual Machine

Expand the Virtual Hard Drive
1. Contact Technical Support to get the Root SSH password
Best method is to open a Web ticket requesting Root SSH with this KB ID in the Title
2. Check that the disk has been partition by running (should be listed as /dev/sdb1): fdisk -l
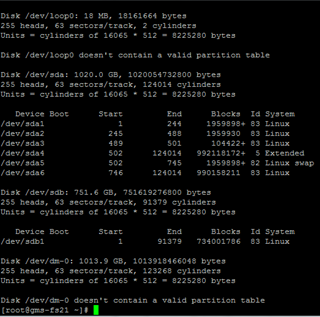
3. First unmount the new device with the command: umount /dev/sdb1
%%% depending on GMS version, this step may not be necessary and return error. That is fine. Continue next step
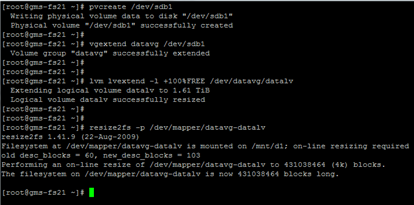
4. Create a Physical Volume (PV) with the following command: pvcreate /dev/sdb1
5. Extend the Volume Group (VG) size to use the new PV with the following command: vgextend datavg /dev/sdb1
6. Extend the Logical Volume (LV) size to use all of the VG free space with the following command: lvm lvextend -l +100%FREE /dev/datavg/datalv
7. Resize the entire file system with the following command: resize2fs -p /dev/mapper/datavg-datalv
(This command can take a little bit depending on the amount of space being added)
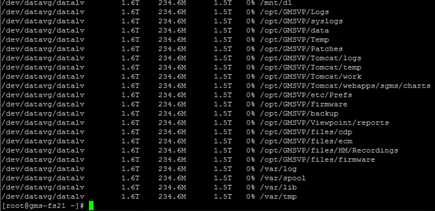
8. Check the size of the disk by running the following command: df -h


 YES
YES NO
NO