-
Products
-
SonicPlatform
SonicPlatform is the cybersecurity platform purpose-built for MSPs, making managing complex security environments among multiple tenants easy and streamlined.
Discover More
-
-
Solutions
-
Federal
Protect Federal Agencies and Networks with scalable, purpose-built cybersecurity solutions
Learn MoreFederalProtect Federal Agencies and Networks with scalable, purpose-built cybersecurity solutions
Learn More - Industries
- Use Cases
-
-
Partners
-
Partner Portal
Access to deal registration, MDF, sales and marketing tools, training and more
Learn MorePartner PortalAccess to deal registration, MDF, sales and marketing tools, training and more
Learn More - SonicWall Partners
- Partner Resources
-
-
Support
-
Support Portal
Find answers to your questions by searching across our knowledge base, community, technical documentation and video tutorials
Learn MoreSupport PortalFind answers to your questions by searching across our knowledge base, community, technical documentation and video tutorials
Learn More - Support
- Resources
- Capture Labs
-
- Company
- Contact Us
How to configure SSLVPN in SonicOSX 7.0 for NSv hosted on Azure or AWS


Description
SSL VPN is a method of allowing Remote Users to connect to the SonicWall and access internal network resources. SSL VPN Connections can be setup with one of three methods:
- The SonicWall NetExtender client
- The SonicWall Mobile Connect client
- SSL VPN bookmarks via the SonicWall Virtual Office
This article details how to setup the SSL VPN Feature for NetExtender and Mobile Connect users, both of which are software based solutions.
NetExtender is available for the following Operating Systems:
- Microsoft Windows
- Linux Distributions
Mobile Connect is available for the following Operating Systems:
- Windows 8.1 & 10
- OS X
- iOS
- Android
Resolution
RESOLUTION FOR SONICOSX 7.0
This release includes significant user interface changes and many new features that are different from the SonicOS 6.5 and earlier firmware. The below resolution is for customers using SonicOSX 7.0 firmware.
Creating an Address Object for the SSL VPN IPv4 Address Range
- Login to the firewall management UI.
- Click Object in the top navigation menu.
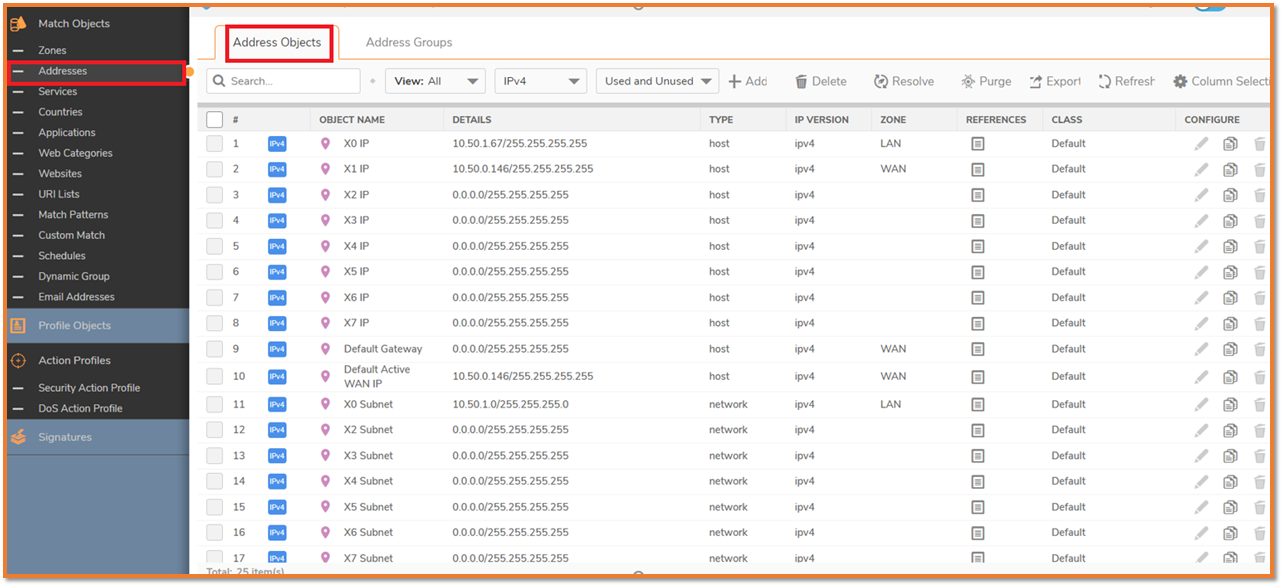
- Navigate to Match Objects |Addresses and click Add at the top of the pane.
NOTE :- Please make sure to create the SSL VPN pool Address object in a completely different subnet ( Different from Azure-VNET/AWS-VPC).
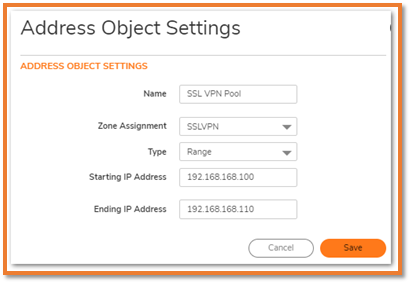
In the pop-up window, enter the information for your SSL VPN Range. An example Range is included below:
- Name: SSL VPN Pool
 TIP: This is only a Friendly Name used for Administration.
 - Zone: SSL VPN
- Type : Range
 NOTE: This does not have to be a range and can be configured as a Host or Network as well. To avoid IP Spoof errors and routing issues, we recommend to use a subnet which is not configured anywhere else on the SonicWall.
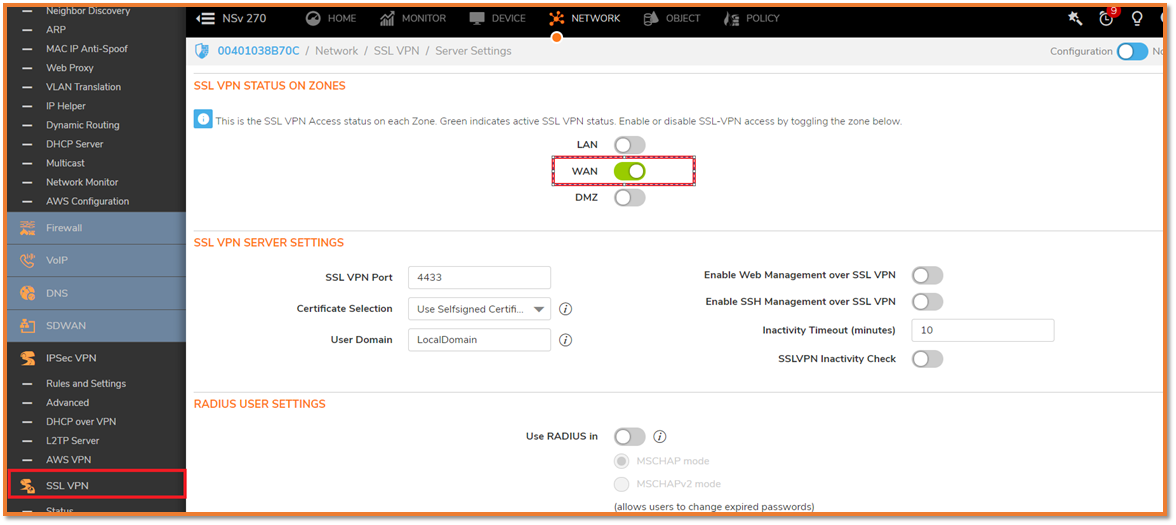
SSL VPN Configuration
- Navigate to the Network |SSL VPN | Server Settings .
- Navigate to SSL VPN STATUS ON ZONES which represents SSL VPN Access status on each Zone.
- Enable or disable SSL-VPN access by toggling the zone below. The Green indicates active SSL VPN status.
- Navigate to SSL VPN SERVER SETTINGS, Select the SSL VPN Port, and Domain as desired.
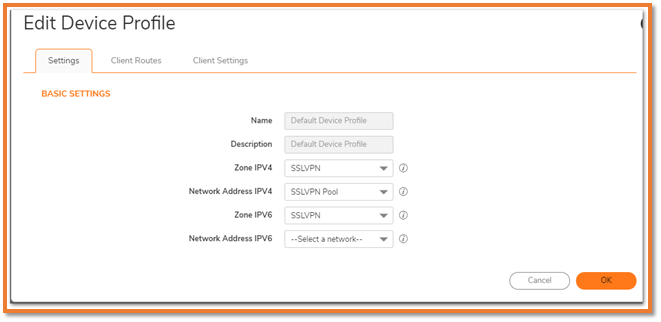
- Navigate to the Network|SSL VPN|Client Settings and Select configure Default Device Profile.
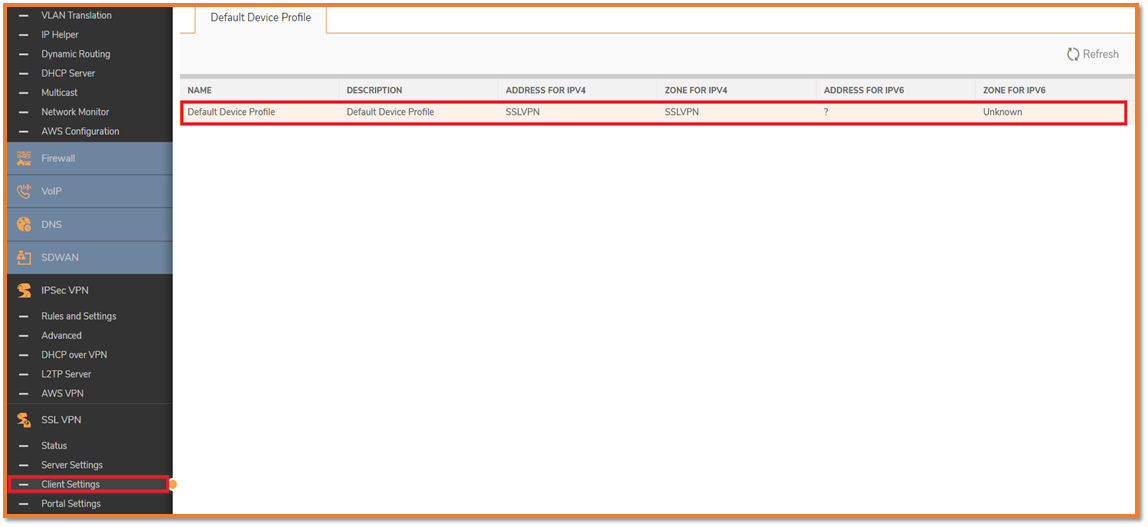
- Set the Zone IP V4 as SSL VPN and Network Address IP V4 as the Address Object you created earlier.
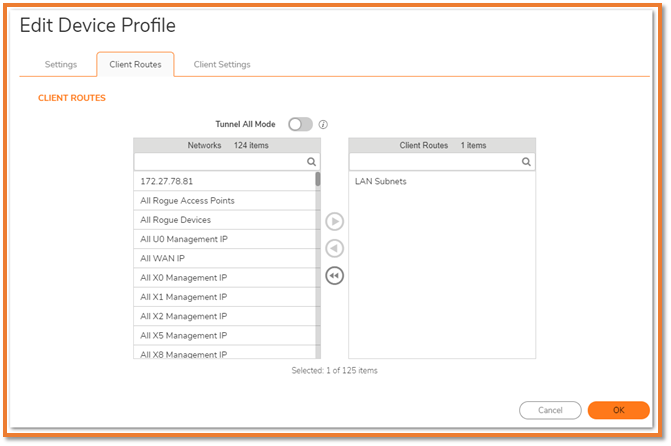
- The Client Routes tab allows the administrator to control what network access SSL VPN Users are allowed. The NetExtender client routes are passed to all NetExtender clients and are used to govern which networks and resources remote users can access via the SSL VPN connection.
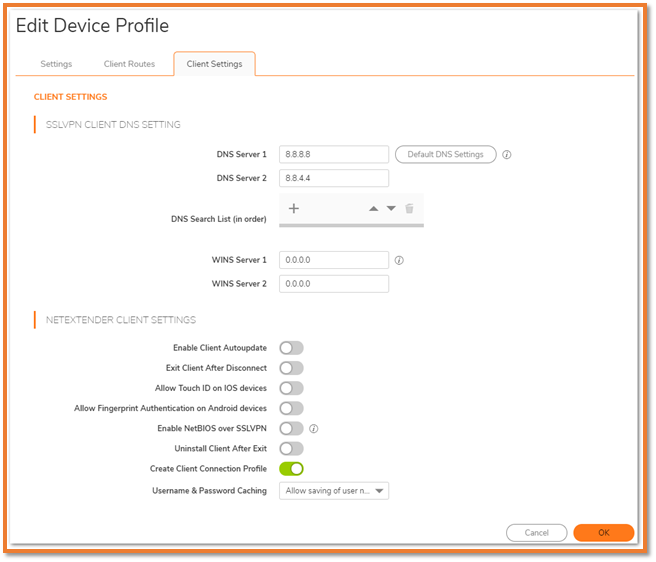
- The Client Settings tab allows the administrator to input DNS, WINS, and Suffix information while also controlling the caching of passwords, user names, and the behavior of the NetExtender Client to access domain resources by name.
- Enable Create Client Connection Profile - The NetExtender client will create a connection profile recording the SSL VPN Server name, the Domain name and optionally the username and password.
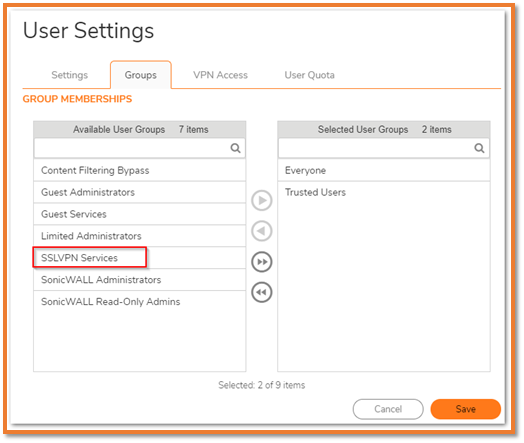
Adding Users to SSL VPN Services Group
NetExtender Users may either authenticate as a Local User on the SonicWall or as a member of an appropriate Group through LDAP.
On the Groups tab add SSL VPN Services to the Member Of: field.
- On the VPN Access tab add the relevant Subnets, Range, or IP Address Address Objects that match what the User needs access to via NetExtender.
 NOTE: SSL VPN Users will only be able to access resources that match both their VPN Access and Client Routes.
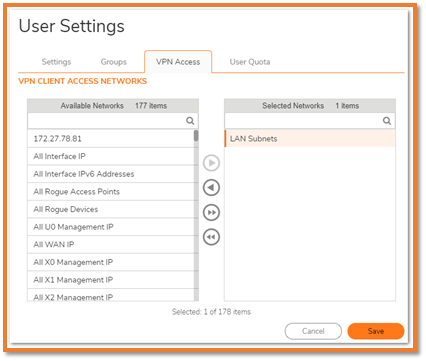
- Click on Save and close the window.
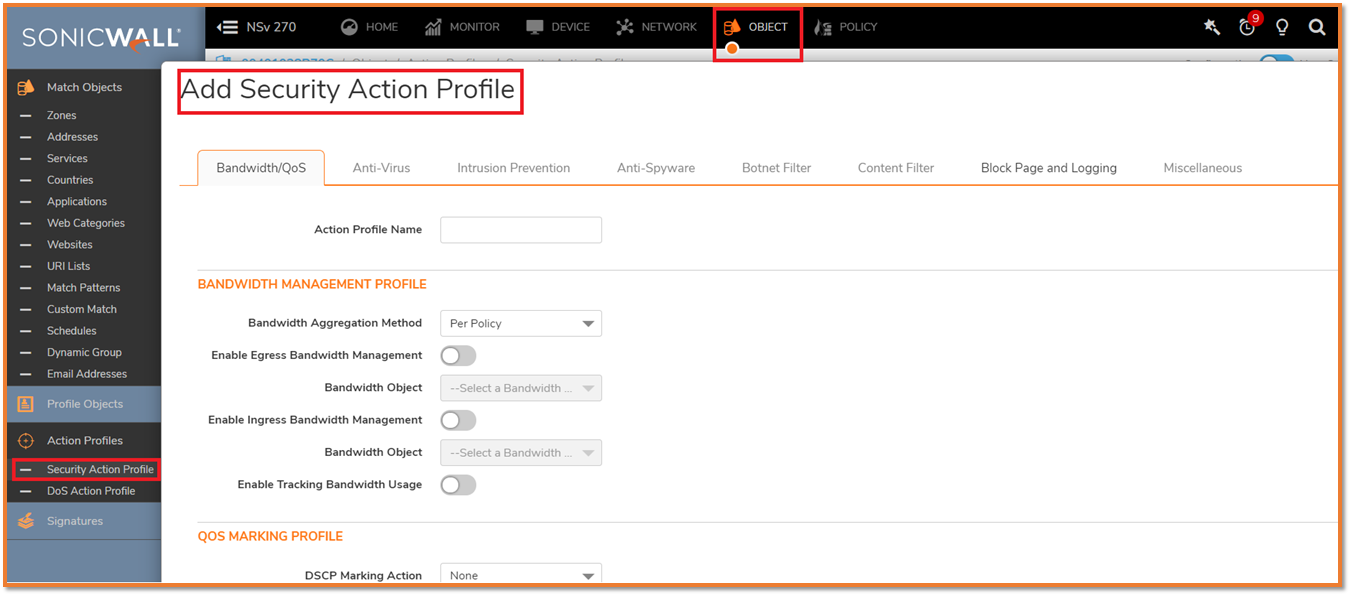
Navigate to the Object|Action Profiles|Security Action profile and add Security Action Profile "SSLVPN" (Enabling Interested Security Services).
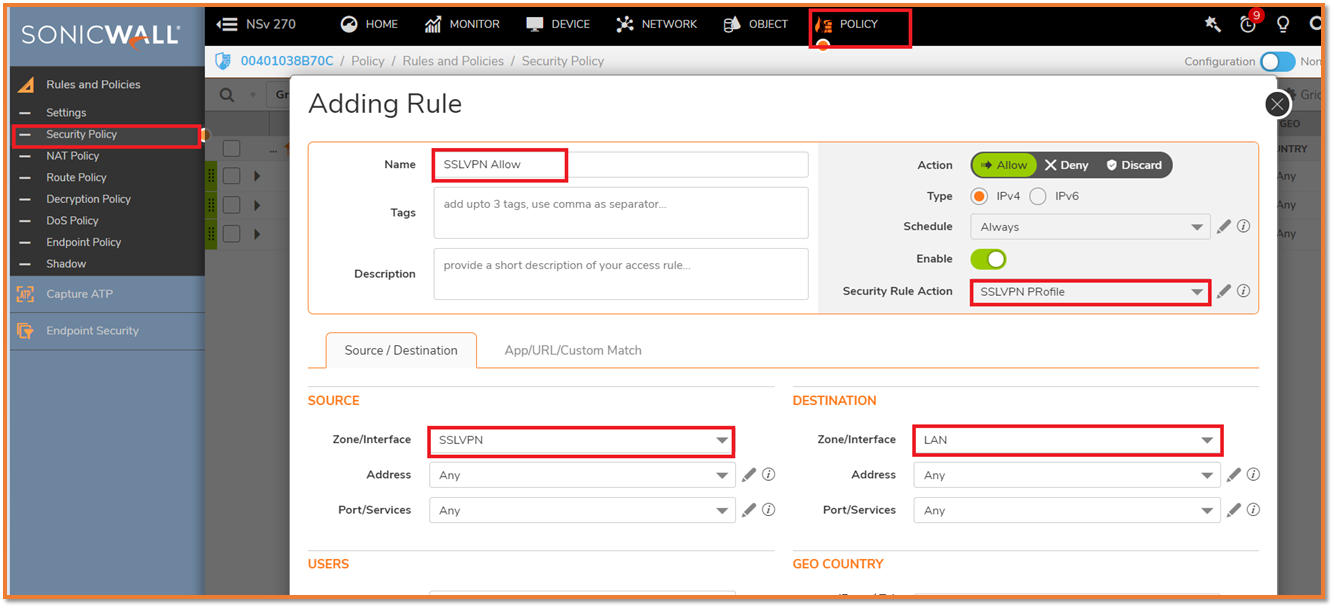
Navigate to the Policy|Security Policy and add Security Policy Rule "SSLVPN Allow" with Source as "SSLVPN" and Destination as "LAN" to allow interested Traffic.
Related Articles
- Error:"Invalid API Argument" when modifying the access rules
- Cysurance Partner FAQ
- Configure probe monitoring for WAN Failover and Loadbalancing - SonicWall UTM
Categories
- Firewalls > NSv Series > Azure
- Firewalls > NSv Series > SSLVPN
- Firewalls > NSv Series > AWS


 YES
YES NO
NO