-
Products
-
SonicPlatform
SonicPlatform is the cybersecurity platform purpose-built for MSPs, making managing complex security environments among multiple tenants easy and streamlined.
Discover More
-
-
Solutions
-
Federal
Protect Federal Agencies and Networks with scalable, purpose-built cybersecurity solutions
Learn MoreFederalProtect Federal Agencies and Networks with scalable, purpose-built cybersecurity solutions
Learn More - Industries
- Use Cases
-
-
Partners
-
Partner Portal
Access to deal registration, MDF, sales and marketing tools, training and more
Learn MorePartner PortalAccess to deal registration, MDF, sales and marketing tools, training and more
Learn More - SonicWall Partners
- Partner Resources
-
-
Support
-
Support Portal
Find answers to your questions by searching across our knowledge base, community, technical documentation and video tutorials
Learn MoreSupport PortalFind answers to your questions by searching across our knowledge base, community, technical documentation and video tutorials
Learn More - Support
- Resources
- Capture Labs
-
- Company
- Contact Us
How to configure Certificate Administration


Description
This document details the best practices to follow in a UC-APL Military Unique Deployment, including deploying appliances, setting policies, and other issues to consider for TNs 1435001, 1435002.
Resolution
Resolution for SonicOS 7.X
This release includes significant user interface changes and many new features that are different from the SonicOS 6.5 and earlier firmware. The below resolution is for customers using SonicOS 7.X firmware.
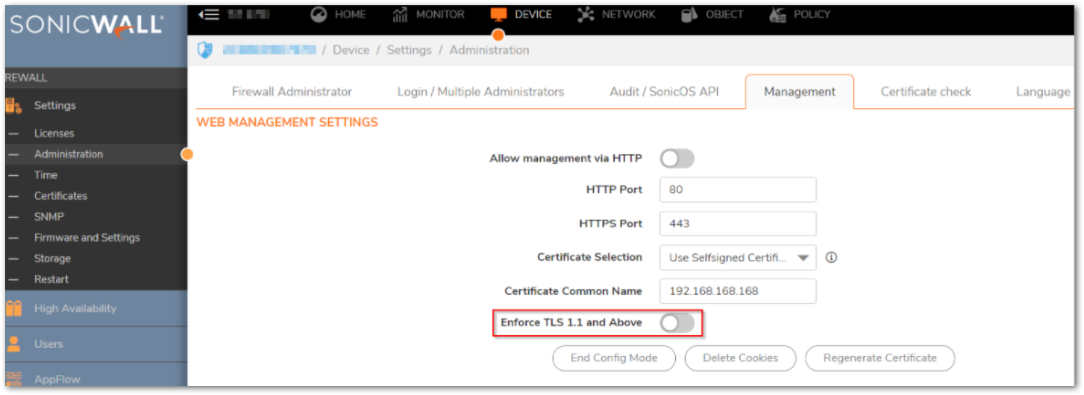
To enforce TLS1.1 and above, complete the following steps:
- Navigate to DEVICE | Settings | Administration | Management, click Enforce TLS.1.1. This requires a system reboot of the firewall to take effect.
- Enable Certificate Expiration Check:
i. Under ‘Check certificate expiration settings’, check ‘Enable periodic expiration check
ii. Set ‘Certificate Expiration alert interval’ to 24
iii. Click ‘Accept’ (NOTE: a reboot may be required)
- Optionally set an OCSP server to validate the CA root cert. This is done within the CA certificate itself.
a. Select the ‘Import’ icon for the CA root cert and import the CRL associated with this root cert and import the CRL associated with this root certificate.
b. In the CRL Import Screen, select ‘Periodically auto-import CRL via HTTP’ button and enter the CRL server URL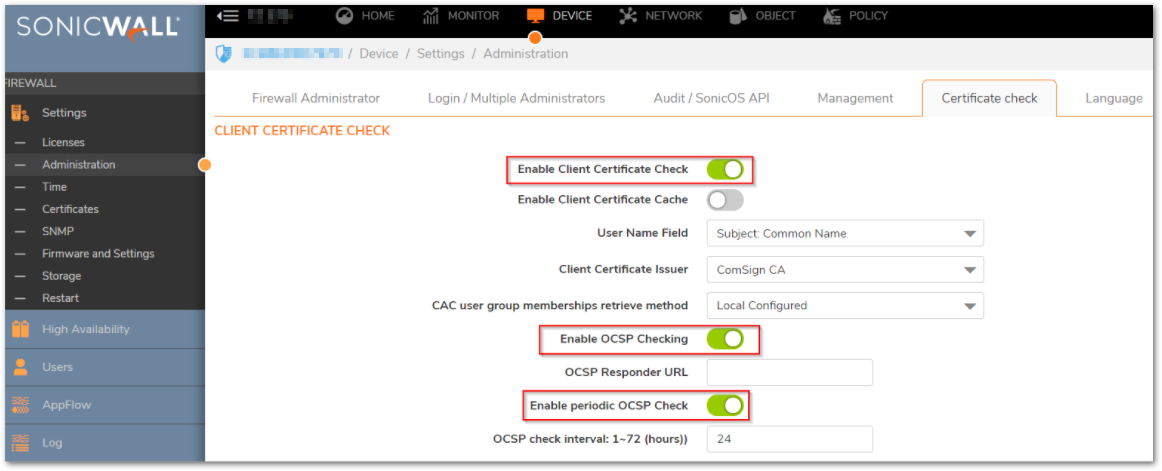
Generating a Certificate Signing Request
To generate certificate signing requests, complete the following steps:
- Navigate to Device | Settings | Certificates and click New Signing Request.
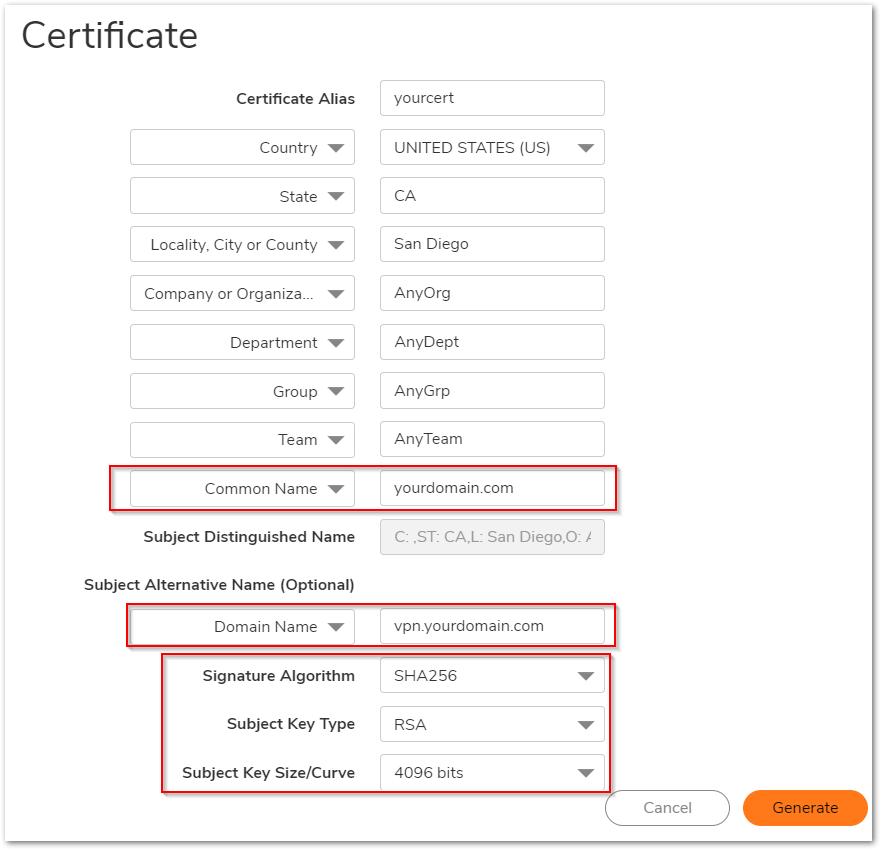
- In the Generate Certificate Signing Request section, enter the fully qualified domain name (FQDN) of the appropriate firewall for the certificate in the Certificate Alias, the Common Name, and the Domain Name fields.
- Select the Request field type from the menu, and then enter information for the certificate in the Request fields. As you enter information in the Request fields, the Distinguished Name (DN) is created in the Subject Distinguished Name field.
- You can also attach an optional Subject Alternative Name to the certificate such as the Domain, Name or E-mail Address.
- The Subject Key type is preset as an RSA algorithm. RSA is a public key cryptographic 19 algorithm used for encrypting data.
- Select a subject key size from the Subject Key Size menu.
- Click Generate to create a certificate signing request file. After the Certificate Signing Request is generated, a message describing the result is displayed.
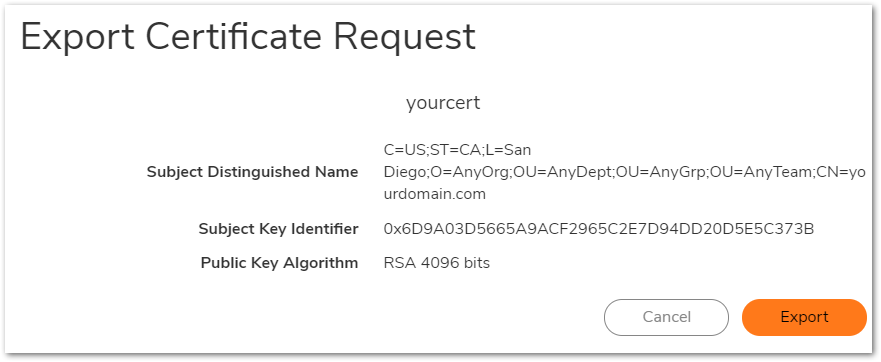
- Click Export to download the file to your computer, then click Save to save it to a directory on your computer. You have generated the Certificate Signing Request that you can send to your Certificate Authority to be signed.
- Log in to the certificate authority server such as https://mycertificateauthority.net/certsrv and upload the CSR to be signed by the certificate authority. The CSR must be signed using the “web server” extension.
- Download the signed certificate from the certificate authority (to your workstation) and then upload the signed certificate into the firewall.
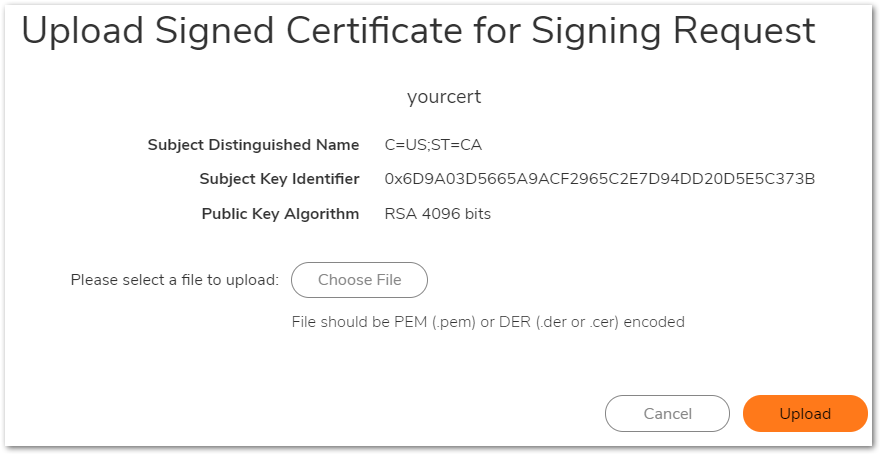
To Import the Root CA Certificate:
- Navigate to Device | Settings | Certificates
- Click the ‘Import’ button
1. Under ‘Import Certificate’, click ‘Import a CA certificate from a PKC#7, PEM or DER
encoded file
2. Choose File
3. Navigate to certificate repository and select CA root certificate file
4. Click ‘Import’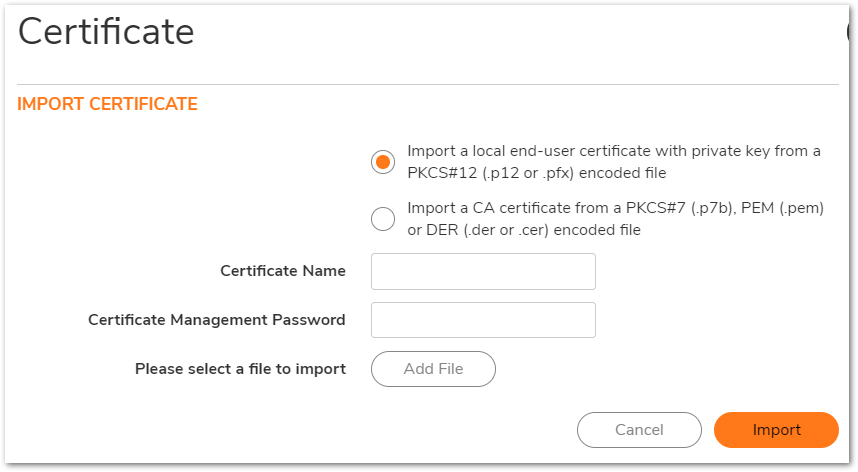
- Repeat the above process for any additional certificates (i.e. Local, CAC or PKI)
Resolution for SonicOS 6.5
This release includes significant user interface changes and many new features that are different from the SonicOS 6.2 and earlier firmware. The below resolution is for customers using SonicOS 6.5 firmware.
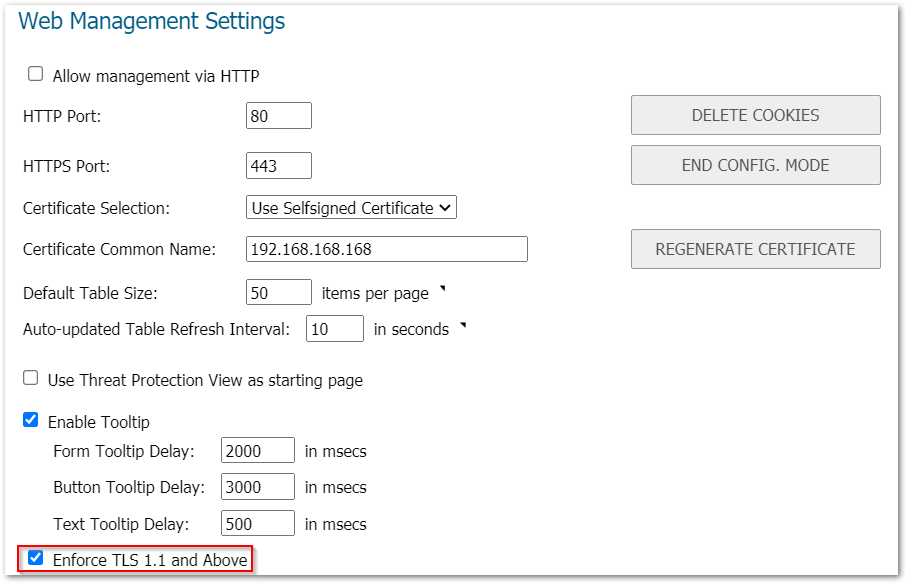
To enforce TLS1.1 and above, complete the following steps:
- Navigate to MANAGE | Appliance | Base Settings, click Enforce TLS.1.1. This requires a system reboot of the firewall to take effect.
- Enable Certificate Expiration Check:
i. Under ‘Check certificate expiration settings’, check ‘Enable periodic expiration check
ii. Set ‘Certificate Expiration alert interval’ to 24
iii. Click ‘Accept’ (NOTE: a reboot may be required)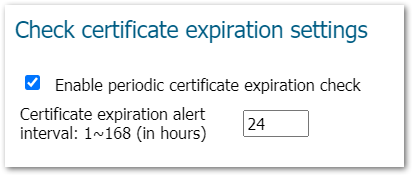
- Optionally set an OCSP server to validate the CA root cert. This is done within the CA certificate itself.
a. Select the ‘Import’ icon for the CA root cert and import the CRL associated with this root cert and import the CRL associated with this root certificate.
b. In the CRL Import Screen, select ‘Periodically auto-import CRL via HTTP’ button and enter the CRL server URL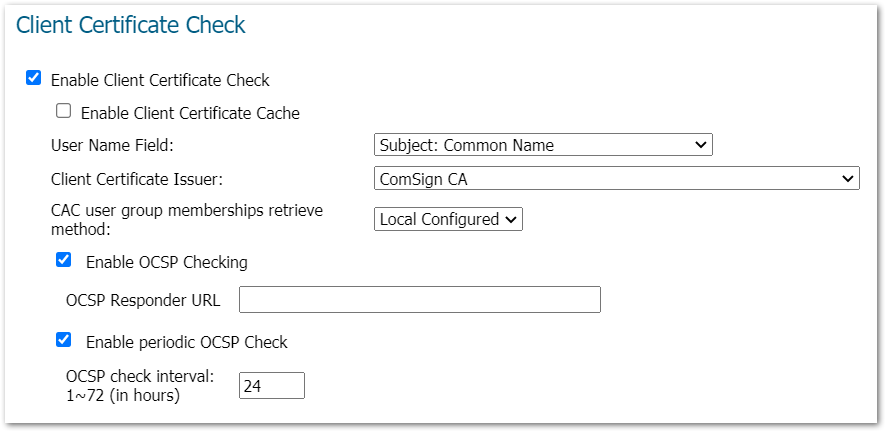
Generating a Certificate Signing Request
To generate certificate signing requests, complete the following steps:
- Navigate to Device | Settings | Certificates and click New Signing Request.
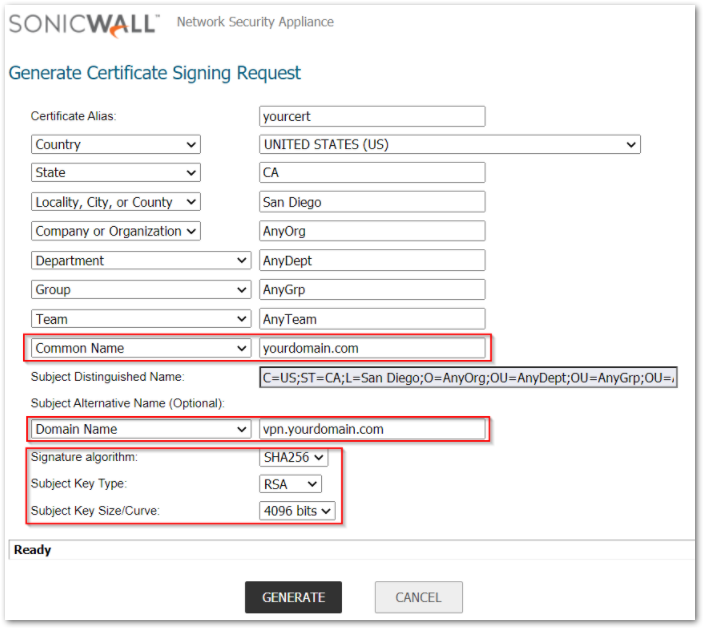
- In the Generate Certificate Signing Request section, enter the fully qualified domain name (FQDN) of the appropriate firewall for the certificate in the Certificate Alias, the Common Name, and the Domain Name fields.
- Select the Request field type from the menu, and then enter information for the certificate in the Request fields. As you enter information in the Request fields, the Distinguished Name (DN) is created in the Subject Distinguished Name field.
- You can also attach an optional Subject Alternative Name to the certificate such as the Domain, Name or E-mail Address.
- The Subject Key type is preset as an RSA algorithm. RSA is a public key cryptographic 19 algorithm used for encrypting data.
- Select a subject key size from the Subject Key Size menu.
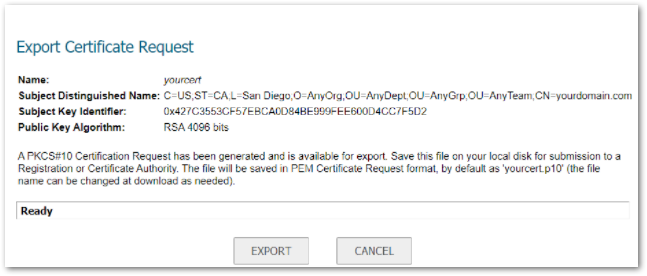
- Click Generate to create a certificate signing request file. After the Certificate Signing Request is generated, a message describing the result is displayed.
- Click Export to download the file to your computer, then click Save to save it to a directory on your computer. You have generated the Certificate Signing Request that you can send to your Certificate Authority to be signed.
- Log in to the certificate authority server such as https://mycertificateauthority.net/certsrv and upload the CSR to be signed by the certificate authority. The CSR must be signed using the “web server” extension.
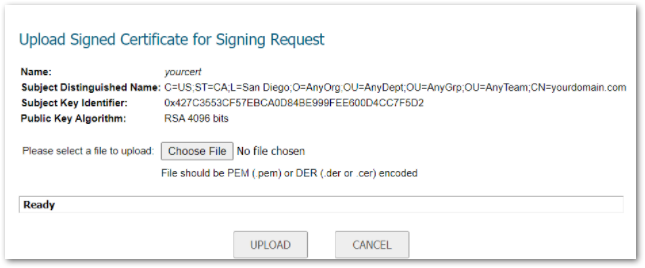
- Download the signed certificate from the certificate authority (to your workstation) and then upload the signed certificate into the firewall.
To Import the Root CA Certificate:
- Navigate to Device | Settings | Certificates
- Click the ‘Import’ button
1. Under ‘Import Certificate’, click ‘Import a CA certificate from a PKC#7, PEM or DER
encoded file
2. Choose File
3. Navigate to certificate repository and select CA root certificate file
4. Click ‘Import’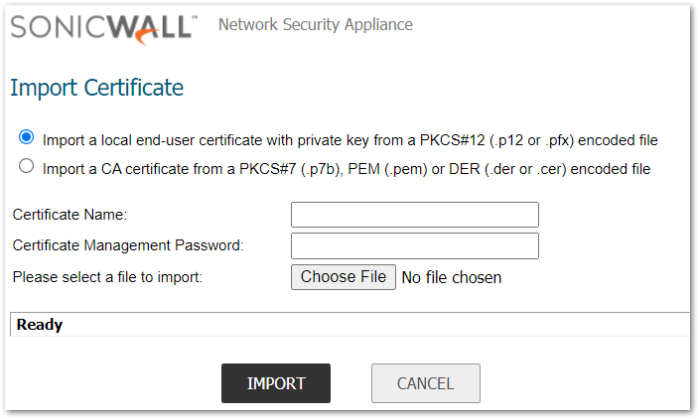
- Repeat the above process for any additional certificates (i.e. Local, CAC or PKI)
Related Articles
- Error:"Invalid API Argument" when modifying the access rules
- Cysurance Partner FAQ
- Configure probe monitoring for WAN Failover and Loadbalancing - SonicWall UTM
Categories
- Firewalls > SonicWall SuperMassive 9000 Series
- Firewalls > SonicWall NSA Series
- Firewalls > TZ Series


 YES
YES NO
NO