-
Products
-
SonicPlatform
SonicPlatform is the cybersecurity platform purpose-built for MSPs, making managing complex security environments among multiple tenants easy and streamlined.
Discover More
-
-
Solutions
-
Federal
Protect Federal Agencies and Networks with scalable, purpose-built cybersecurity solutions
Learn MoreFederalProtect Federal Agencies and Networks with scalable, purpose-built cybersecurity solutions
Learn More - Industries
- Use Cases
-
-
Partners
-
Partner Portal
Access to deal registration, MDF, sales and marketing tools, training and more
Learn MorePartner PortalAccess to deal registration, MDF, sales and marketing tools, training and more
Learn More - SonicWall Partners
- Partner Resources
-
-
Support
-
Support Portal
Find answers to your questions by searching across our knowledge base, community, technical documentation and video tutorials
Learn MoreSupport PortalFind answers to your questions by searching across our knowledge base, community, technical documentation and video tutorials
Learn More - Support
- Resources
- Capture Labs
-
- Company
- Contact Us
How can I block HTTPS (SSL) sites using SonicWall DPI-SSL and Content Filter Service (CFS 4.0)?


Description
This article explains how we can use Deep Packet Inspection to perform Content Filtering on HTTPS websites.
Deep Packet Inspection of Secure Socket Layer (DPI-SSL) extends SonicWall's Deep Packet Inspection technology to allow for the inspection of encrypted HTTPS traffic and other SSL-based traffic.Normally, without DPI-SSL, HTTPS traffic cannot be blocked by SonicWall Security Services. However, with SonicWall DPI-SSL feature, the SSL traffic is decrypted by the SonicWall for inspection, thus enabling SonicWall to inspect traffic and enforce any Security Services prevention on it. This article describes how to block https://www.bing.com using SonicWall Content Filtering (CFS4.0) when DPI-SSL is enabled.
Resolution
Resolution for SonicOS 7.X
This release includes significant user interface changes and many new features that are different from the SonicOS 6.5 and earlier firmware. The below resolution is for customers using SonicOS 7.X firmware.
In this section we will enable DPI-SSL Client Inspection. The Client DPI-SSL deployment scenario typically is used to inspect HTTPS traffic when clients on the LAN browse content located on the WAN.
For the purpose of this article we will be using Default SonicWall DPI-SSL Certificate Authority (CA) Certificate as the re-signing authority. Users should be instructed to add the certificate to their browser's trusted list to avoid certificate trust errors.
- Login to the SonicWall management GUI.
- Navigate to POLICY| DPI-SSL | Client SSL Deployment.
- On the Client SSL page, check the box under Enable SSL Client Inspection.
- Check the box under Content Filter

Now that DPI-SSL Client Inspection is enabled, the firewall will be able to apply CFS policies on the clear-text portion of the SSL encrypted payload passing through it.Adding Certificates to Browsers
 NOTE: To avoid certificate trust errors and to enable the re-signing certificate authority to successfully re-sign certificates, browsers would have to trust this certificate authority. Such trust can be established by having re-signing certificate imported into the browser's trusted CA list.
 - Navigate to POLICY| DPI-SSL | Client SSL Deployment | Certificate page, and click (download) link to download the Default SonicWall DPI-SSL Certificate Authority (CA) Certificate.

Import the certificate into a browser such as Chrome, In Chrome address bar, input chrome://settings, click Manage certificates button under HTTPS/SSL.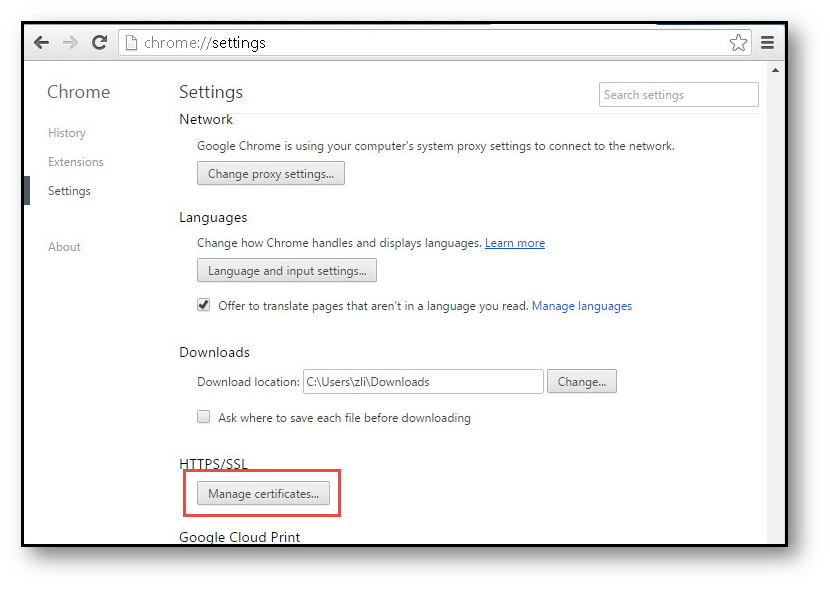
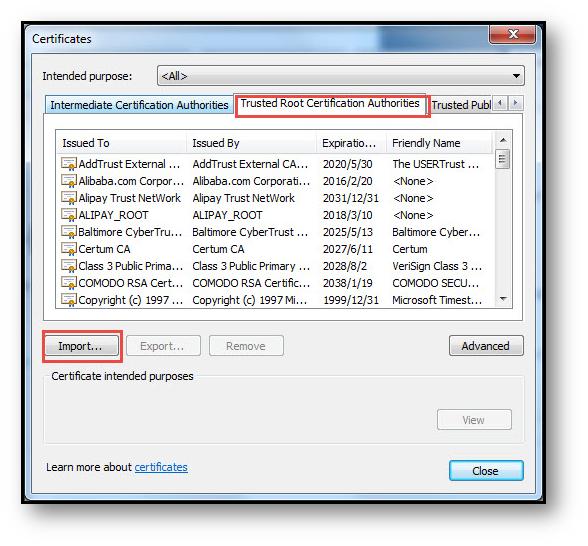
Click the Trusted Root Certification Authorities tab, and click Import. The Certificate Import Wizard will guide you through importing the certificate.


Configuring SonicWall Content Filter
- Navigate to OBJECT| URI LISTS.
- Create URI List Object for bing.com by selecting Add under URI List Objects.

- Create CFS Profile object for bing.com by selecting Add under CFS Profile Objects.

- Navigate to the Policy| Security Services | Content Filter page.
- Check the box next to Enable Content Filtering Service.

- Navigate to the Policy| Rules and Policies | Content Filter policies page.
- Create a new Content Filtering Policy. Here we have created a policy that uses the CFS profile.

How to Test
- Open Chrome browser and enter https://bing.com. A CFS blocked page will appear as under.
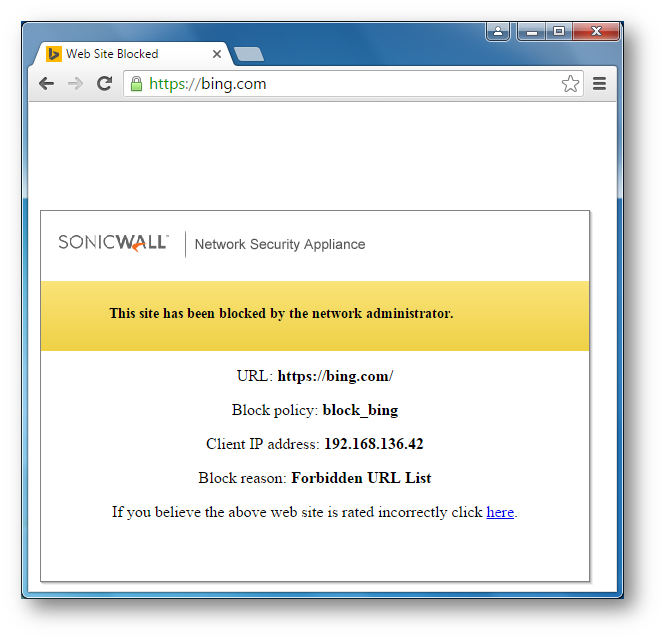
 NOTE: If this is being done from the same computer as the one which is logged into the SonicWall Management GUI, make sure you are logged out before testing. Otherwise, you need go to Security | Content Filter, check the box next to Exclude Administrator under CFS Exclusion section.
- Open Chrome browser and enter https://bing.com. A CFS blocked page will appear as under.
Resolution for SonicOS 6.5
This release includes significant user interface changes and many new features that are different from the SonicOS 6.2 and earlier firmware. The below resolution is for customers using SonicOS 6.5 firmware.
In this section we will enable DPI-SSL Client Inspection. The Client DPI-SSL deployment scenario typically is used to inspect HTTPS traffic when clients on the LAN browse content located on the WAN.
For the purpose of this article we will be using Default SonicWall DPI-SSL Certificate Authority (CA) Certificate as the re-signing authority. Users should be instructed to add the certificate to their browser's trusted list to avoid certificate trust errors.
- Login to the SonicWall management GUI.
- Navigate to Manage | Deep Packet Inspection | Client SSL Deployment.
- On the Client SSL page, check the box under Enable SSL Client Inspection.
- Check the box under Content Filter.

- Now that DPI-SSL Client Inspection is enabled, the firewall will be able to apply CFS policies on the clear-text portion of the SSL encrypted payload passing through it.
Adding Certificates to Browsers
 NOTE: To avoid certificate trust errors and to enable the re-signing certificate authority to successfully re-sign certificates, browsers would have to trust this certificate authority. Such trust can be established by having re-signing certificate imported into the browser's trusted CA list.
- Navigate to Manage | Deep Packet Inspection | Client SSL Deployment | Certificate page, click (download) link to download the Default SonicWall DPI-SSL Certificate Authority (CA) Certificate.
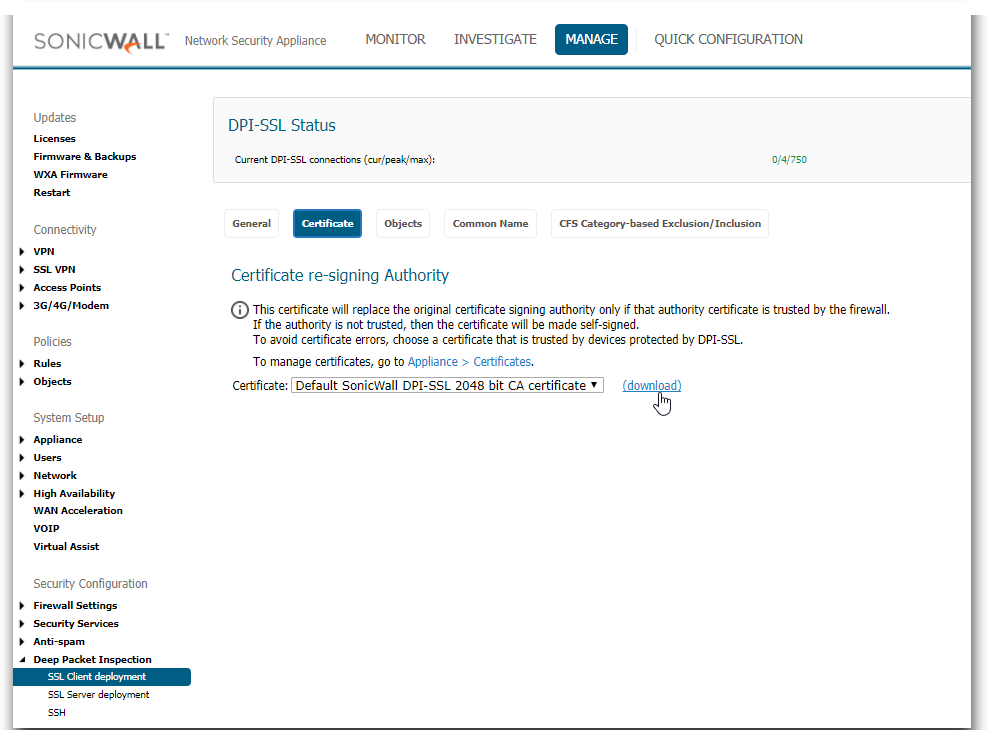
- Import the certificate into a browser such as Chrome, In Chrome address bar, input chrome://settings, click Manage certificates button under HTTPS/SSL.


- Click the Trusted Root Certification Authorities tab, and click Import. The Certificate Import Wizard will guide you through importing the certificate.
 |
 |
 |
 |
Configuring SonicWall Content Filter
- Navigate to Firewall | Content Filter Objects.
- Create URI List Object for bing.com by selecting Add under URI List Objects.

- Create CFS Profile object for bing.com by selecting Add under CFS Profile Objects.
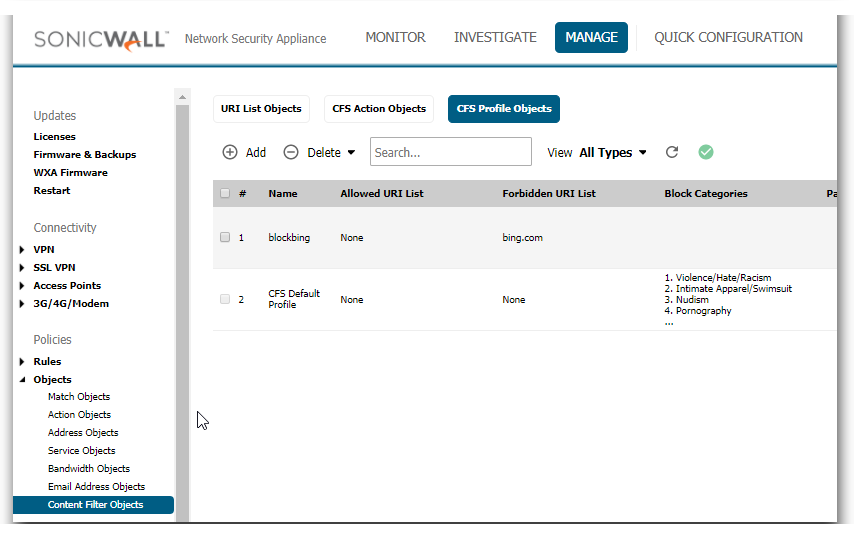
- Navigate to Security Services | Content Filter page.

- Check the box next to Enable Content Filtering Service.
- Create a new Content Filtering Policy. Here we have created a policy which uses the CFS profile.

How to Test
- Open Chrome browser and enter https://bing.com. A CFS blocked page will appear as under.

 NOTE: If this is being done from the same computer as the one which is logged into the SonicWall Management GUI, make sure you are logged out before testing. Otherwise, you need go to Security | Content Filter, check the box next to Exclude Administrator under CFS Exclusion section.
Resolution for SonicOS 6.2 and Below
The below resolution is for customers using SonicOS 6.2 and earlier firmware. For firewalls that are generation 6 and newer we suggest to upgrade to the latest general release of SonicOS 6.5 firmware.
In this section we will enable DPI-SSL Client Inspection. The Client DPI-SSL deployment scenario typically is used to inspect HTTPS traffic when clients on the LAN browse content located on the WAN.
For the purpose of this article we will be using Default SonicWall DPI-SSL Certificate Authority (CA) Certificate as the re-signing authority. Users should be instructed to add the certificate to their browser's trusted list to avoid certificate trust errors.
- Login to the SonicWall management GUI.
- Navigate to DPI-SSL | Client SSL.
- On the Client SSL page, check the box under Enable SSL Client Inspection.
- Check the box under Content Filter.

- Now that DPI-SSL Client Inspection is enabled, the firewall will be able to apply CFS policies on the clear-text portion of the SSL encrypted payload passing through it.
Adding Certificates to Browsers
 NOTE: To avoid certificate trust errors and to enable the re-signing certificate authority to successfully re-sign certificates, browsers would have to trust this certificate authority. Such trust can be established by having re-signing certificate imported into the browser's trusted CA list.
- In the DPI-SSL | Client SSL page, click download link to download the Default SonicWall DPI-SSL Certificate Authority (CA) Certificate.

- Import the certificate into a browser such as Chrome, In Chrome address bar, input chrome://settings, click Manage certificates button under HTTPS/SSL.


- Click the Trusted Root Certification Authorities tab, and click Import. The Certificate Import Wizard will guide you through importing the certificate.
 |
 |
 |
 |
Configuring SonicWall Content Filter
- Navigate to Firewall | Content Filter Objects.
- Create URI List Object for bing.com by selecting Add under URI List Objects.
- Create CFS Profile object for bing.com by selecting Add under CFS Profile Objects.

- Navigate to Security Services | Content Filter page.

- Check the box next to Enable Content Filtering Service.
- Create a new Content Filtering Policy. Here we have created a policy which uses the CFS profile.
How to Test:
- Open Chrome browser and enter https://bing.com. A CFS blocked page will appear as under.

 NOTE: If this is being done from the same computer as the one which is logged into the SonicWall Management GUI, make sure you are logged out before testing. Otherwise, navigate to Security | Content Filter, check the box next to Exclude Administrator under CFS Exclusion section.
Related Articles
- Error:"Invalid API Argument" when modifying the access rules
- Cysurance Partner FAQ
- Configure probe monitoring for WAN Failover and Loadbalancing - SonicWall UTM
Categories
- Firewalls > TZ Series > DPI-SSL
- Firewalls > NSa Series > Client/Server DPI-SSL
- Firewalls > NSa Series > Content Filtering Service
- Firewalls > TZ Series > Content Filtering Service
- Firewalls > NSv Series > Client/Server DPI-SSL


 YES
YES NO
NO