-
Products
-
SonicPlatform
SonicPlatform is the cybersecurity platform purpose-built for MSPs, making managing complex security environments among multiple tenants easy and streamlined.
Discover More
-
-
Solutions
-
Federal
Protect Federal Agencies and Networks with scalable, purpose-built cybersecurity solutions
Learn MoreFederalProtect Federal Agencies and Networks with scalable, purpose-built cybersecurity solutions
Learn More - Industries
- Use Cases
-
-
Partners
-
Partner Portal
Access to deal registration, MDF, sales and marketing tools, training and more
Learn MorePartner PortalAccess to deal registration, MDF, sales and marketing tools, training and more
Learn More - SonicWall Partners
- Partner Resources
-
-
Support
-
Support Portal
Find answers to your questions by searching across our knowledge base, community, technical documentation and video tutorials
Learn MoreSupport PortalFind answers to your questions by searching across our knowledge base, community, technical documentation and video tutorials
Learn More - Support
- Resources
- Capture Labs
-
- Company
- Contact Us
How can I restrict admin access to the device?


Description
In this article we will be discussing how to restrict Admin access to the device so that the device is secure and the changes are done only by authorized personnel. We will also limit access only from a particular IP address or a range of IP addresses so that only those IP addresses can access the device.
Resolution
Resolution for SonicOS 7.X
This release includes significant user interface changes and many new features that are different from the SonicOS 6.5 and earlier firmware. The below resolution is for customers using SonicOS 7.X firmware.
Admin access from the LAN
- Navigate to Network| System | Interfaces.
- Edit the LAN interface by clicking on
button.
- Enable the HTTPS check box for Management.
- Check the box Add rule to enable redirect from HTTP to HTTPS.

At this point, all the devices on the LAN zone should be able to get to the management page(login page) of the device. To restrict the management so that the device responds only to a particular IP or a Group of IP, an access rule is needed.
To create an access rule, we would need to create an address objects with the required IP addresses. To create an address object
- Navigate to Object | Match Objects | Addresses.
- Click Add.
- Give a friendly name in the Name field.
- Select the Zone as LAN or any zone from which you need to access the SonicWall.
- Type needs to be set to Host if you need to give access to the management page for just one IP address or you can use the type as range if you need to give access to the device to a range of IP addresses.
- Enter the IP address in the IP address field.

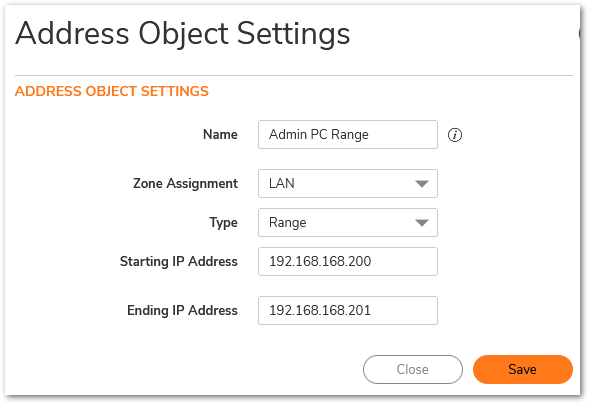
Once the Address objects are created
- Navigate to Policy |Rules and Policies | Access Rules.
- Click on Drop down boxes(radio button).
- From LAN to LAN.
- You will see two auto created management rules here.

- Edit both the rules and select the required address object in the source field and click OK to save the settings.

- At this point, only the Admin PC will be able to access the SonicWall's management page and login to the device.
Admin access from the WAN
Admin access from the WAN is needed only if you need remote access to the device. If you are not going to access the device from the outside world, it is recommended to disable the Management on the WAN interface. In this section, we will consider a scenario where you need access to the device only from your home. An address object needs to be created and the IP address will be the public IP address of your home network. You can find this using third party websites ipchicken.com or whatismyip.com.
- Navigate to Network | System | Interfaces.
- Edit the WAN interface by clicking on
button.
- Enable the HTTPS check box for management. Once you enable HTTP checkbox, you will get a warning, Please read and click OK to continue.
- Check the box Add rule to enable redirect from HTTP to HTTPS.
- Click OK .

At this point, any device on the WAN zone should be able to get to the management page(login page) of the device. To restrict the management so that the device responds only to a particular IP or a Group of IP, an access rule is needed from zone WAN to WAN.
- Navigate to Policy |Rules and Policies | Access Rules.
- Click on Drop down boxes(radio button).
- From WAN to WAN.
- You will see two auto created management rules here as well.
- Edit both the rules and select the required address object in the source field and click OK to save the settings.

- At this point, only the Home PC will be able to access the SonicWall's management page and login to the device.
Resolution for SonicOS 6.5
This release includes significant user interface changes and many new features that are different from the SonicOS 6.2 and earlier firmware. The below resolution is for customers using SonicOS 6.5 firmware.
Admin access from the LAN
- Navigate to Manage | Network | Interfaces.
- Edit the LAN interface by clicking on
button.
- Enable the HTTPS check box for Management.
- Check the box Add rule to enable redirect from HTTP to HTTPS.
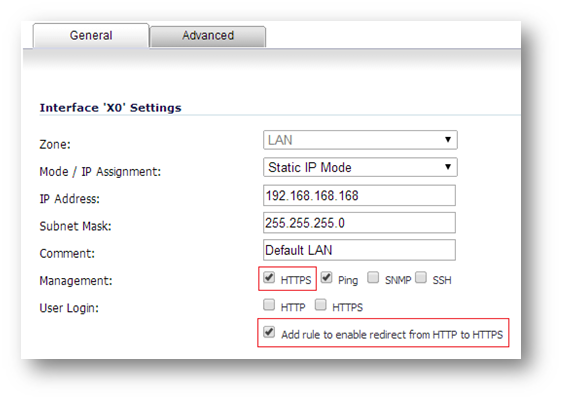
At this point, all the devices on the LAN zone should be able to get to the management page(login page) of the device. To restrict the management so that the device responds only to a particular IP or a Group of IP, an access rule is needed.
To create an access rule, we would need to create an address objects with the required IP addresses. To create an address object
- Navigate to Manage | Policies | Objects | Address Objects.
- Click Add.
- Give a friendly name in the Name field.
- Select the Zone as LAN or any zone from which you need to access the SonicWall.
- Type needs to be set to Host if you need to give access to the management page for just one IP address or you can use the type as range if you need to give access to the device to a range of IP addresses.
- Enter the IP address in the IP address field.
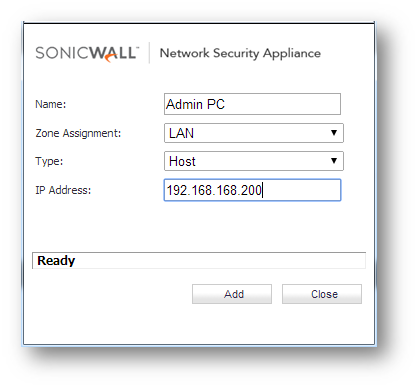
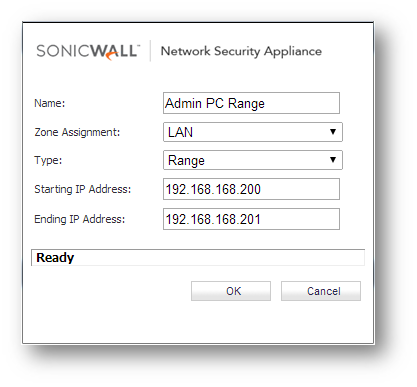
Once the Address objects are created
- Navigate to Manage | Policies | Rules | Access Rules.
- Click on Drop down boxes(radio button).
- From LAN to LAN.
- You will see two auto created management rules here.

- Edit both the rules and select the required address object in the source field and click OK to save the settings.

- At this point, only the Admin PC will be able to access the SonicWall's management page and login to the device.
Admin access from the WAN
Admin access from the WAN is needed only if you need remote access to the device. If you are not going to access the device from the outside world, it is recommended to disable the Management on the WAN interface. In this section, we will consider a scenario where you need access to the device only from your home. An address object needs to be created and the IP address will be the public IP address of your home network. You can find this using third party websites ipchicken.com or whatismyip.com.
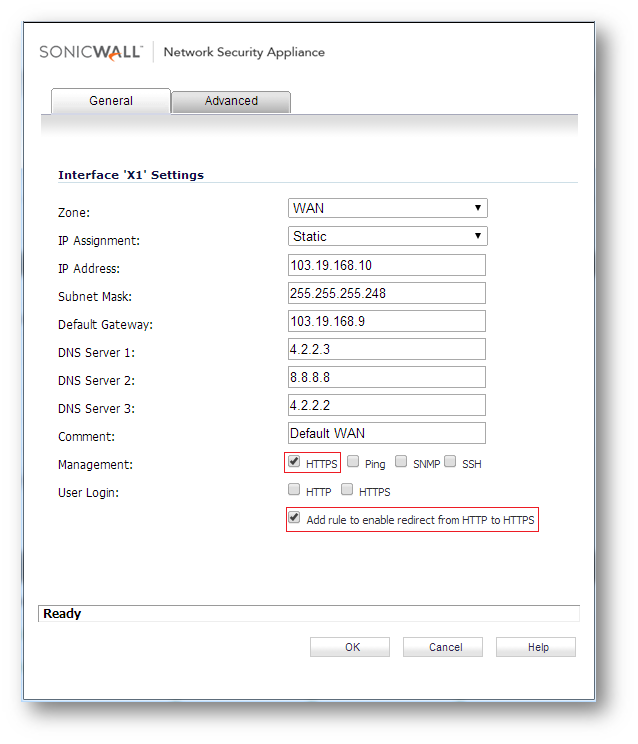
- Navigate to Manage | Network | Interfaces.
- Edit the WAN interface by clicking on
button.
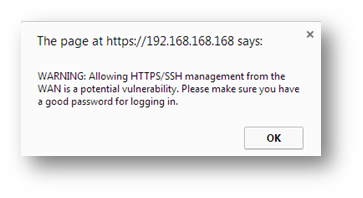
- Enable the HTTPS check box for management. Once you enable HTTP checkbox, you will get a warning, Please read and click OK to continue.
- Check the box Add rule to enable redirect from HTTP to HTTPS.
- Click OK .
At this point, any device on the WAN zone should be able to get to the management page(login page) of the device. To restrict the management so that the device responds only to a particular IP or a Group of IP, an access rule is needed from zone WAN to WAN.
- Navigate to Manage | Policies | Rules | Access Rules.
- Click on Drop down boxes(radio button).
- From WAN to WAN.
- You will see two auto created management rules here as well.
- Edit both the rules and select the required address object in the source field and click OK to save the settings.

- At this point, only the Home PC will be able to access the SonicWall's management page and login to the device.
Resolution for SonicOS 6.2 and Below
The below resolution is for customers using SonicOS 6.2 and earlier firmware. For firewalls that are generation 6 and newer we suggest to upgrade to the latest general release of SonicOS 6.5 firmware.
Admin access from the LAN
- Navigate to Network | Interfaces.
- Edit the LAN interface by clicking on
button.
- Enable the HTTPS check box for management..
- Check the box Add rule to enable redirect from HTTP to HTTPS.

At this point, all the devices on the LAN zone should be able to get to the management page(login page) of the device. To restrict the management so that the device responds only to a particular IP or a Group of IP, an access rule is needed.
To create an access rule, we would need to create an address objects with the required IP addresses. To create an Address object,
- Navigate to Network | Address object.
- Click Add.
- Give a friendly name in the Name field.
- Select the zone as LAN or any zone from which you need to access the SonicWall.
- Type needs to be set to Host if you need to give access to the management page for just one IP address or you can use the type as range if you need to give access to the device to a range of IP addresses.
- Enter the IP address in the IP address field.


Once the Address objects are created
- Navigate to Firewall | Access rules.
- Click on Drop down boxes(radio button).
- From LAN to LAN.
- You will see two auto created management rules here.

- Edit both the rules and select the required address object in the source field and click on OK to save the settings.

- At this point, only the Admin PC will be able to access the SonicWall's management page and login to the device.
Admin access from the WAN:
Admin access from the WAN is needed only if you need remote access to the device. If you are not going to access the device from the outside world, it is recommended to disable the Management on the WAN interface. In this section, we will consider a scenario where you need access to the device only from your home. An address object needs to be created and the IP address will be the public IP address of your home network. You can find this using third party websites ipchicken.com or whatismyip.com
- Navigate to Network | Interfaces.
- Edit the WAN interface by clicking on
button.
- Enable the HTTPS check box for management. Once you enable HTTP checkbox, you will get a warning, Please read and click OK to continue.

- Check the box Add rule to enable redirect from HTTP to HTTPS.
- Click OK .

At this point, any device on the WAN zone should be able to get to the management page(login page) of the device. To restrict the management so that the device responds only to a particular IP or a Group of IP, an access rule is needed from zone WAN to WAN.
- Navigate to Firewall | Access rules.
- Click on Drop down boxes(radio button).
- From WAN to WAN
- You will see two auto created management rules here as well.
- Edit both the rules and select the required address object in the source field and click on OK to save the settings.

- At this point, only the home PC will be able to access the SonicWall's management page and login to the device.
Related Articles
- Mobile Connect breaks after upgrade to SonicOS 6.5.4.15
- Intermittent 'Login Full' error when trying to manage the firewall
- How to configure Rogue Access Point Detection in Wireless?
Categories
- Firewalls > NSa Series > Firewall Management
- Firewalls > NSv Series > Firewall Management
- Firewalls > TZ Series > Firewall Management UI


 YES
YES NO
NO