Configuring Windows VSS for Rollback
Description
This Article explains about how to configure VSS on windows computers for capture client rollback feature to work
The capture client (Advanced) Rollback feature uses the Microsoft Windows Volume Shadow Copy Service (VSS). This service saves a snapshot of the endpoint drives (physical and logical). The service saves changes of the drive to a new snapshot on an interval.
Note: VSS does not save copies of mapped network shares.
Resolution
Getting started
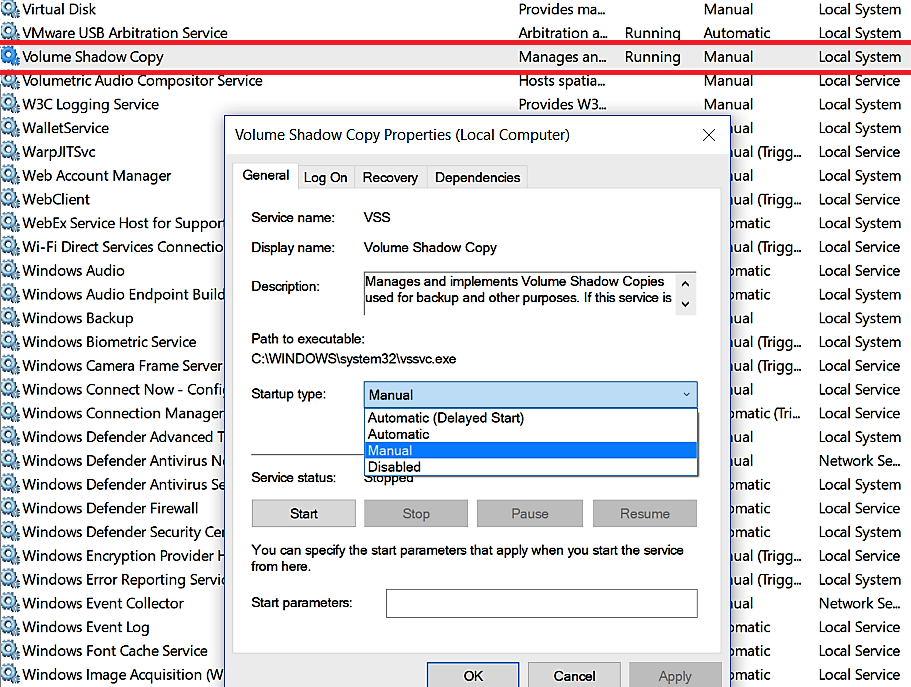
VSS start options are set on the endpoint OS.
- If the service is disabled on endpoints, shadow copies are not saved and Rollback will not work.
Note: On Windows Server 2008 R2, the Agent always starts the service and saves shadow copies. - If the service is set to Manual or Automatic start, the SentinelOne Agent makes sure that shadow copies are saved.
Important: If the service is disabled on an endpoint, and you change it to Manual or Automatic, the Agent does not take a snapshot until the endpoint is rebooted. - Shadow copies are protected from accidental delete when the Agent is installed.
Note: once you change/enable VSS service to Manual or Automatic, the Agent does not take a snapshot until the endpoint is rebooted.
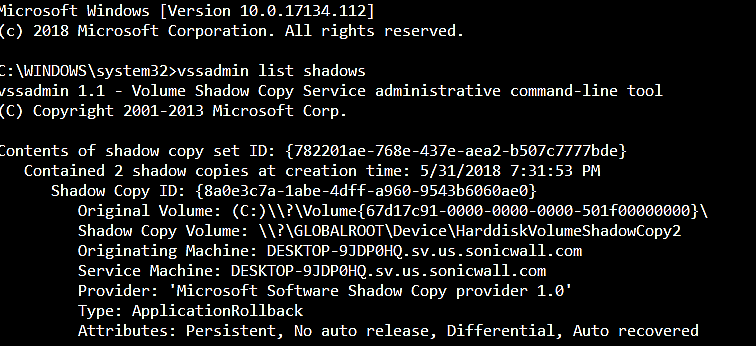
To see shadow copies and add copies on an endpoint:
- On the endpoint, start cmd with Run as Administrator.
- Run: vssadmin list shadows
- In the output, see the shadow copies of the Agent. The Type is: ApplicationRollback
- If there are no copies, enable the service:
vssadmin Add ShadowStorage /For=drive /On=storage_drive /MaxSize=percent%
For example: vssadmin Add ShadowStorage /For=C: /On=C: /MaxSize=10%
If there are no copies, please verify if Volume Shadow Copy Service has been enabled/running, if not, enable the service. As the shadow copies will not be saved and Rollback will not work if the VSS service is disabled on endpoints, hence make sure VSS service has been enabled and shadow copies are saved periodically.
Note: Shadow copies can take up huge space on your hard drive. This is especially important on virtual systems. We recommend you to set the minimum VSS percent disk utilization to 10% and not to be less than 5%. VSS space configuration changes the number of stored copies. When the allocated space is filled, the next VSS snapshot replaces older copies.
To see used space in Windows 7 and higher:
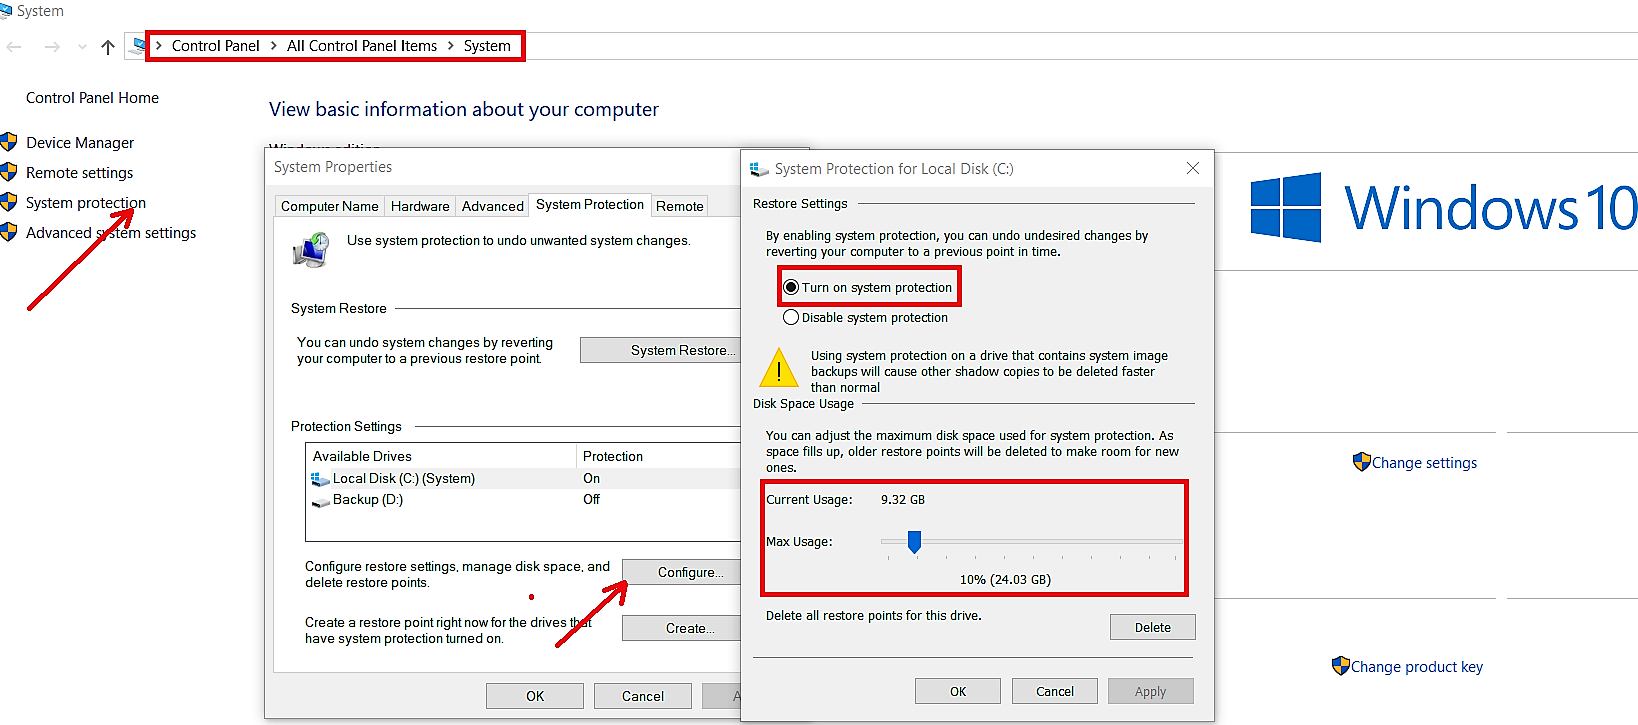
- Open System and Security > System.
- Click System protection.
- In the System Properties window, open the System Protection tab.
Make sure the drives you want to be able to rollback are selected. The SentinelOne Agent creates a new snapshot (restore point) when the endpoint shuts down or starts. If you want to make a new snapshot for this drive on this endpoint, click Create. - Click Configure.
The System Protection for drive window opens. See the Current Usage and Max Usage.
To configure Windows for optimal disk space:
Shadow copies can take up space. This is especially important on virtual systems. We recommend that you set the minimum VSS percent disk utilization to 10%. We highly recommend that it not be less than 5%. VSS space configuration changes the number of stored copies. When the allocated space is filled, the next VSS snapshot replaces older copies.
The Agent respects the limits set by the operating system and does not change the VSS configuration. It does not exceed the allocated space or maximum limit of stored copies (512).
- On the endpoint, start cmd with Run as Administrator.
- Run: vssadmin List ShadowStorage
The last line of the output shows the maximum storage in GB and in percent of the total. - Change the space allocation for VSS:
vssadmin Resize ShadowStorage /For=<drive> /On=<storage_drive> /MaxSize=<percent>%
Example: vssadmin Resize ShadowStorage /For=C: /On=C: /MaxSize=10%
Space allocation impacts security!
Imagine that you set the Windows allocated space for shadow copies to 1% of the disk space of an endpoint. Your Agent is set to save a copy every 4 hours. The endpoint is attacked successfully by ransomware. You must mitigate with Rollback in less than 4 hours - 4 hours from the last copy, not 4 hours from the attack. If you wait too long, the good copies (before the attack) are replaced with copies of the encrypted drive or files. If the attack happens just before the interval roll, your security team has almost no chance with 1% space.
The minimum recommended space allocation of 5 to 10 percent is enough to give you time to respond with a successful mitigation.
To change the VSS interval snapshots:
The default times for VSS to take a new snapshot, as set in the OS, are usually specific hours, twice a day. The Agent sets the interval by default to every four hours, starting at Agent install. Shadow copies are made at a different time for each endpoint, not by the clock. When you create Agent packages or change an Agent configuration, you can change the interval. If you change the interval to zero, shadow copies are disabled.
Note: The counter for the interval does not move when the endpoint is on sleep mode or hibernate. For example, if the endpoint takes a snapshot at midnight, then sleeps for one hour, and is then active for four hours, the next snapshot (with an interval of 4 hours) will be taken at 5:00 AM (and not at 4:00 AM).
- Go to "Devices" section and download devices list (as shown below)


- On the endpoint, start cmd with Run as Administrator.
Go to the SentinelOne directory:
cd c:\program files\sentinelone\sentinel agent <version>\ - Turn off the Agent self-protection. With the passphrase that you copied, run:
sentinelctl.exe unprotect -k "<passphrase>"
The unprotect command is necessary to change the configuration of the Agent. Complete this procedure quickly. Do not leave the Agent vulnerable for longer than necessary. - Run the command to change the interval.
sentinelctl.exe configure -p agent.snapshotIntervalMinutes -v <minutes>
The output shows the interval. For example:240 = every 4 hours .
Note: If the output is 0, no shadow copies are saved. This is for specific environment limitations that require you temporarily turn off VSS snapshots for some Agents. If other programs use VSS and take snapshots, Rollback will work. It will depend on the frequency of the other programs and how quickly mitigation is run.
- Unload the Agent: sentinelctl.exe unload -a
- Load the Agent again: sentinelctl.exe load -a
- Turn on the Agent self-protection: sentinelctl.exe protect
To enable VSS for all endpoints:
- On your Domain Controller server, click Start and enter: mmc
- In the Windows Console window, click File > Add/Remove Snap-in.
- Add the Group Policy Management snap-in.
- In Domains > the domain to configure, right-click Default Domain Policy and select Edit.
- In the Group Policy Manager Editor, click Computer Configuration > Preferences > Control Panel Settings.
- Right-click Services and select New > Service.
- In New Service Properties > Startup, click Manual.
- In the Service name list, select VSS (Volume Shadow Copy).
- In Log on as, select Local System account.
- Click OK.
To configure all endpoints consistently for VSS:
- Make sure the change does not impact other programs. Run: vssadmin list shadowsThe output shows, with other data, the Type of each copy. ApplicationRollback is SentinelOne. Look at other types and make sure you understand their purpose. Run vssadmin list writers to learn more about other programs. Note: Not all programs that use VSS are listed as writers.
- In the Domain Controller Group Policy Manager Editor, open Control Panel Settings.
- Right-click Scheduled Tasks and select New > Scheduled Task (At least Windows 7).
- In the window that opens, enter a name for the Task and select the Domain Administrator account to use.
- In the Action list, click Create.
- In the Trigger tab, click New.
- In the window that opens, in the Begin the task list, click At log on.
- Click OK.
- In the Actions tab, click New.
- In the window that opens, in the Action list, click Start a program.
- In Program/Script, enter the command to configure the VSS service with the recommended maximum storage size of 10%: cmd /c "vssadmin Resize ShadowStorage /For=c: /On=C: /MaxSize=10%"
- Click OK. The change is applied to endpoints after they reboot.
To restore shadow copies:
- Download ShadowExplorer.
- Install and run it. See ShadowExplorer.com for instructions.
- In the main window, select the drive and backup time of the restore point.
- Select the folders and files to restore.
- Right-click and select Export.
- In the window that opens, create or select a folder.
- Click OK.
To disable VSS protection completely:
- Turn off the Agent self-protection. With the passphrase that you copied, run: sentinelctl.exe unprotect -k "<passphrase>"
- Turn off VSS protection: sentinelctl config -p agent.vssConfig.vssProtection -v falsesentinelctl config -p agent.vssSnapshots -v false
- Turn on the Agent self-protection: sentinelctl.exe protect
- Reboot the endpoint.
To delete snapshots:
Important: This procedure uses vssadmin, which is a Microsoft tool. For help with vssadmin specific issues, please contact Microsoft.
- Turn off the Agent self-protection.
With the passphrase that you copied, run: sentinelctl.exe unprotect -k "<passphrase>" - Disable deletion-protection for shadow copies.
Run: sentinelctl config -p vssConfig.vssProtection -v false - Open cmd or powershell as administrator and run the relevant command:
- To delete all shadow copies: vssadmin delete shadows /all
- To delete the oldest: vssadmin delete shadows /For=C:/Oldest
- To select shadow copies to delete, get a list of the shadow copy IDs and then delete by ID:
vssadmin list shadows
vssadmin delete shadows /shadow=<ShadowID> - If you see this error:
"Error: Snapshots were found, but they were outside of your allowed context. Try removing them with the backup application which created them."- Log in as an administrator. Membership in the local Administrators group, or equivalent, is required to run DiskShadow.
- Start DiskShadow: Diskshadow
- Run: delete shadows all
- Turn on the Agent self-protection:
sentinelctl.exe protect