Configuring access to server behind a SonicWall from WLAN zone to LAN using public IP address
Description
This document describes how a host on a SonicWall WLAN can access a server on the LAN using the server's public IP address (typically provided by DNS).
 EXAMPLE:
NSA 4500 network in which the Primary LAN Subnet is 192.168.10.0 /24 and the Primary WAN IP is 1.1.1.1. Let's say you have a web site for your customers. You have already written the policies and rules needed so that outsiders can get to the web site, but it's really running on a private side server 192.168.10.20.
Now imagine that you are a person using a laptop on the private side of WLAN. You want to reach the server using its public name or public IP, because you do the same thing when your laptop is with you on the road.
If you sit on the private side and request http://www.domain.com, loopback is what makes it possible for that to work, even though the server is actually right next to you on a local IP address.
Resolution
�
Resolution for SonicOS 6.5
This release includes significant user interface changes and many new features that are different from the SonicOS 6.2 and earlier firmware. The below resolution is for customers using SonicOS 6.5 firmware.
Creating Address Objects
- Click Manage Tab.
- Click Objects | Address Objects.
- Click Add under Address Objects and create the address object for server on LAN.
- Address Object for server IP
Name My Server Private Zone LAN Type Host IP address 192.162.10.20 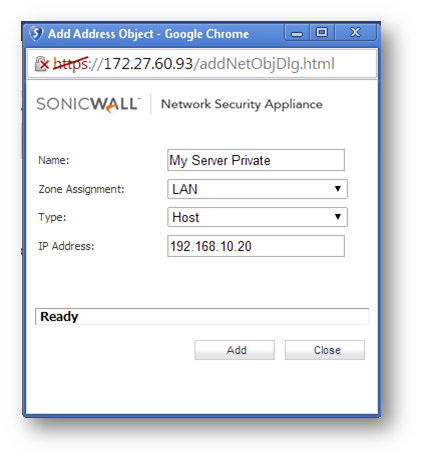
- Address Object for WAN(Public) IP
Name My Server Public Zone WAN Type Host IP address 1.1.1.1 
Creating Loopback Policy.
- Click Manage tab.
- Click Rules | NAT Policies.
- Click Add button and choose following settings.Original Source:Firewalled SubnetsTranslated Source:My Server PublicOriginal Destination:Myserver PublicTranslated Destination:Myserver PrivateOriginal service:AnyTranslated Service:OriginalInbound Interface:AnyOutbound Interface:AnyComment:Loopback PolicyEnable NAT Policy:CheckedCreate Reflexive Policy:Unchecked

Creating Firewall Access Rule.
- Click Manage tab
- Click Rules | Access Rule.
- Select view type from View Style and go to WLAN to LAN.
- Click Add and choose the following settings.
Action:Allow From Zone:WLAN To Zone:LAN Source port:Any Service: Any Source: Any Destination: My Server Public Users Allowed:All Schedule:Always on Enable Logging:Checked Allow Fragmented Packets:Checked |  |
Resolution for SonicOS 6.2 and Below
The below resolution is for customers using SonicOS 6.2 and earlier firmware. For firewalls that are generation 6 and newer we suggest to upgrade to the latest general release of SonicOS 6.5 firmware.
Creating Address Objects
- Navigate to Network | Address Objects.
- Click Add under address objects and create address object for server on LAN.
- Address Object for server IP
Name My Server Private Zone LAN Type Host IP address 192.162.10.20
- Address Object for WAN(Public) IP
Name My Server Public Zone WAN Type Host IP address 1.1.1.1
Creating Loopback Policy.
- Navigate to Network | NAT Policies.
- Click Add button and choose following settings.Original Source:Firewalled SubnetsTranslated Source:My Server PublicOriginal Destination:Myserver PublicTranslated Destination:Myserver PrivateOriginal service:AnyTranslated Service:OriginalInbound Interface:AnyOutbound Interface:AnyComment:Loopback PolicyEnable NAT Policy:CheckedCreate Reflexive Policy:Unchecked
Creating Firewall Access Rule.
- Navigate to Firewall | Access Rule.
- Select view type from View Style and go to WLAN to LAN.
- Click Add and choose the following settings.
Action:Allow From Zone:WLAN To Zone:LAN Source port:Any Service: Any Source: Any Destination: My Server Public Users Allowed:All Schedule:Always on Enable Logging:Checked Allow Fragmented Packets:Checked | |
