-
Products
-
SonicPlatform
SonicPlatform is the cybersecurity platform purpose-built for MSPs, making managing complex security environments among multiple tenants easy and streamlined.
Discover More
-
-
Solutions
-
Federal
Protect Federal Agencies and Networks with scalable, purpose-built cybersecurity solutions
Learn MoreFederalProtect Federal Agencies and Networks with scalable, purpose-built cybersecurity solutions
Learn More - Industries
- Use Cases
-
-
Partners
-
Partner Portal
Access to deal registration, MDF, sales and marketing tools, training and more
Learn MorePartner PortalAccess to deal registration, MDF, sales and marketing tools, training and more
Learn More - SonicWall Partners
- Partner Resources
-
-
Support
-
Support Portal
Find answers to your questions by searching across our knowledge base, community, technical documentation and video tutorials
Learn MoreSupport PortalFind answers to your questions by searching across our knowledge base, community, technical documentation and video tutorials
Learn More - Support
- Resources
- Capture Labs
-
- Company
- Contact Us
MDR for Windows Defender Agent Install Instructions


Description
Please navigate to your device OS for ARR (Active Ready Response) agent installation instructions.
Required Parameters:
Your ARR Instance\ c-name: www.YOURINSTANCE.infocyte.com
Please be certain to replace the *********** in the commands with the Instancename provided to you by your SonicWall Managed Services Engineer.
Your ARR Agent Registration Key (Regkey)
Please be certain to replace the %%%%%%%%% in the commands with the Regkey provided to you by your SonicWall Managed Services Engineer.
Installing Agent
Method 1 - PowerShell command (RECOMMENDED):
-
Ensure to run PSConsole as Administrator if doing a manual install
-
Make sure your current AntiVirus policy does not block PSConsole usage or have Memory protection enabled without the proper Infocyte exclusions placed
- Copy script into PowerShell Console
[System.Net.ServicePointManager]::SecurityProtocol = [Enum]::ToObject([System.Net.SecurityProtocolType], 3072); (new-object Net.WebClient).DownloadString("https://raw.githubusercontent.com/Infocyte/PowershellTools/master/AgentDeployment/install_huntagent.ps1") | iex; installagent *********** %%%%%%%%%
Method 2 - Installer
64 Bit Installer
-
Download the installer from:
-
Run the installer using the following command in an elevated command prompt:
agent.windows.exe --url https://***********.infocyte.com --key %%%%%%%%%
32 Bit Installer
-
Download the installer from:
-
Run the installer using the following command in an elevated command prompt:
agent.windows32.exe --url https://***********.infocyte.com --key %%%%%%%%%
Method 3 - Group Policy
Prerequisites:
-
Windows Server 2012 R2 or greater
-
Domain Administrator account
-
Microsoft Windows endpoints
-
File to convert into a Batch file "install_agent.txt"
-
Instancename (provided by SonicWall Managed Services, Inc
-
Regkey (provided by SonicWall Managed Services, Inc)
Getting Ready:
-
Copy the following code into a text editor
@echo off
:: Install Hunt Agent
:: For use in a GPO Startup Script (Note: Logon script will not work as it operates with the user's non-admin permissions)
:: Best Reference for steps: https://www.petri.com/run-startup-script-batch-file-with-administrative-privileges
:: Set "instancename" to the instance name provided by Solutions Granted, Inc
:: Set "regkey" to your registration key provided by Solutions Granted, Inc
set instancename=myinstancename123
set regkey=myregkey123
C:\Windows\System32\WindowsPowerShell\v1.0\powershell.exe -nologo -win 1 -executionpolicy bypass -nop -command "[System.Net.ServicePointManager]::SecurityProtocol = [Enum]::ToObject([System.Net.SecurityProtocolType], 3072); (new-object Net.WebClient).DownloadString('https://raw.githubusercontent.com/Infocyte/PowershellTools/master/AgentDeployment/install_huntagent.ps1') | iex; installagent %instancename% %regkey%" -
Change the myinstancename123 to the the instancename provided by SonicWall Managed Services, Inc
-
Change the myregkey123 to the regkey provided by SonicWall Managed Services, Inc
-
Save the file as “install_agent.bat”
-
If you use Notepad, you will want to make sure it doesn’t default to “install_agent.bat.txt”
-

Create the GPO:
-
Open Server Manager and go to Tools > Group Policy Management
-
In Group Policy Management Console select domain and click Group Policy Objects
-
Right-click Group Policy Objects and select New
-
For Name type "Install HUNT Agent" and click OK
-
Right-click the new GPO in the right pane and click Edit
-
In the Group Policy Management Editor window, click Computer Configuration, then Policies, then Scripts. Double-click Startup
-
On the Scripts tab of the Startup Properties box, click Show Files. Copy the "install_agent.bat" file created in the previous Getting Ready section of this article
-
Click Add
-
Click Browse and select the file "install_agent.bat"
-
Click OK
-
Find the Domain or OU that you wish to link to the newly created GPO
-
Right-click it and click Link an Existing GPO
-
Click OK
Your script should now run and install the ARR agent on all machines in the selected group.
Validating Install
- You can validate a successful install if you see the service ‘Infocyte HUNT Agent’ running on the machine

- You can also validate a successful install by searching for the device in the Portal and ensuring it is reporting the latest agent version and in a “Monitored” Status
Uninstall (Windows)
- In order to uninstall an agent on Windows, users can uninstall via Add/Remove Programs or via command line as an Administrator using the following command:
"C:\Program Files\Infocyte\Agent\agent.exe" --uninstall - If needed, the /quiet Windows command switch can be added to run the uninstall silently:
"C:\Program Files\Infocyte\Agent\agent.exe" /quiet --uninstall
Linux Support for Agent Installation:
- To install the Linux Agent, systemd is required as the default init for the system. This is the default with most modern Linux OS's.
- The check if you are using systemd, type this command:
file /sbin/init
- The output should be something similar to:
/sbin/init: symbolic link to /lib/systemd/systemd
Installing Agent
64-Bit
- Download the 64-bit installer from: https://s3.us-east-2.amazonaws.com/infocyte-support/executables/agent.linux64.exe
- After downloading the agent, navigate to the download folder (or location of downloaded file) and run the following command to prep the agent for execution.
chmod +x linux64.exe - Now you can run the installer with the following command:
sudo ./linux64.exe --key %%%%%%%%% --url https://***********.infocyte.com
32-Bit
- Download the 32-bit installer from: https://s3.us-east-2.amazonaws.com/infocyte-support/executables/agent.linux32.exe
- After downloading the agent, navigate to the download folder (or location of downloaded file) and run the following command to prep the agent for execution:
chmod +x linux32.exe - Now you can run the installer with the following command:
sudo ./linux32.exe --key %%%%%%%%% --url https://***********.infocyte.com
Validating Install
- Please let us know once you have confirmed a good push and we can provide confirmation of what is registered in the console.
Uninstall (Linux)
- Run the following command:
sudo /usr/local/infocyte/agent/agent.exe --uninstall
Manual Uninstall
- Run the following commands in a terminal:
systemctl stop HUNTAgent
systemctl disable HUNTAgent
rm /etc/systemd/system/HUNTAgent.service
systemctl daemon-reload
systemctl reset-failed
rm -rf "opt/ infocyte
MacOS Installation
Installing Agent
- Download the MacOS installer from:
- https://s3.us-east-2.amazonaws.com/infocyte-support/executables/agent.macos.exe
Open the terminal, navigate to the download folder (or location of downloaded file)
- Run command:
sudo chmod +x agent.macos.exe - Run command:
sudo ./agent.macos.exe --url https://***********.infocyte.com --key %%%%%%%%%
Validating Install (All macOS)
- Run the following command from a macOS terminal:
ps -u root | grep agent - You should see something similar to the following screenshot.

Uninstall
- Run Command:
sudo /usr/local/infocyte/agent/agent.exe --uninstall
Manual Uninstall
- Run the following commands in a terminal:
systemctl stop HUNTAgent
systemctl disable HUNTAgent
rm /etc/systemd/system/HUNTAgent.service
systemctl daemon-reload
systemctl reset-failed
rm -rf "opt/ infocyte
Installing Agent
- Download the MacOS installer from:
- Rename the file to: rts.macos.exe
- Open the terminal, navigate to the download folder (or location of downloaded file)
- Run command:
sudo cat rts.macos.exe > rts.macos-catalina.exe && sudo chmod +x rts.macos-catalina.exe - Run command:
sudo ./rts.macos-catalina.exe --url https://***********.infocyte.com --key %%%%%%%%%
Validating Install (All macOS)
- Run the following command from a macOS terminal:
ps -u root | grep agent - You should see something similar to the following screenshot.

Uninstall
- Run Command:
sudo /usr/local/infocyte/agent/agent.exe --uninstall
Manual Uninstall
- Run the following commands in terminal:
systemctl stop HUNTAgent
systemctl disable HUNTAgent
rm /etc/systemd/system/HUNTAgent.service
systemctl daemon-reload
systemctl reset-failed
rm -rf "opt/ infocyte
Installing Agent
- Open the Terminal.
- Run the following command:
sudo spctl --master-disable - Enter Admin Password when prompted.
- Close the Terminal.
- Run the following command:
- Download the MacOS installer from:
- Rename the file to: rts.macos.exe
- Move the renamed file to the documents folder.
- Open Terminal.
- Navigate in Terminal to the documents folder:
cd documents - Run each of the following commands:
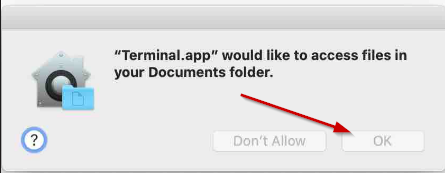
cat rts.macos.exe > rts.macos-catalina.exe - When the following window pops up, select OK

-
chmod +x rts.macos-catalina.exe -
sudo ./rts.macos-catalina.exe --url https://***********.infocyte.com --key %%%%%%%%% - Enter Admin Password when prompted
-
sudo spctl --master-enable
BE CERTAIN TO RUN THE LAST COMMAND TO RE-ENABLE SYSTEM SECURITY
-
sudo spctl --master-enable
Validating Install
You can use EITHER of the following methods to validate agent is installed and running on the device.
- Look for agent.exe process in the Activity Monitor.
![]()
OR
- Run the following command from a macOS terminal:
ps -u root | grep agent - You should see something similar to the following screenshot.

Uninstall
- Navigate to and open /Library/LaunchDaemons/com.infocyte.HUNTAgent.plist.
- Delete ONLY the FIRST empty line in the file.
- Save the changes to the file.
- Run the following uninstall command:
sudo /usr/local/infocyte/agent/agent.exe --uninstall
Manual Uninstall
- Navigate to and open /Library/LaunchDaemons/com.infocyte.HUNTAgent.plist.
- Delete ONLY the FIRST empty line in the file.
- Save the changes to the file.
- Run the following commands in a terminal:
systemctl stop HUNTAgent
systemctl disable HUNTAgent
rm /etc/systemd/system/HUNTAgent.service
systemctl daemon-reload
systemctl reset-failed
rm -rf "opt/ infocyte
Windows
1) C:\windows\temp\infocyte.exe
2) C:\Program Files\Infocyte\Agent
![]() Linux
Linux
1) /tmp/infocyte.exe
2) /opt/infocyte/agent
While rare, some AV engines may require the Agent Application folder to be whitelisted in Agent based deployments of Infocyte. You can whitelist the following directories or use the hashes found under the download section to specify the specific files.
Windows:
C:\program files\infocyte\agentLinux:
/opt/infocyte/
Whitelisting by Hash
You can whitelist in your AV by hash as well assuming it supports this. Our hashes can always be found in the "/admin/downloads" page of your Infocyte console.
Endpoint to Cloud:
- For each agent deployed in your environment, bidirectional communication from TCP port 443 to the URL for your instance must be permitted.
- Infocyte IP Addresses to allow:
- 3.221.153.58
- 3.227.41.20
- 3.229.46.33
- 35.171.204.49
- 52.200.73.72
- 52.87.145.239
- dl.infocyte.com (Amazon CloudFront, IP Range can vary based on location. Recommended for optimal performance)
- *.infocyte.com- This communication is secured with TLS 1.2/1.3 (HTTPS) and applies to both agents and agentless (temporary agents). If you are on a network with SSL Inspection/Decryption you might need to bypass decryption for your instance <CNAME>.infocyte.com, and dl.infocyte.com.
- Required ports for communication with EDR cloud infrastructure

- Brokers communication with EDR cloud infrastructure; can alternatively allowlist *.es.datto.net

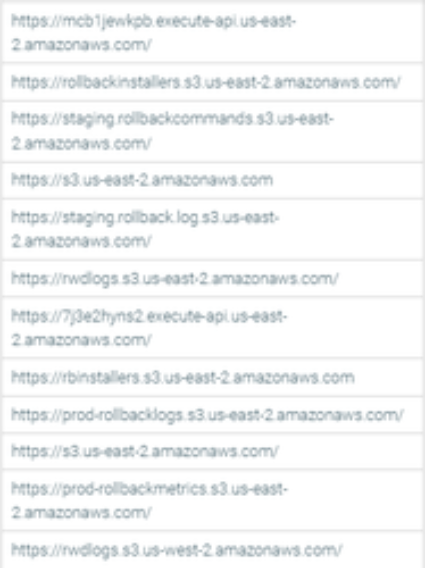
- Amazon S3 webhosts for Datto EDR cloud infrastructure

- Additional Exclusions on an as needed basis
- .infocyte.com
- hunt-saas-surveys.s3.amazonaws.com
- hunt-saas-surveys.s3.us-east-1.amazonaws.com
- infocyte-downloads.s3.us-east-1.amazonaws.com
Related Articles
- Cloud Threat Analytics: SaaS Alerts Onboarding
- NDR: Integration Guide (Start Here)
- MSS CAS Migrations: Frequently Asked Questions (FAQs)


 YES
YES NO
NO