-
Products
-
SonicPlatform
SonicPlatform is the cybersecurity platform purpose-built for MSPs, making managing complex security environments among multiple tenants easy and streamlined.
Discover More
-
-
Solutions
-
Federal
Protect Federal Agencies and Networks with scalable, purpose-built cybersecurity solutions
Learn MoreFederalProtect Federal Agencies and Networks with scalable, purpose-built cybersecurity solutions
Learn More - Industries
- Use Cases
-
-
Partners
-
Partner Portal
Access to deal registration, MDF, sales and marketing tools, training and more
Learn MorePartner PortalAccess to deal registration, MDF, sales and marketing tools, training and more
Learn More - SonicWall Partners
- Partner Resources
-
-
Support
-
Support Portal
Find answers to your questions by searching across our knowledge base, community, technical documentation and video tutorials
Learn MoreSupport PortalFind answers to your questions by searching across our knowledge base, community, technical documentation and video tutorials
Learn More - Support
- Resources
- Capture Labs
-
- Company
- Contact Us
MSS FW Best Practices: Wireless (Wi-Fi)


Description
 CAUTION: These documents are intended to provide partners with firewall configuration recommendations ONLY. They contain examples and caution should be exercised when making changes to your firewall as unplanned changed could result in downtime based on the complexity of the environment and/or configuration.
MSS Recomended SonicWall Firewall Best Practices Index
Firewalls with Built in Wi-Fi
There are a couple of different way to configure SonicWall firewalls with built in Wi-Fi.
- Configuring Built-in Wireless with Corporate SSID bridged to LAN (Access to Internet & LAN resource | SonicWall
- Provision SonicWall access points on the primary WLAN interface with virtual access points on VLAN | SonicWall
SonicWave 600 Series Wireless Access Points
The SonicWall 600 series Wireless Access Points can be setup & managed using either the SonicWall Cloud Wireless Network Manager (WMN) or a Generation 7 SonicWall firewall.
Setting up SonicWave 600 Series Wireless Access Points (WMN Managed)
Setting up SonicWave 600 Series Wireless Access Points (Firewall Managed)
![]() Configuring the Firewall for Wireless Access
Configuring the Firewall for Wireless Access
This section provides instructions for configuring SonicOS on your SonicWall network security appliance to connect your SonicWave 641 to the WLAN zone and manage it as a Layer 2 device. This includes:
- Configuring the SonicWave Provisioning Profile for radio frequency, mode, authentication type
- Configuring the Network Interface to which the SonicWave 641 connects
- Configuring the WLAN Zone for trust, security, and SonicWave provisioning profile
- The below steps are taken from the SonicWave 641 Quick Start Guide (sonicwall.com)
Configuring the SonicWave Provisioning Profile
SonicWave provisioning profiles include all of the settings that can be configured on a SonicWave 641 access point. The profile is then selected when you configure the wireless zone (WLAN by default). When your SonicWave 641 connects to that zone, it is automatically provisioned with the profile settings. To configure the SonicWave provisioning profile:
- Log into your SonicWall firewall as an administrator (default: admin / password).
- Navigate to the DEVICE | External Controllers | Access Points > Settings page.
- In the Access Point Provisioning Profiles section, do one of the following:
- To modify the default SonicWave profile, click the Edit Profile icon after hovering in the SonicWave row.
- To create a new profile, select SonicWave Profile from the Add New Profile drop down menu. The Add/Edit SonicWave Profile dialog displays.

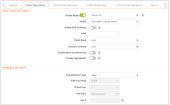
- General screen settings:
- Select Enable. This is selected by default.
- To turn on the LEDs for SonicWaves using this provisioning profile, select Enable LED. The LEDs are turned off by default.
- If adding a new profile, type a simple, descriptive name into the Name Prefix field to assist in identifying the SonicWave in this zone. This is the name of the provisioning profile. Each provisioned SonicWave is named with this prefix followed by a unique number. Optionally change the Name Prefix if editing the default SonicWave profile.
- Verify the Country Code for the area of operation.
- Accept the defaults or configure the remaining options as necessary.

- Radio Basic Settings:
- Click 5GHz Radio Basic.
- Select Enable Radio. This is selected by default.
- Select a MODE or use the default.
- Type a short, descriptive name into the SSID field. This is the access point name that appears in clients’ lists of available wireless connections.
- Under Wireless Security, select the Authentication Type for your wireless network. SonicWall recommends using WPA2 as the authentication type if all client devices support it. PSK uses a passphrase for authentication, EAP uses an Enterprise RADIUS server.
- Select the Cipher Type. When using WPA and WPA2, SonicWall recommends AES for maximum security if all client devices support it.
- Fill in the fields specific to the authentication type that you selected. The remaining fields change depending on the selected authentication type.
- Click 2.4GHz Radio Basic and repeat Step 2 through Step 7.

- Radio Advanced Settings:
- Click 5GHz Radio Advanced.
- For most advanced options, the default settings give optimum performance.
- Optionally select the Hide SSID in Beacon checkbox. The SSID refers to the access point name that appears in clients’ lists of available wireless connections. Hiding the SSID provides additional security because it requires the user to know the access point name before connecting.
- Click 2.4GHz Radio Advanced and repeat Step 3.

- When finished configuring all options, click OK. For information about configuring the other options and screens in the Add/Edit SonicWave Profile dialog, see the SonicOS Administration documentation.
Configuring the Network Interface
Each SonicWave or group of SonicWaves must be connected to a physical network interface that is configured in a wireless zone. SonicOS provides a standard wireless zone (WLAN) that can be applied to any available interface. To configure the network interface in SonicOS:
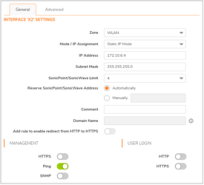
- Navigate to the NETWORK | System > Interfaces page and click the Edit this interface icon by hovering over the interface to which your SonicWave connects.
- Select WLAN or another (custom) wireless zone from the Zone drop-down menu. The default wireless zone is WLAN.
- Select Static IP Mode for the Mode/IP Assignment.
- In the IP Address field, type in any private IP address that does not interfere with the IP address range of any other interfaces on the appliance. Wireless clients are assigned an IP address in this subnet.
- Enter a Subnet Mask. The default is 255.255.255.0.
- Select a non-zero number for SonicPoint/SonicWave Limit. If 0 is selected, no access points can be discovered on this interface.
- Use the default settings or select appropriate settings for the other fields and click OK.

Configuring the Firewall for Wireless Access
To configure the WLAN zone in SonicOS:
- Navigate to OBJECT | Mach Objects > Zones page, click the Edit icon in the WLAN row.
- On the General screen, select the Allow Interface Trust option to automate the creation of Access Rules to allow traffic to flow between the interfaces within the zone, regardless of the interfaces to which the zone is applied. For example, if the WLAN zone has both the X2 and X3 interfaces assigned to it, selecting Allow Interface Trust creates the necessary access rules to allow hosts on these interfaces to communicate with each other.
- Select the checkboxes to enable security services on this zone. Minimally, you would select Enable Gateway Anti-Virus Service, Enable IPS, and Enable Anti-Spyware Service. If your wireless clients are all running SonicWall Client Anti-Virus, select Enable Client AV Enforcement Service.
- In the Guest Services screen, optionally configure guest Internet access. For information about Guest Services, see the SonicOS Administration documentation.
- In the Wireless screen under SonicPoint/SonicWave Settings, select the desired provisioning profile from the SonicWave Provisioning Profile drop-down menu. If you added a new profile in Configuring the SonicWave Provisioning Profile, select it here.
- Select Only allow traffic generated by a SonicPoint/SonicWave to allow only traffic from SonicWall wireless access points to enter the WLAN zone interfaces, providing maximum security.
- When finished, click Save. You are now ready to connect your SonicWave 641 to your SonicWall network security appliance as described in the following sections.

You are now ready to connect your SonicWave 641 to your SonicWall network security appliance.
Related Articles
- Cloud Threat Analytics: SaaS Alerts Onboarding
- NDR: Integration Guide (Start Here)
- MSS CAS Migrations: Frequently Asked Questions (FAQs)
Categories
- Managed Security Services > Firewall Monitoring and Management > Firewall Configuration and Best Practices


 YES
YES NO
NO