-
Products
-
SonicPlatform
SonicPlatform is the cybersecurity platform purpose-built for MSPs, making managing complex security environments among multiple tenants easy and streamlined.
Discover More
-
-
Solutions
-
Federal
Protect Federal Agencies and Networks with scalable, purpose-built cybersecurity solutions
Learn MoreFederalProtect Federal Agencies and Networks with scalable, purpose-built cybersecurity solutions
Learn More - Industries
- Use Cases
-
-
Partners
-
Partner Portal
Access to deal registration, MDF, sales and marketing tools, training and more
Learn MorePartner PortalAccess to deal registration, MDF, sales and marketing tools, training and more
Learn More - SonicWall Partners
- Partner Resources
-
-
Support
-
Support Portal
Find answers to your questions by searching across our knowledge base, community, technical documentation and video tutorials
Learn MoreSupport PortalFind answers to your questions by searching across our knowledge base, community, technical documentation and video tutorials
Learn More - Support
- Resources
- Capture Labs
-
- Company
- Contact Us
How to re-deploy a NSv in the existing resource group in azure platform


Description
This article explains how we can re-deploy NSv in an existing resource group if you are upgrading from 7.0.1 to 7.1.1 and above which needs a re-deploy. Please note that there is no upgrade path from the existing NSv versions running SonicOS 7.0.1 firmware to SonicOS 7.1.x.
Resolution
To deploy a fresh NSv we have 2 options using the Azure Marketplace and the custom template,
However to re deploy NSv in an existing resource group where you have old instance, We will have to use the the below temple:
The link will be redirected to Microsoft Azure custom template deployment page.
Once the page loads you should see the following:
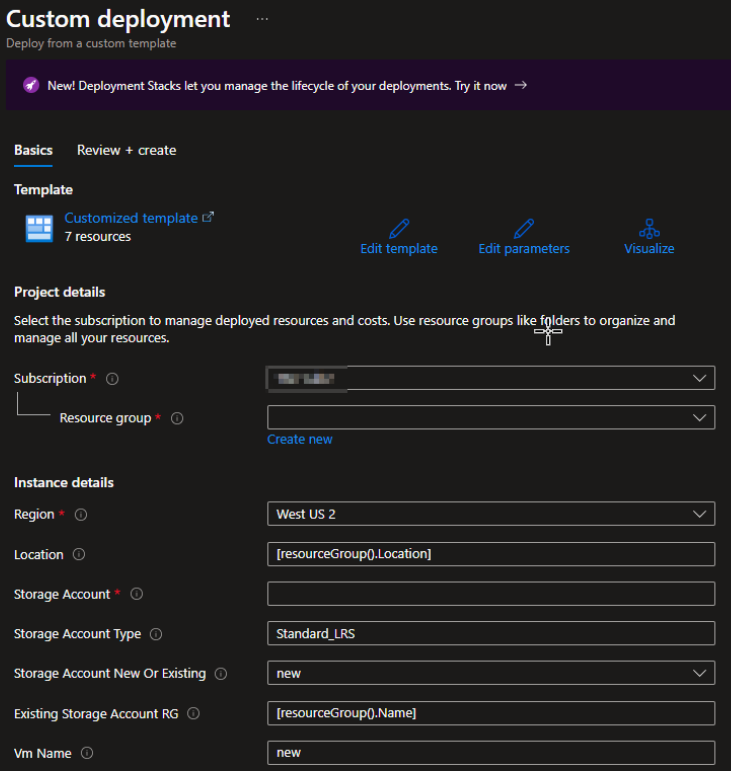
Review all the fields in this form and complete as necessary:-
- Select the same Resource Group you’re currently using for the NSv as well as the same Region
- You can deploy the new NSv into the same Storage Account you’re using for the current NSv
- Specify the SSH password you want to use when accessing the Serial Console or Putty session
- For the Virtual Network, you will need the name of the VNET, the VNET address space, and the names and prefixes of the WAN and LAN subnets.
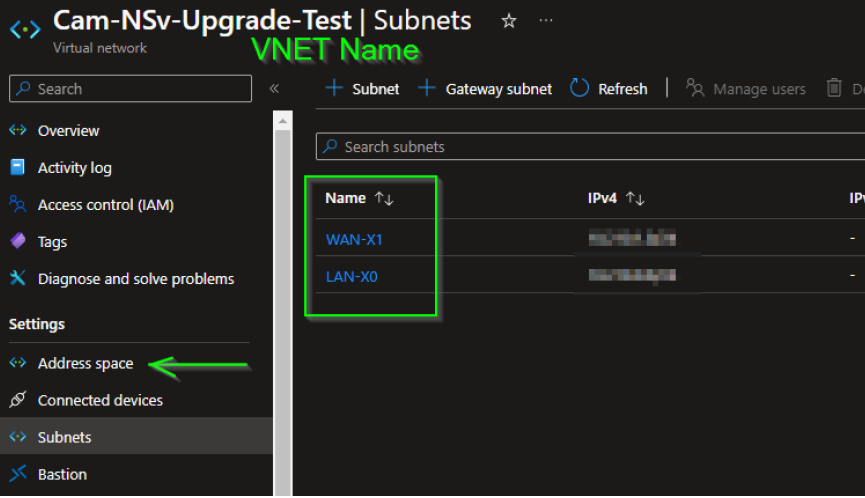
- To deploy the 7.1.1 firmware version, make sure the Image SKU shows “snwl-NSv-scx” and the Image Version shows “latest”
- You can leave the public IP as new as it will only be temporary while you’re setting up the new NSv
- Once you have filled in all the necessary sections, click on “Review + Create” at the bottom of the page. The system will go through a validation process, and once it passes you can click “Create” at the bottom of that page. The deployment process will take about 10 minutes to complete.
Deregistering the old NSv:-
- Click on Device at the top
- Click on Licenses on the left
- Click the “Deregister” button as seen in the below screenshot

- When you click on Deregister, the firewall is going to reboot and come back up with no licensing
Once the new NSv is deployed and the current NSv is back up, we can power down both VMS so we can move the NICs. Click on the VM name in the Azure Resource Group, then click on the “Stop” button to power it down.
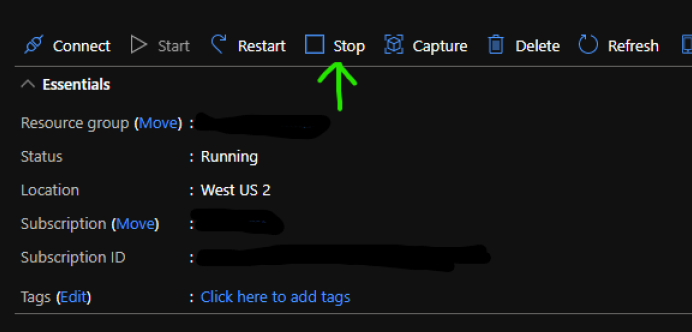
When powering off the VM it may ask if you want to reserve the public IP. If you want to use the same IP, make sure to enable this option.
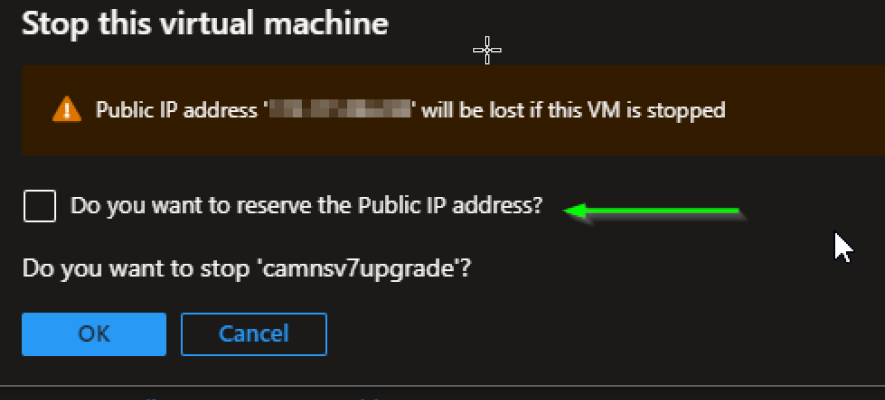
 NOTE: The VM has to have at least one NIC attached to it according to Azure, so this will need to be done in steps.
First, we will detach one of the NICs from the new NSv using the steps below, that will allow us to detach both of the NICs from the current NSv to minimize the number of steps needed.
Detach the X1 interface because it needs to be attached first in order for the new NSv to use it as the WAN interface.
- Click the name of the new NSv in the Resource Group
- Click Network Settings on the left
- Click “Detach network interface” at the top
- Use the drop down to select which NIC you want to detach and click OK
Once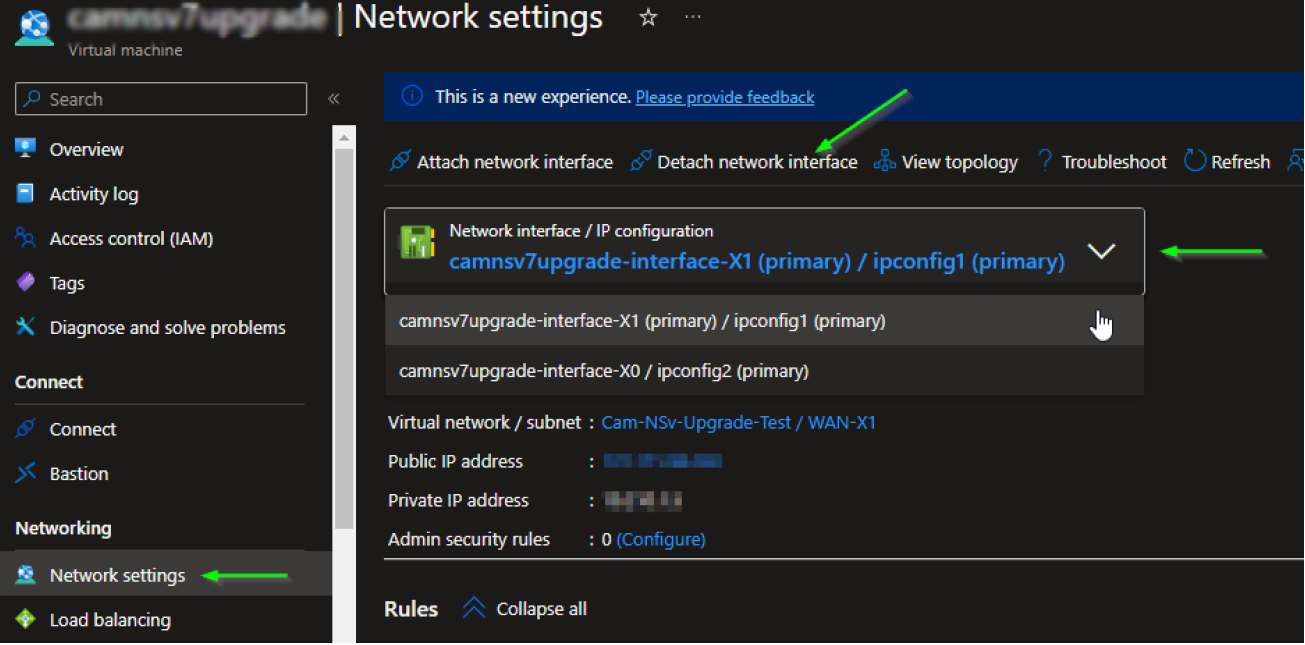
Once the NIC is detached from the new NSv, we need to detach the NICs from the old NSv. First start by detaching either of the NICs from the current NSv, then attach the NIC from the new NSv to the old one. Now detach the other NIC from the old NSv.
Now that we have both NICs detached from the old NSv, let’s go back to the new NSv and attach the NICs. We need to start with the X1 interface so the Azure system knows to use that as the WAN interface.
Attach the X1 interface from the old NSv to the new one, then detach the X0 interface from the new NSv, then you can attach the X0 from the old NSv to the new one. This should leave you with 2 NICs attached to the new NSv, which will have the IPs from the old one, one NIC attached to the old NSv, and a NIC not attached to anything. I would attach the X0 interface from the new NSv to the old one so you can access it if anything is needed from that machine.
Now you can power the new NSv back on and connect using the IP address from the old NSv. Register the unit which will prompt for a reboot, then import your settings will prompt for another reboot.
At this point, you have now upgraded your NSv to 7.1.1 firmware and all traffic should be passing through the new NSv.
You can keep the old NSv in your resource group for as long as you would like, but once you’re ready to remove everything, delete the old NSv instance, the NICs that were deployed with the new NSv, the disk associated with the old NSv, the NSG deployed with the new NSv, and the Public IP for the new NSv as well.
Related Articles
- Error:"Invalid API Argument" when modifying the access rules
- Cysurance Partner FAQ
- Configure probe monitoring for WAN Failover and Loadbalancing - SonicWall UTM
Categories
- Firewalls > NSv Series > Azure


 YES
YES NO
NO