-
Products
-
SonicPlatform
SonicPlatform is the cybersecurity platform purpose-built for MSPs, making managing complex security environments among multiple tenants easy and streamlined.
Discover More
-
-
Solutions
-
Federal
Protect Federal Agencies and Networks with scalable, purpose-built cybersecurity solutions
Learn MoreFederalProtect Federal Agencies and Networks with scalable, purpose-built cybersecurity solutions
Learn More - Industries
- Use Cases
-
-
Partners
-
Partner Portal
Access to deal registration, MDF, sales and marketing tools, training and more
Learn MorePartner PortalAccess to deal registration, MDF, sales and marketing tools, training and more
Learn More - SonicWall Partners
- Partner Resources
-
-
Support
-
Support Portal
Find answers to your questions by searching across our knowledge base, community, technical documentation and video tutorials
Learn MoreSupport PortalFind answers to your questions by searching across our knowledge base, community, technical documentation and video tutorials
Learn More - Support
- Resources
- Capture Labs
-
- Company
- Contact Us
Modifying Address Object via SonicOS API call using cURL


Description
This article demonstrates how to modify address object via SonicOS API call using cURL tool
Resolution
Resolution for SonicOS 7.X
This release includes significant user interface changes and many new features that are different from the SonicOS 6.5 and earlier firmware. The below resolution is for customers using SonicOS 7.X firmware.
The following steps should be completed first to be able to use the API.
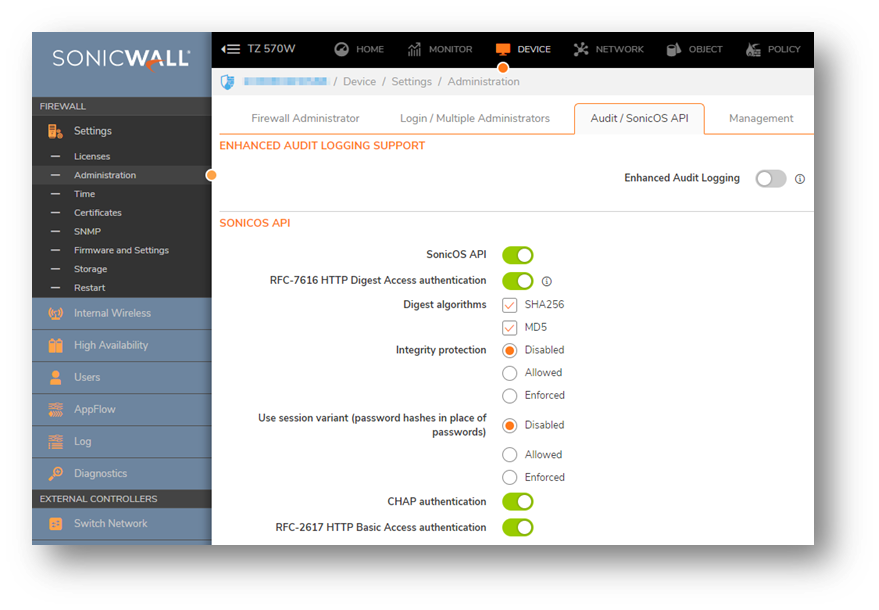
- SonicOS API enabled on DEVICE| Settings | Administration| Audit/SonicOS API
- "Enable RFC-2617 HTTP Basic Access authentication" option selected on the same page

- A user created that is part of "SonicWall Administrators" group
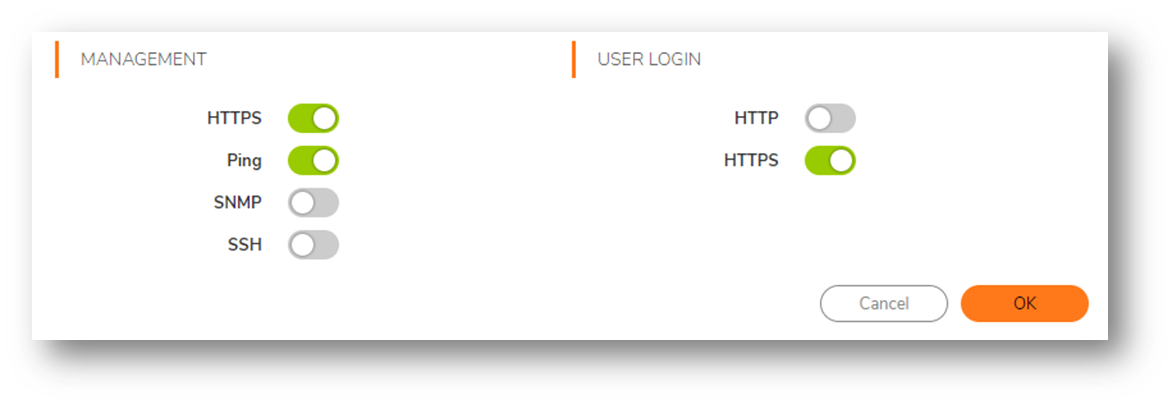
- HTTPS "User Login" option enabled on the respective interface, which will be used for API calls

- An Address Object that already exist on the firewall. In this example the name of the Address Object is "AO-Test", which is a "host" type with an IP address of "10.10.10.10" and is part of the "LAN" zone.
In this use case we will create Address Objects and add them to a Address Group Object named "Blacklist". A typical scenario could be to populate and Address Group Object that is associated to an Access Rule to deny network traffic. The following API calls can be utilized with cURL tool. Please replace the IP address and username/password per your config.
- Authentication
curl -k -i -u myuser:mypassword -digest -X HEAD https://192.168.168.168/api/sonicos/auth - Starting the firewall management
curl --insecure -X POST "https://192.168.168.168/api/sonicos/start-management" - Changing the firewall to Config Mode
curl --insecure -X POST "https://192.168.168.168/api/sonicos/config-mode" - Modify Address Object named "AO-Test" with IP address "10.10.10.10" and UUID "00000000-0000-001d-0100-2cb8ed9d8020" to "10.10.10.99"
curl --insecure -X PUT "https://192.168.168.168/api/sonicos/address-objects/ipv4" -H "accept: application/json" -H "Content-Type: application/json" -d "{\"address_objects\": [{ \"ipv4\": { \"name\": \"AO-Test\", \"uuid\": \"00000000-0000-001d-0100-2cb8ed9d8020\", \"zone\": \"LAN\", \"host\": {\"ip\": \"10.10.10.99\"}}}]} - Committing the change
curl --insecure -X POST "https://192.168.168.168/api/sonicos/config/pending" -H "accept: application/json" -H "Content-Type: application/json" -d "{}"
Resolution for SonicOS 6.5
This release includes significant user interface changes and many new features that are different from the SonicOS 6.2 and earlier firmware. The below resolution is for customers using SonicOS 6.5 firmware.
The following steps should be completed first to be able to use the API.
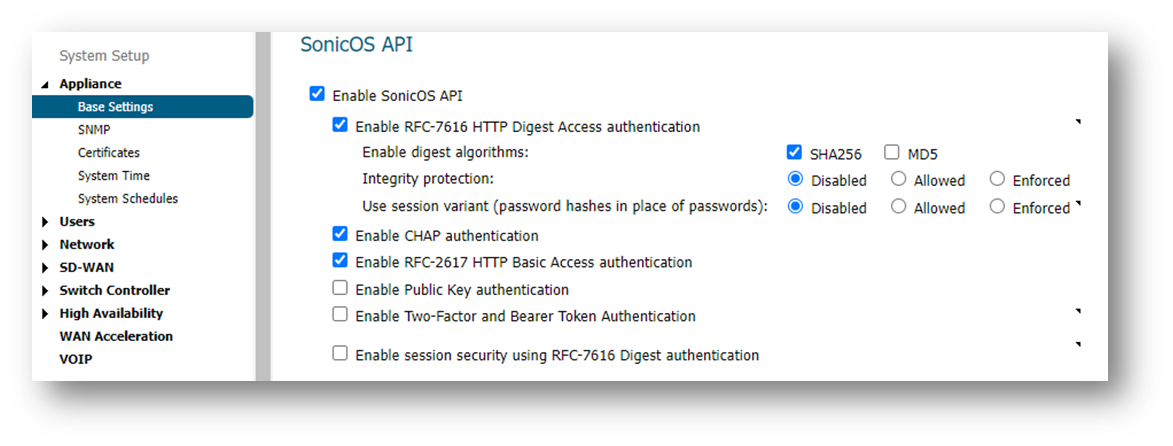
- SonicOS API enabled on Manage | Appliance | Base Settings
- "Enable RFC-2617 HTTP Basic Access authentication" option selected on the same page

- A user created that is part of "SonicWall Administrators" group
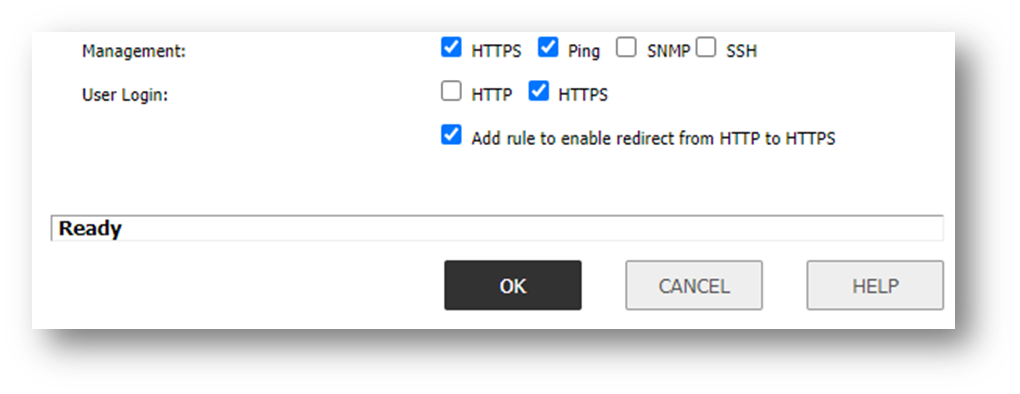
- HTTPS "User Login" option enabled on the respective interface, which will be used for API calls

In this use case we will create Address Objects and add them to a Address Group Object named "Blacklist". A typical scenario could be to populate and Address Group Object that is associated to an Access Rule to deny network traffic. The following API calls can be utilized with cURL tool. Please replace the IP address and username/password per your config.
- Authentication
curl -k -i -u myuser:mypassword -digest -X HEAD https://192.168.168.168/api/sonicos/auth - Modify Address Object named "AO-Test" with IP address "10.10.10.10" and UUID "00000000-0000-001d-0100-2cb8ed9d8020" to "10.10.10.99"
curl --insecure -X PUT "https://192.168.168.168/api/sonicos/address-objects/ipv4" -H "accept: application/json" -H "Content-Type: application/json" -d "{\"address_objects\": [{ \"ipv4\": { \"name\": \"AO-Test\", \"uuid\": \"00000000-0000-001d-0100-2cb8ed9d8020\", \"zone\": \"LAN\", \"host\": {\"ip\": \"10.10.10.99\"}}}]} - Committing the change
curl --insecure -X POST "https://192.168.168.168/api/sonicos/config/pending" -H "accept: application/json" -H "Content-Type: application/json" -d "{}"
Related Articles
- Error:"Invalid API Argument" when modifying the access rules
- Cysurance Partner FAQ
- Configure probe monitoring for WAN Failover and Loadbalancing - SonicWall UTM
Categories
- Firewalls > NSa Series
- Firewalls > TZ Series
- Firewalls > NSsp Series
- Firewalls > SonicWall SuperMassive 9000 Series
- Firewalls > NSv Series


 YES
YES NO
NO