-
Products
-
SonicPlatform
SonicPlatform is the cybersecurity platform purpose-built for MSPs, making managing complex security environments among multiple tenants easy and streamlined.
Discover More
-
-
Solutions
-
Federal
Protect Federal Agencies and Networks with scalable, purpose-built cybersecurity solutions
Learn MoreFederalProtect Federal Agencies and Networks with scalable, purpose-built cybersecurity solutions
Learn More - Industries
- Use Cases
-
-
Partners
-
Partner Portal
Access to deal registration, MDF, sales and marketing tools, training and more
Learn MorePartner PortalAccess to deal registration, MDF, sales and marketing tools, training and more
Learn More - SonicWall Partners
- Partner Resources
-
-
Support
-
Support Portal
Find answers to your questions by searching across our knowledge base, community, technical documentation and video tutorials
Learn MoreSupport PortalFind answers to your questions by searching across our knowledge base, community, technical documentation and video tutorials
Learn More - Support
- Resources
- Capture Labs
-
- Company
- Contact Us
How to stop the creation of Auto-Added Access Rules and enable the ability to edit or delete the existing rules?


Description
This article explains how the creation of auto-added access rules on the SonicWall can be stopped and if there are some already auto-added access rules, how those can be edited/ deleted.
Cause
On SonicWall, by default, the suppression of auto-added access rules is not enabled. This results in the Auto creation of access rules either restricting or allowing access between the zones. In environments where there are more Zones created, an enormous number of Access Rules are auto-created.
Resolution
Resolution for SonicOS 7.X
This release includes significant user interface changes and many new features that are different from the SonicOS 6.5 and earlier firmware. The below resolution is for customers using SonicOS 7.X firmware.
Stop the Creation of Auto-Added Access Rules
For Network Zones:
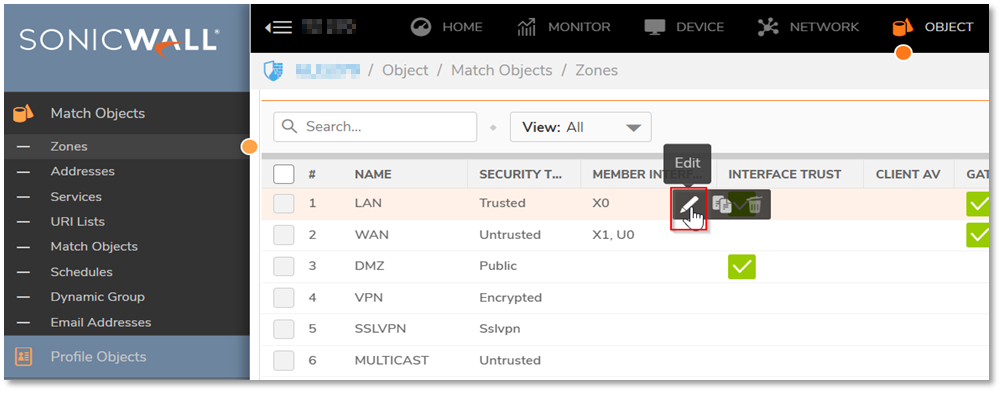
- Login to the firewall and Browse to OBJECT | Match Object > Zones

- Edit the Zone
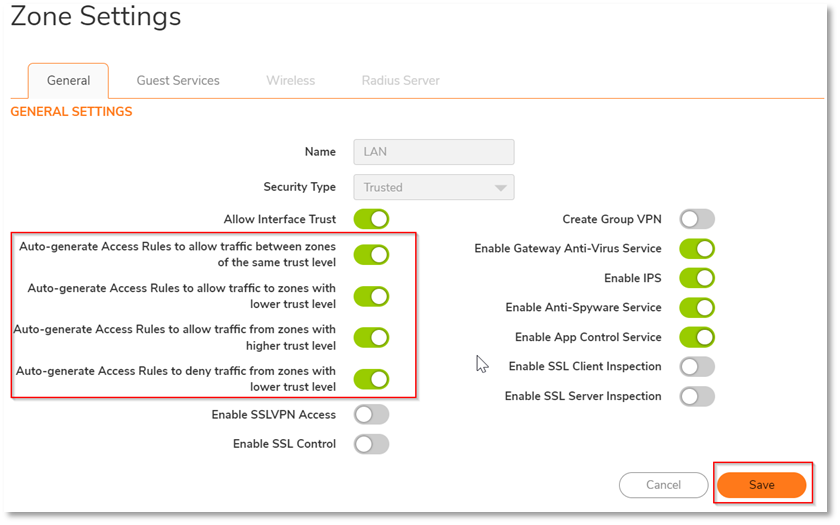
- Disable the Auto-Generation of access rules by disabling the options highlighted in the below screenshot and then Click on “Save”
For Site-to-Site VPNs:
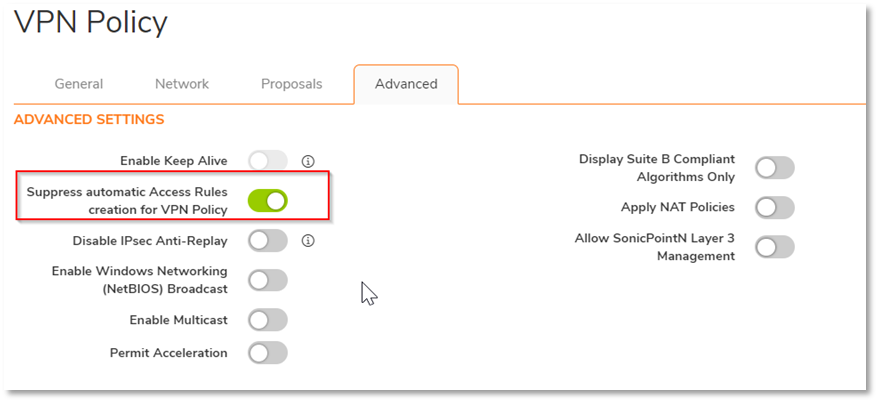
Generation of Access Rules while creating Site-to-Site VPNs can be stopped by following the below-mentioned steps:
- While creating a Site-to-Site VPN, Navigate to the Advanced Tab
- Enable the option Suppress automatic Access Rules creation for VPN Policy
For Tunnel Interface VPNs:
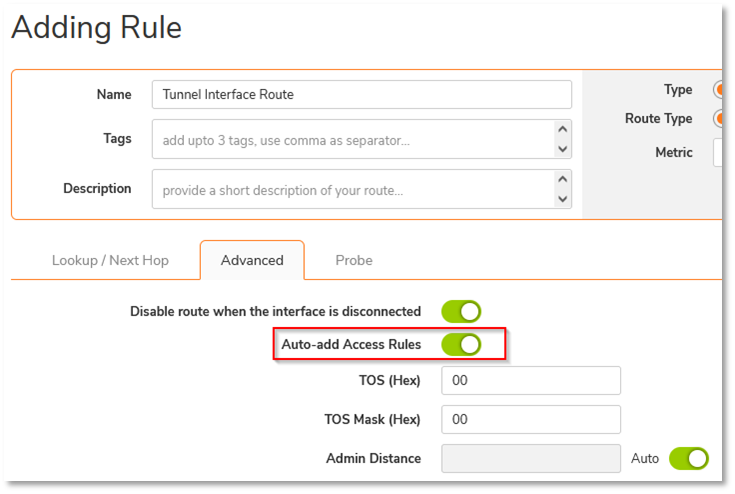
Generation of Access Rules for a Tunnel Interface VPN can be stopped while creating routes for the VPN, by following the below-mentioned steps:
- While creating a route for the Tunnel Interface VPN, navigate to the “Advanced” tab, Disable the Option “Auto-add Access Rules” and then click on “Add”
Enable the Ability to Edit/Delete existing auto-added rules
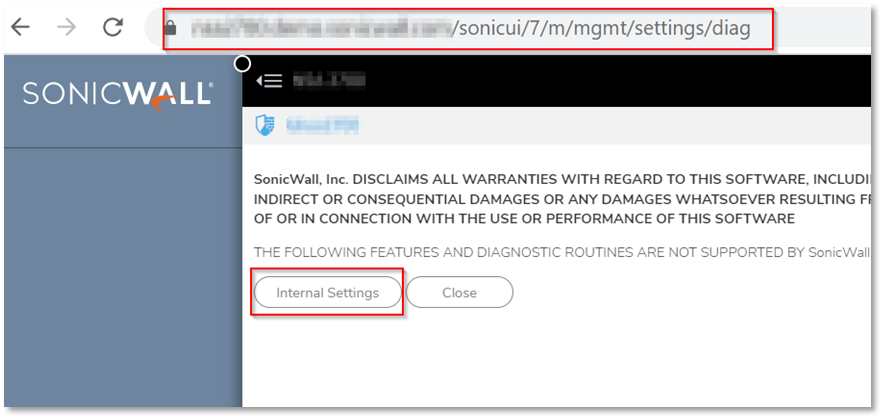
- Login to the firewall and change the URL to https://
/sonicui/7/m/mgmt/settings/diag
Example: https://192.168.168.168/sonicui/7/m/mgmt/settings/diag - Click on Internal Settings
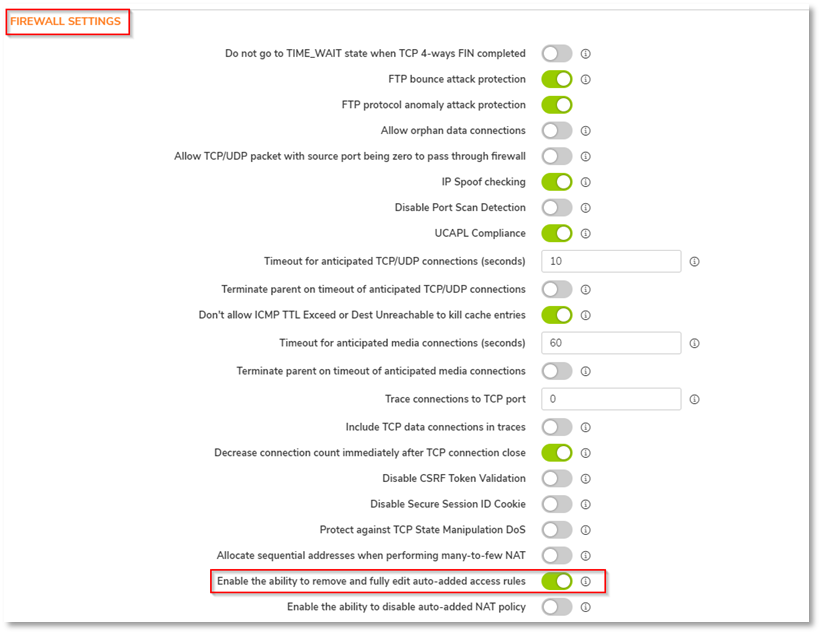
- Scroll down to FIREWALL SETTINGS and you will be able to find the option to “Enable the ability to remove and fully edit auto-added access rules”, Enable that option.
- Click Accept at the Top of the page and then Exit Internal Settings

After following the above steps, you will be able to Edit/Delete the auto-added access rules.
Resolution for SonicOS 6.5
This release includes significant user interface changes and many new features that are different from the SonicOS 6.2 and earlier firmware. The below resolution is for customers using SonicOS 6.5 firmware.
Stop the Creation of Auto-Added Access Rules
For Network Zones:
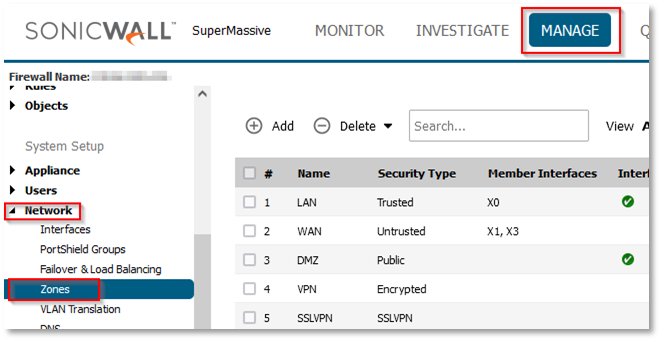
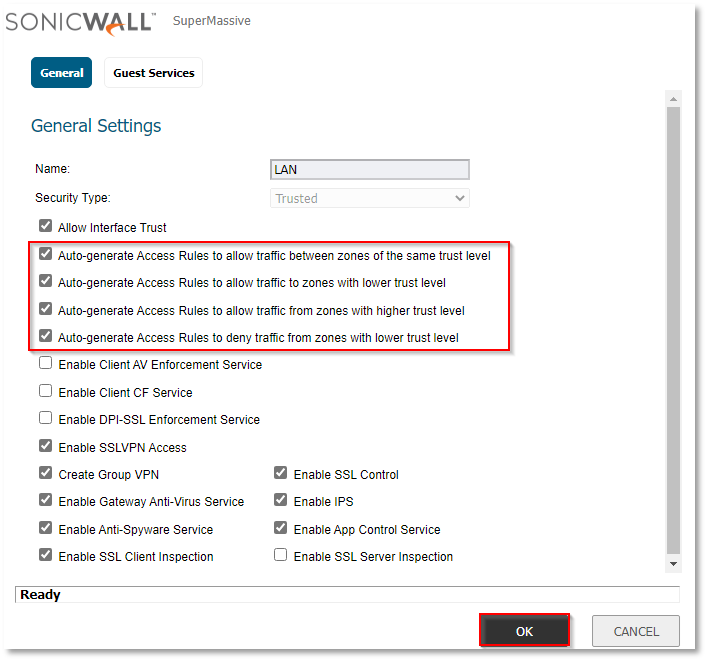
- Login to the firewall and browse to MANAGE | Network > Zones
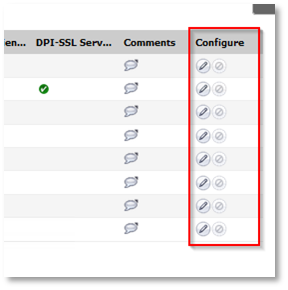
- Click on Configure on the respective Zone
- Disable the Auto-Generation of access rules by disabling the options highlighted in the below screenshot and then Click on “OK”
For Site-to-Site VPNs:
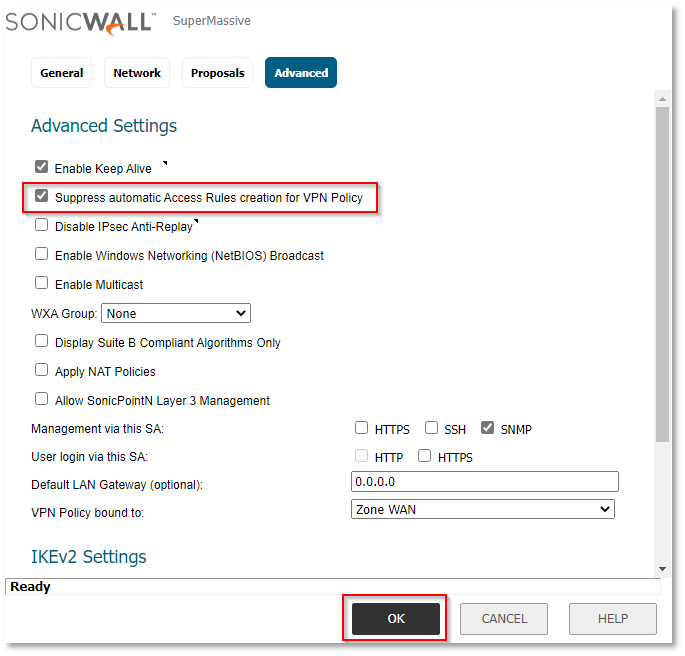
Generation of Access Rules while creating Site-to-Site VPNs can be stopped by following the below-mentioned steps:
- While creating a Site-to-Site VPN, Navigate to the Advanced Tab
- Enable the option Suppress automatic Access Rules creation for VPN Policy.
For Tunnel Interface VPNs:
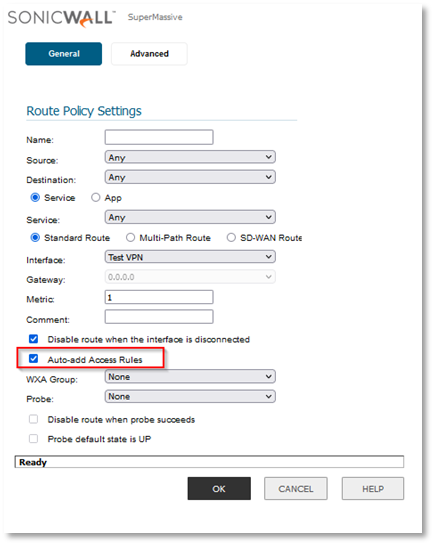
Generation of Access Rules for a Tunnel Interface VPN can be stopped while creating routes for the VPN, by following the below-mentioned steps:
- While creating a route for the Tunnel Interface VPN, Disable the Option “Auto-add Access Rules” and then click on “OK”
Enable the Ability to Edit/Delete existing auto-added rules
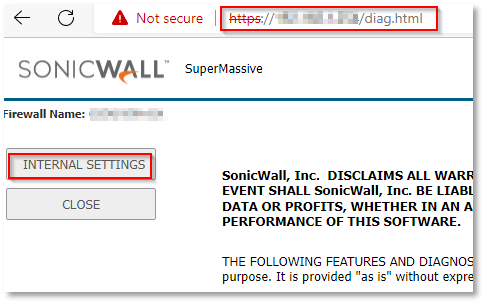
- Login to the firewall and change the URL to https://
/diag.html
Example: https://192.168.168.168/diag.html - Click on Internal Settings
- Scroll down to Firewall Settings and you will be able to find the option to
“Enable the ability to remove and fully edit auto-added access rules”, Enable that option.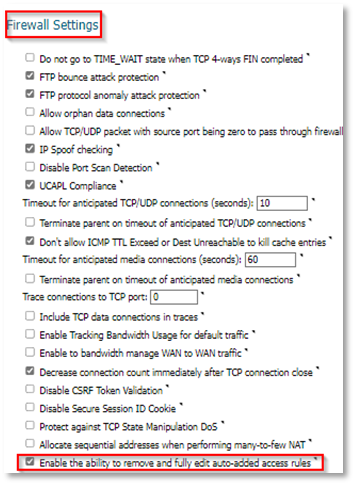
- Click Accept and then Close
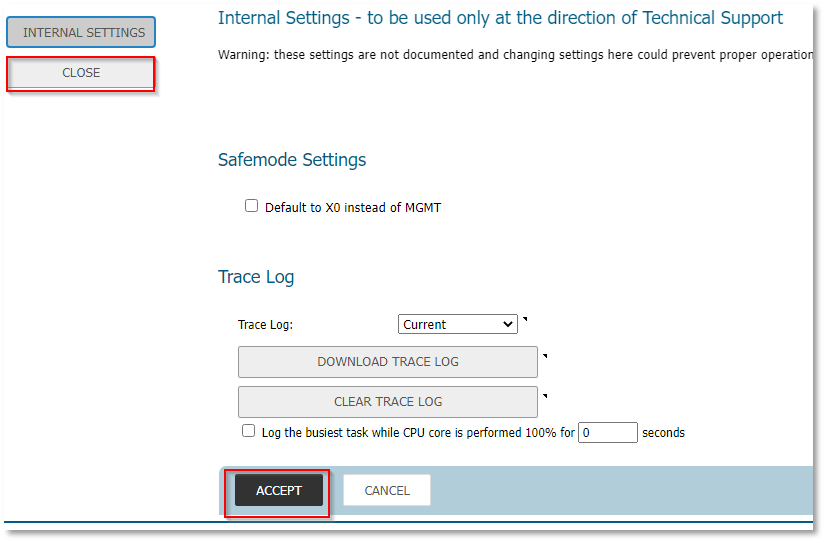
After following the above steps, you will be able to Edit/Delete the auto-added access rules.
Related Articles
Categories
- Firewalls > NSa Series > Networking
- Firewalls > TZ Series > Networking
- Firewalls > SonicWall SuperMassive 9000 Series > Networking
- Firewalls > SonicWall SuperMassive E10000 Series > Networking
- Firewalls > NSsp Series > Networking


 YES
YES NO
NO