-
Products
-
SonicPlatform
SonicPlatform is the cybersecurity platform purpose-built for MSPs, making managing complex security environments among multiple tenants easy and streamlined.
Discover More
-
-
Solutions
-
Federal
Protect Federal Agencies and Networks with scalable, purpose-built cybersecurity solutions
Learn MoreFederalProtect Federal Agencies and Networks with scalable, purpose-built cybersecurity solutions
Learn More - Industries
- Use Cases
-
-
Partners
-
Partner Portal
Access to deal registration, MDF, sales and marketing tools, training and more
Learn MorePartner PortalAccess to deal registration, MDF, sales and marketing tools, training and more
Learn More - SonicWall Partners
- Partner Resources
-
-
Support
-
Support Portal
Find answers to your questions by searching across our knowledge base, community, technical documentation and video tutorials
Learn MoreSupport PortalFind answers to your questions by searching across our knowledge base, community, technical documentation and video tutorials
Learn More - Support
- Resources
- Capture Labs
-
- Company
- Contact Us
How to add SonicWall Switch manually to SonicWall UTM?


Description
This article explains how SonicWall switch can be manually added to the SonicWall UTM without using auto-discovery feature.
Resolution
By default switch is a DHCP client & All the ports are members of Native VLAN 1 (untagged). Once the switch is Powered ON it will try to Discover the DHCP Server for the IP address:
*** If found it will acquire the IP address from the subsequent DHCP pool (Untagged VLAN subnet)
*** If the DHCP server is not found then it will fall back to factory default IP 192.168.168.169 ***
If the switch connects to a Firewall interface & it has DHCP Server Enabled, then the switch will get an IP from the same subnet and you can find the assigned IP from Firewall DHCP Leases.
If the DHCP server is not enabled on the firewall/ No DHCP server, then you need to configure the switch MGMT IP address manually/Static.
To access the switch Management console GUI follow the steps:
Considering there is NO DHCP server & the switch has a factory default IP address: 192.168.68.169
We would need to connect to the Switch over Ethernet using the following steps.
- Assign a static IP in the subnet 192.168.0.x on the computer with which you would like to connect to the switch directly.
- Bring up the Network Status display and double-click on the Change adapter options.
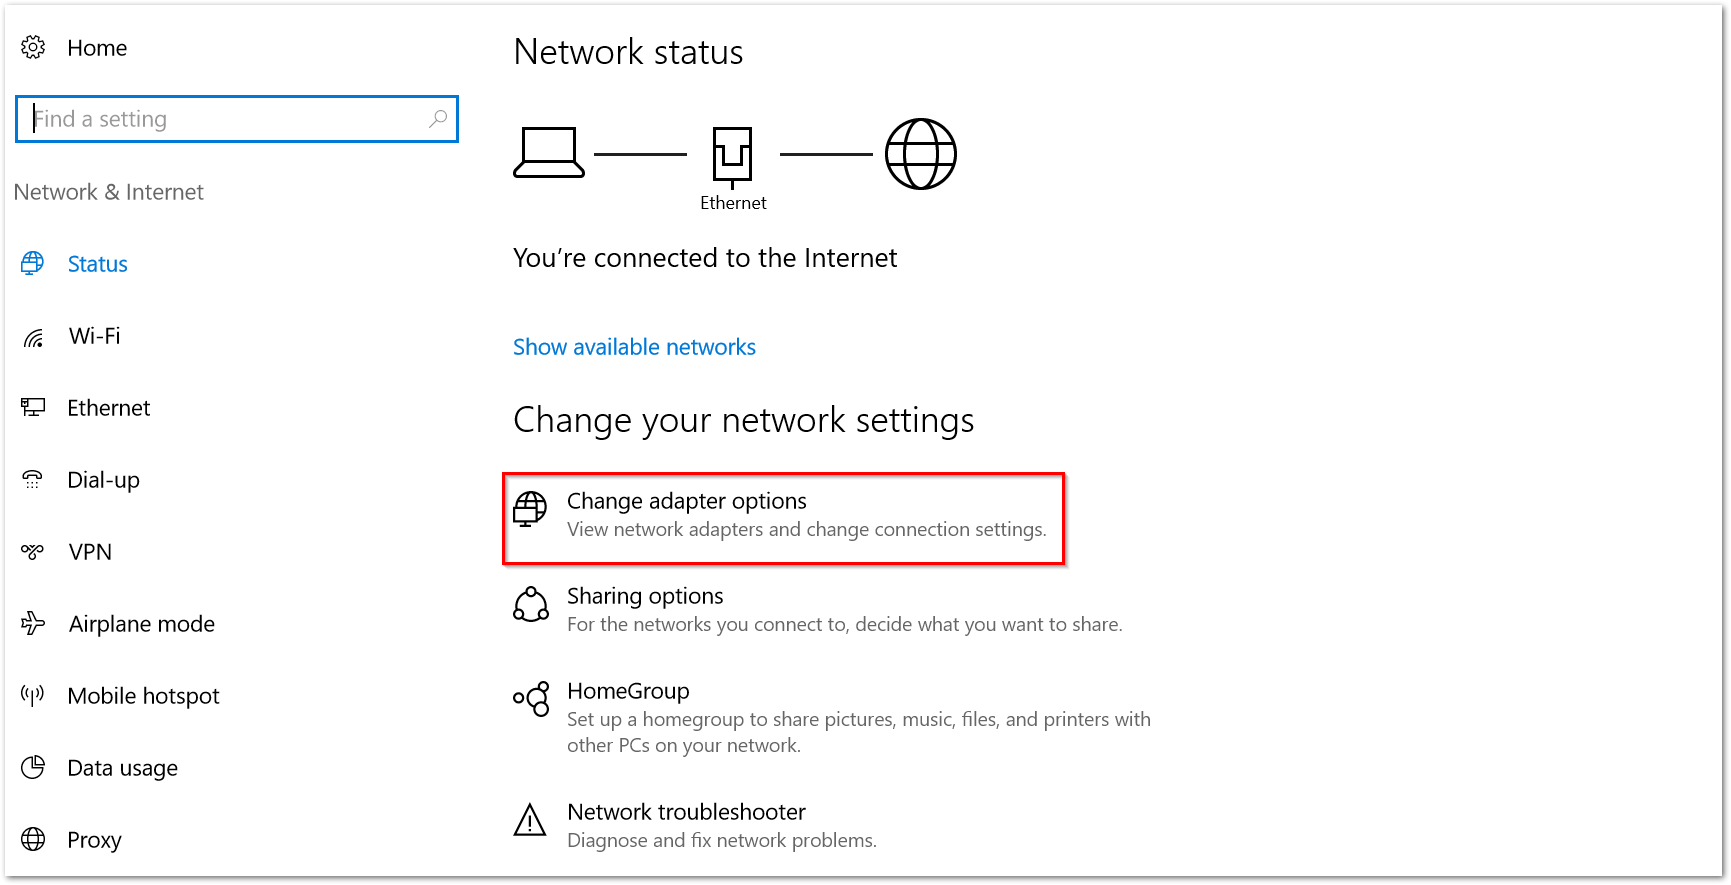
- When the Network Connections appear, select the Ethernet adapter connected to the switch, right-click and select Properties.

- When the Ethernet Networks dialog box comes up, select Internet Protocol Version 4 (TCP/IPv4) and click on Properties.
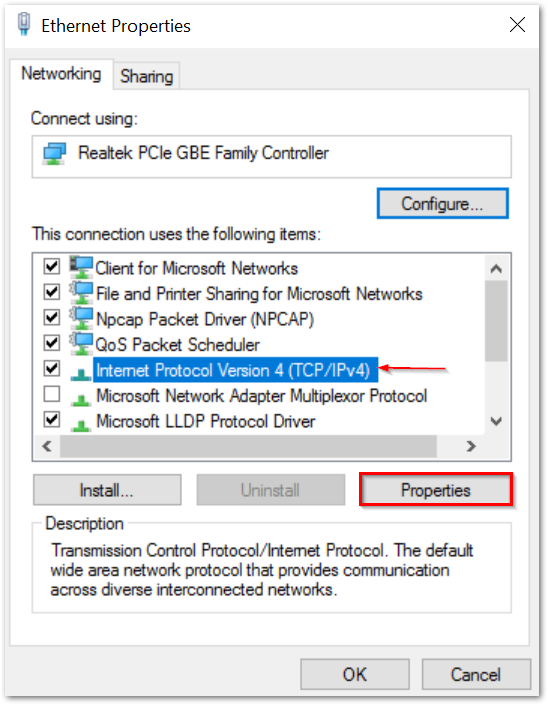
- In the next dialog box, enter the IP address and Subnet mask as shown.
- Power up the switch and wait for it to fully boot. Connect an Ethernet cable from your system to one for the copper (RJ45) Ethernet ports on the switch.
- Bring up a browser and address the Switch management console: https://192.168.0.239.

- Enter username as admin and password as password to start a management console session for the first time.
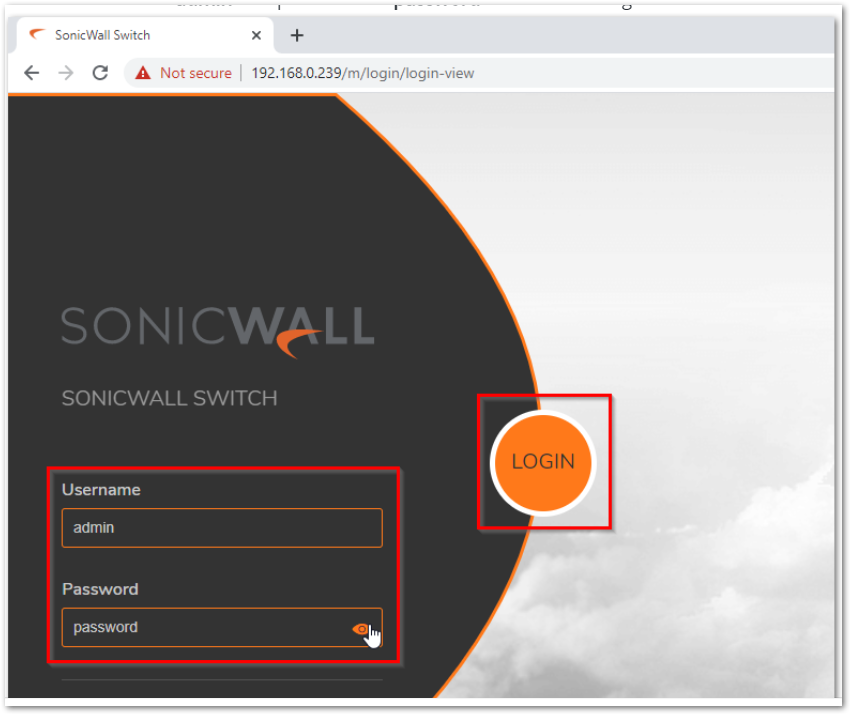
 NOTE: By default, the switch will be in DHCP client and will receive an IP from the SonicWall interface used for provisioning.
 - To add the switch to a network without a DHCP server, you can do the following.
- Navigate to System | Network and click Action.

- Under IPV4 SETTINGS, select Static. Assign the IP address and subnet mask.
- Click OK to update the system.
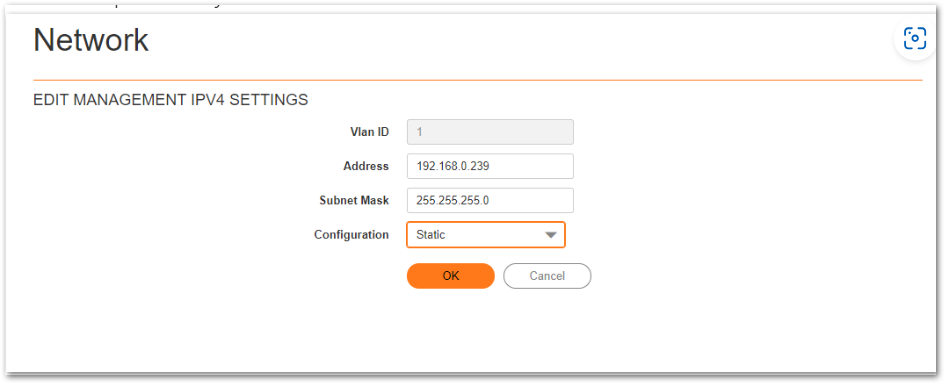
Once these changes are made on the Switch directly, the following changes can be done on the firewall.
- Connect an Ethernet cable (that is, RJ45 to RJ45) from a port on the SonicWall Switch to an available port on the firewall.
 NOTE: You can navigate to MANAGE | Network | DHCP Server to find the IP address assigned to the switch if you are using DHCP.

- Navigate to MANAGE | System Setup | Switch Controller and Overview tab. You can also add the switch from the List view or VLAN view.
- Click on the Add Switch button.
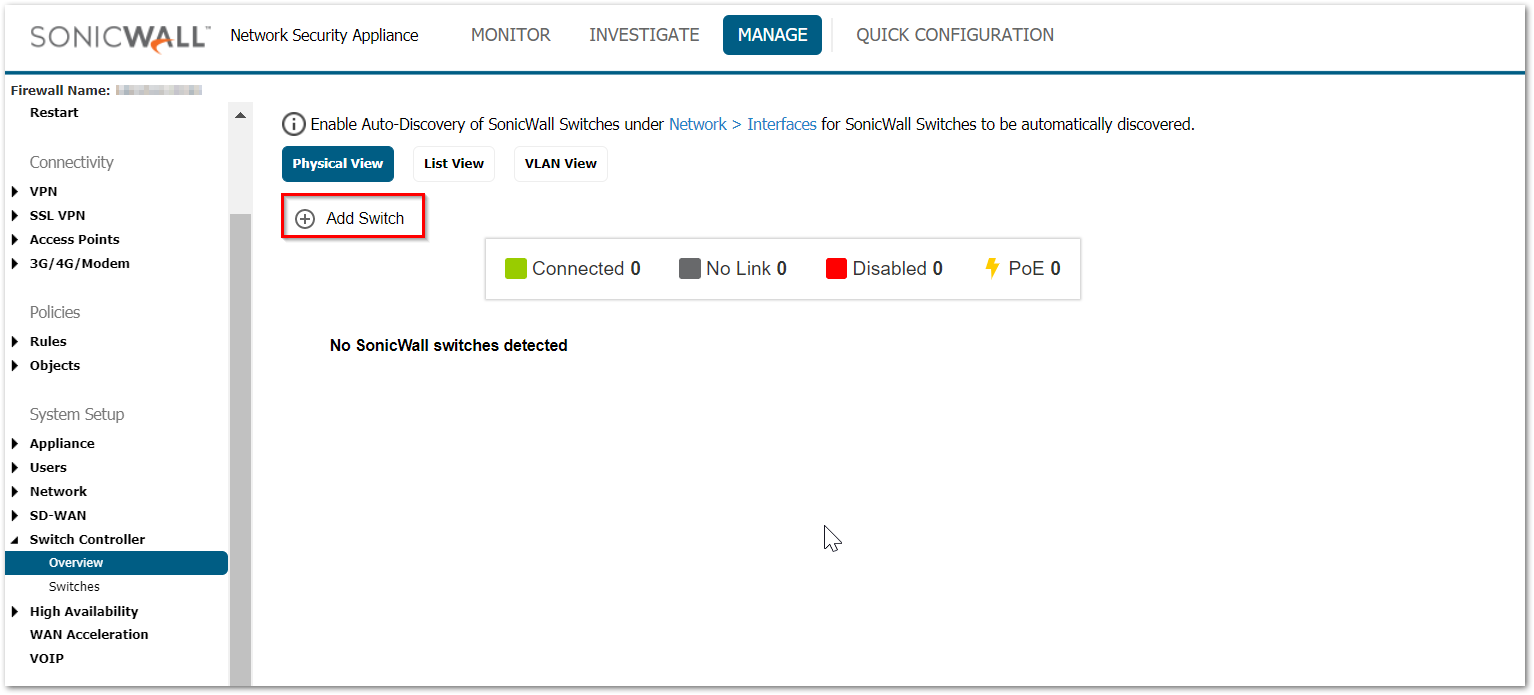
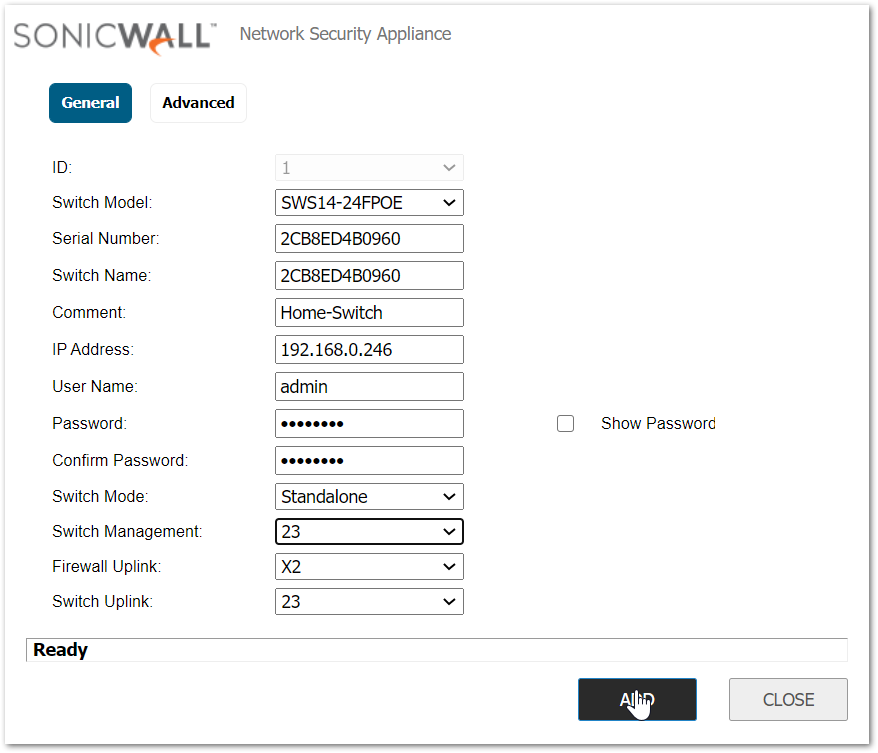
- A new dialog box will appear asking for all switch details.
• ID: The system will auto-assign a consecutive number here.
• Switch Model: Click on the down-pointing selection arrow and choose. Check the label on the bottom of your switch if necessary.
• Serial Number: Check the label on the bottom of the switch.
• Switch Name: Any friendly name can be used.
• Comment: For optional reference.
• IP Address: Mention the IP address of the switch chosen statically or the one that it received using DHCP.
• User Name: Default is admin.
• Password: The password configured on the switch.
• Switch Mode: The choices are Standalone for one switch per port or Daisy Chain when multiple switches are added such that no switch connects with more than two others.
• Switch Management: Management traffic flows on this interface.
• Firewall Uplink: This is the port on the firewall to which the switch will connect.
• Switch Uplink: This is the port on the switch connecting to the firewall.
Click on Advanced to access the Spanning Tree Protocol settings:
• STP Mode: Rapid or Multiple
• STP State: Enabled or Disabled
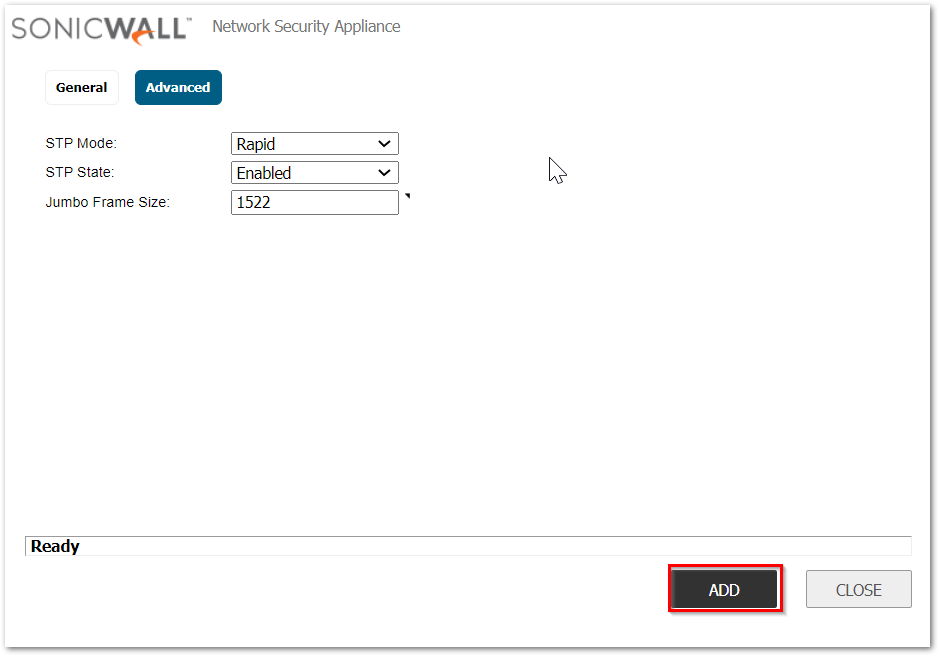
- Once the dialog boxes are complete, click ADD.
 NOTE: Every SonicWall interface has an internal VLAN associated with it. By default, 2 to 33 VLANs are reserved by the SonicWall. While provisioning the switch, it is important to make sure that no VLANs are configured on the firewall that overlaps with this range. It might lead to the following Error: Extended Switch cannot be configured due to the presence of VLAN sub-interfaces in the reserved VLAN range. Please refer to Configurable Internal VLAN for more details.
 - Navigate to the Overview tab, the new switch will appear graphically with the ports linking the switch and the firewall indicated.

- You can also view the Switch details from MANAGE | System Setup | Switch Controller and Switches tab. The Switch tab lists all the necessary details regarding this switch.

Related Articles
- Supported SonicWall and 3rd party SFP and SFP+ Modules that can be used with SonicWall Switches
- How to enable Port Mirror on Sonicwall Switch.
- Create a new VLAN on Sonicwall Switch managed by WCM.


 YES
YES NO
NO