-
Products
-
SonicPlatform
SonicPlatform is the cybersecurity platform purpose-built for MSPs, making managing complex security environments among multiple tenants easy and streamlined.
Discover More
-
-
Solutions
-
Federal
Protect Federal Agencies and Networks with scalable, purpose-built cybersecurity solutions
Learn MoreFederalProtect Federal Agencies and Networks with scalable, purpose-built cybersecurity solutions
Learn More - Industries
- Use Cases
-
-
Partners
-
Partner Portal
Access to deal registration, MDF, sales and marketing tools, training and more
Learn MorePartner PortalAccess to deal registration, MDF, sales and marketing tools, training and more
Learn More - SonicWall Partners
- Partner Resources
-
-
Support
-
Support Portal
Find answers to your questions by searching across our knowledge base, community, technical documentation and video tutorials
Learn MoreSupport PortalFind answers to your questions by searching across our knowledge base, community, technical documentation and video tutorials
Learn More - Support
- Resources
- Capture Labs
-
- Company
- Contact Us
How to Configure Botnet Filtering with Firewall Access Rules


Description
This article covers how to use SonicWall Botnet security service with access rule. This article will demonstrate how to create a firewall access rule for a mail server so that the mail server will be protected from going to a Botnet command and control website while the rest of the network traffic will be passed without being scanned by the Botnet security service.
 NOTE: When implementing Botnet Security to website(s) make sure to evaluate all depending business applications; blocking access to a Botnet listed website(s) may impact dependent applications/process.
Resolution
Resolution for SonicOS 7.X
This release includes significant user interface changes and many new features that are different from the SonicOS 6.5 and earlier firmware. The below resolution is for customers using SonicOS 7.X firmware.
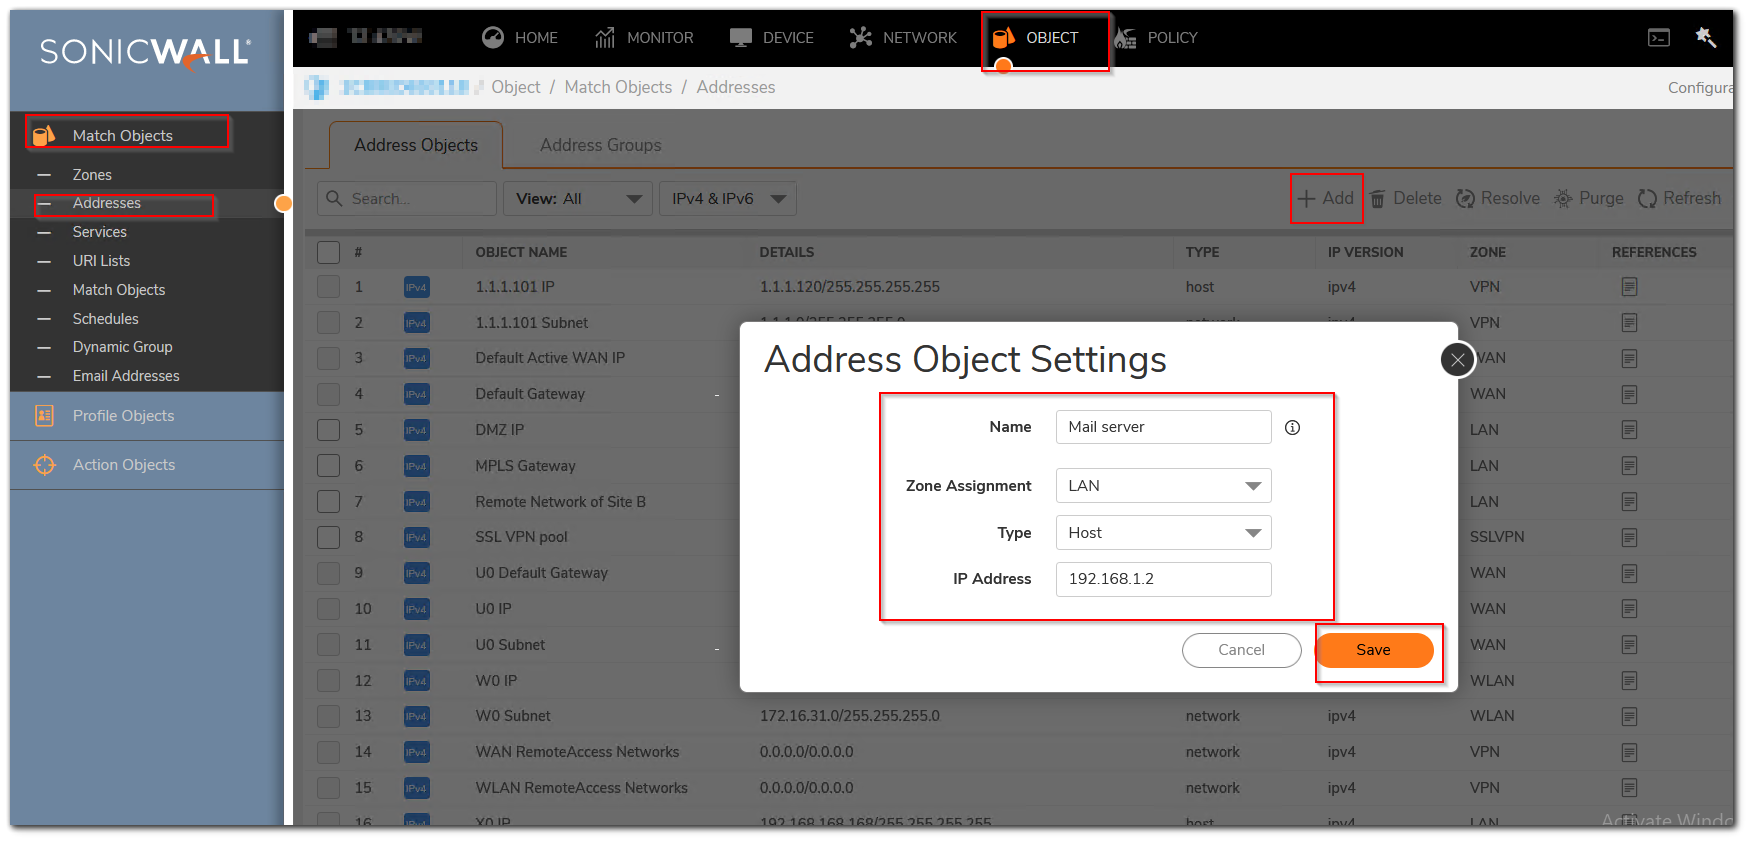
Step 1: Create an Address Object for the Mail Server.
- Click OBJECT in the top navigation menu
- Navigate to Match Objects | Addresses
- Click on Add
- Enter the Mail Server IP address
- Click on Save
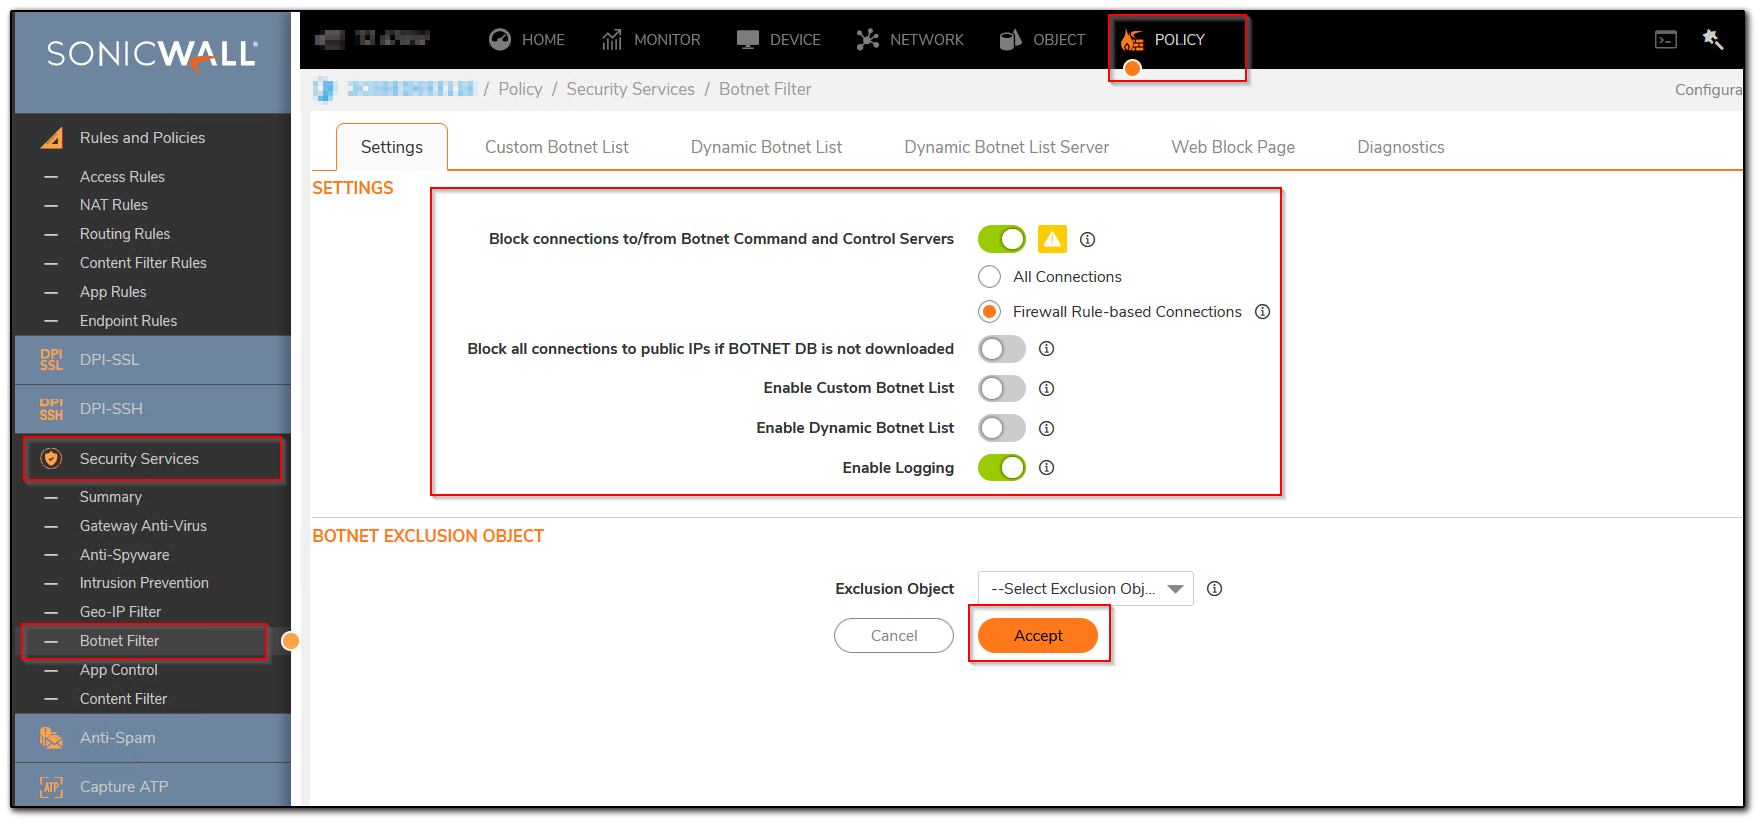
Step 2: Click POLICY in the top navigation menu
- Navigate to Security Services | Botnet filter
- Enable Block connections to/from Botnet Command and Control Servers based on Firewall Rule-based Connections and Enable Logging
- Click on ACCEPT to Save
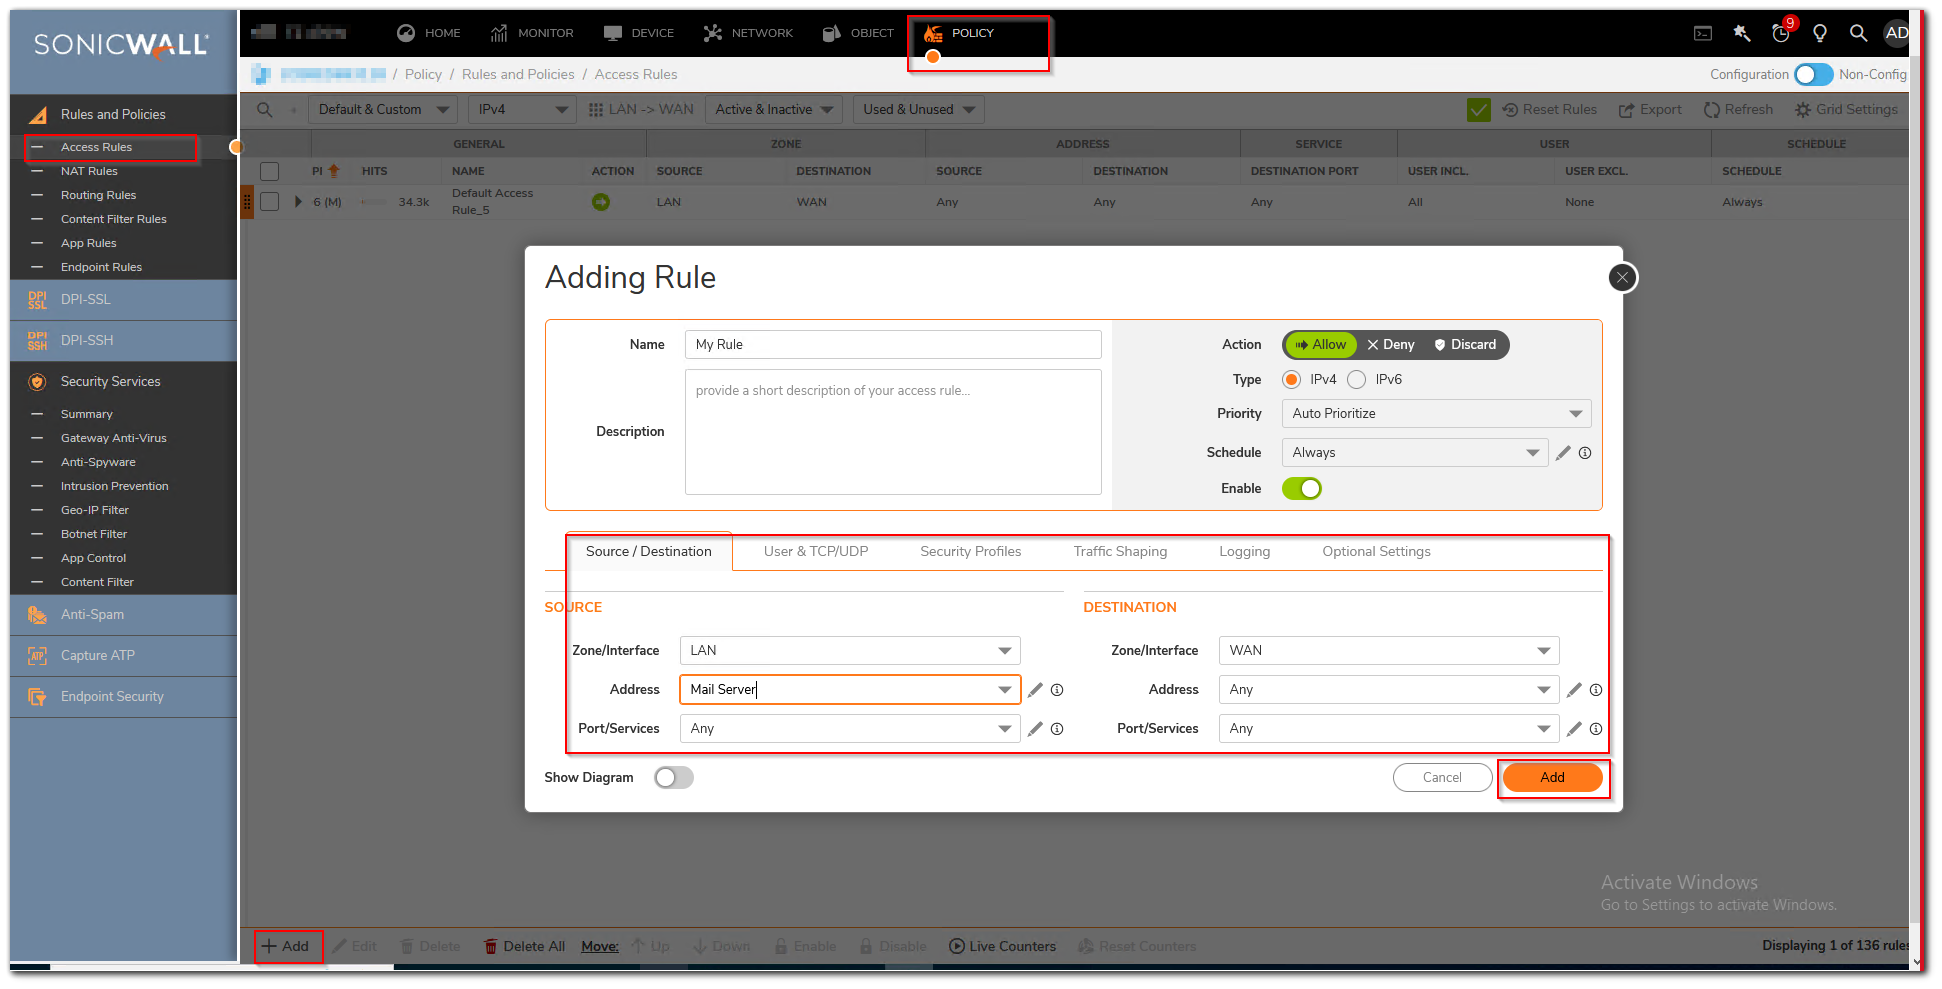
Step 3: Create an Access Rule that we want to apply the Botnet Filter service to.
- Click POLICY in the top navigation menu
- Navigate to Rules and Policies | Access Rules
- Click on Add
- In our example we will create an access rule from the LAN>WAN to enable Botnet Filtering from the Mail Server.
- On Access rule navigate to Security Profiles, Enable BOTNET / CC
- Click on Add
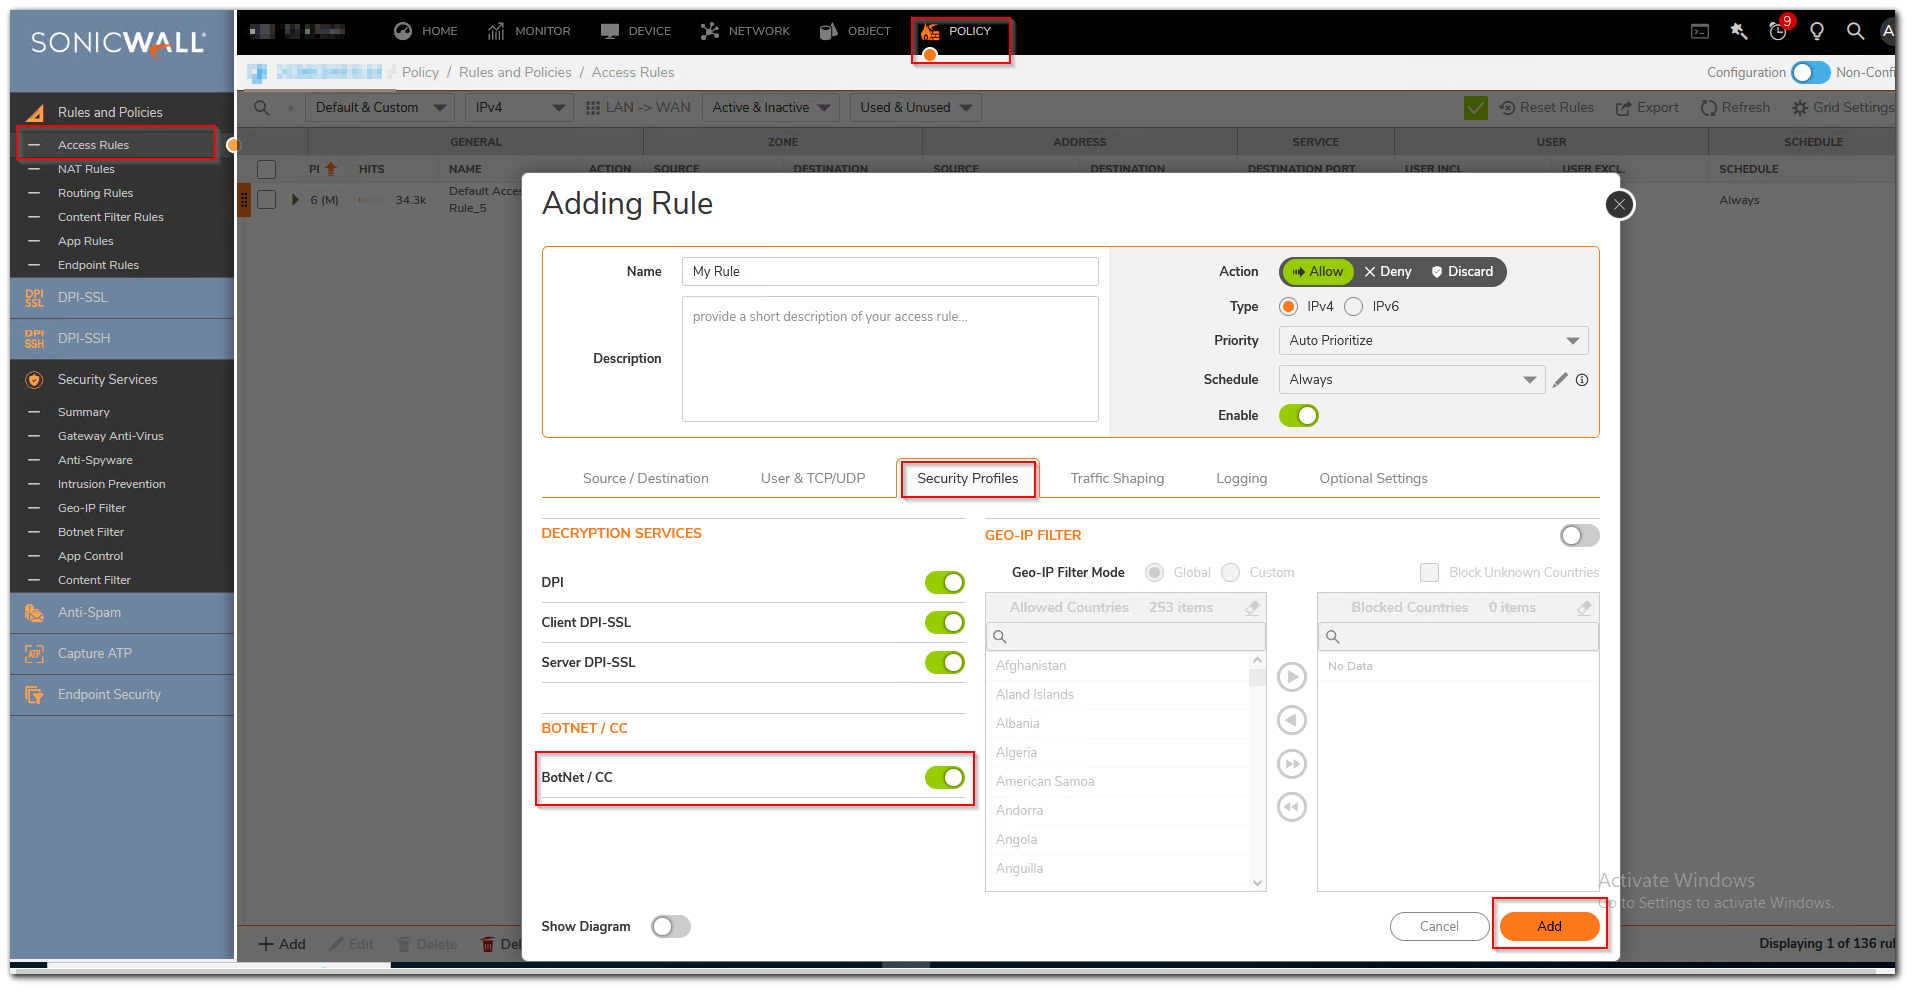
Any traffic going to the Internet from the Mail Server will be scanned via the Botnet Filter Security Service, all other network traffic will not be scanned.
Resolution for SonicOS 6.5
This release includes significant user interface changes and many new features that are different from the SonicOS 6.2 and earlier firmware. The below resolution is for customers using SonicOS 6.5 firmware.
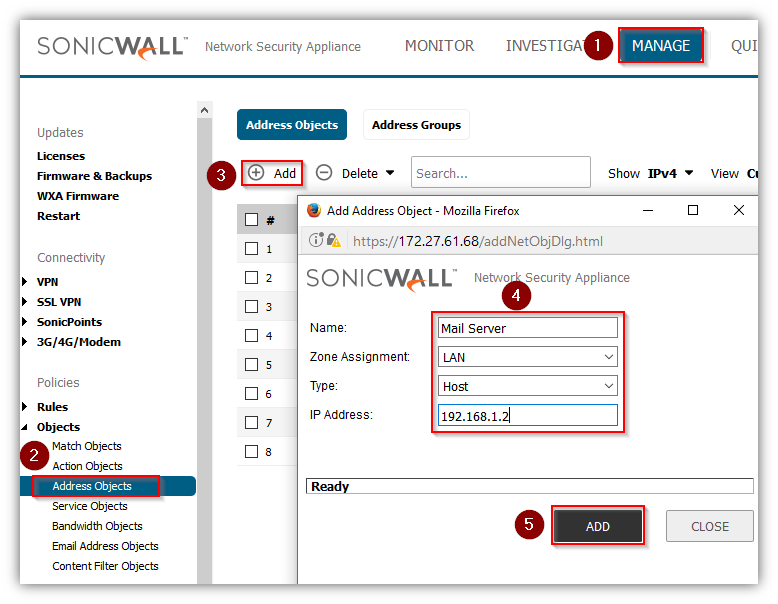
Step 1: Create an Address Object for the Mail Server.
- Click Manage in the top navigation menu
- Navigate to Objects | Address Objects
- Click on Add
- Enter the Mail Server IP address
- Click on OK to Save
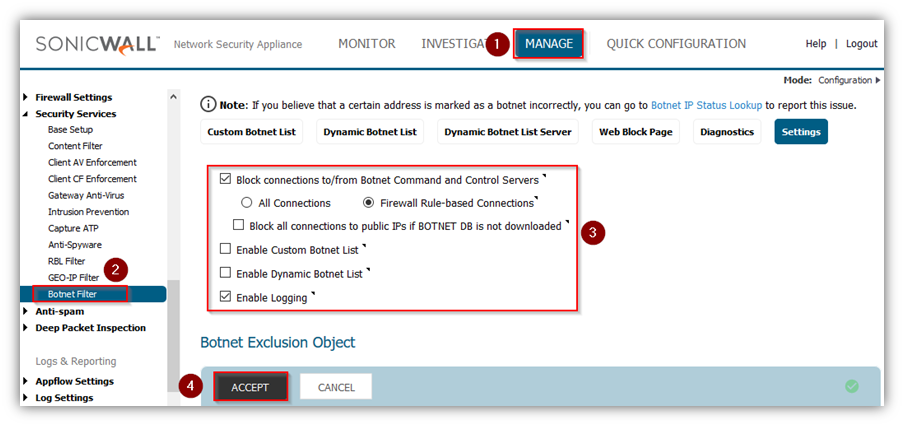
Step 2: .
- Click Manage in the top navigation menu
- Navigate to Security Services | Botnet filter
- Enable Botnet Filter Blocking based on the Firewall Access Rules and Enable Logging
- Click on ACCEPT to Save
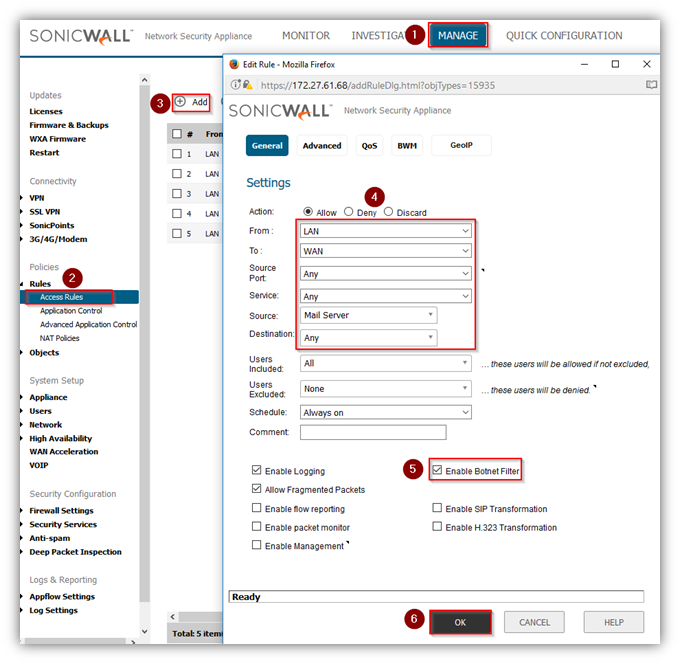
Step 3: Create an Access Rule that we want to apply the Botnet Filter service to.
- Click Manage in the top navigation menu
- Navigate to Rules | Access Rules
- Click on Add
- In our example we will create an access rule from the LAN>WAN to enable Botnet Filtering from the Mail Server.
- Enable Botnet filter
- Click on OK to Save
Any traffic going to the Internet from the Mail Server will be scanned via the Botnet Filter Security Service, all other network traffic will not be scanned.
Resolution for SonicOS 6.2 and Below
The below resolution is for customers using SonicOS 6.2 and earlier firmware. For firewalls that are generation 6 and newer we suggest to upgrade to the latest general release of SonicOS 6.5 firmware.
Step 1: Create an Address Object for the Mail Server.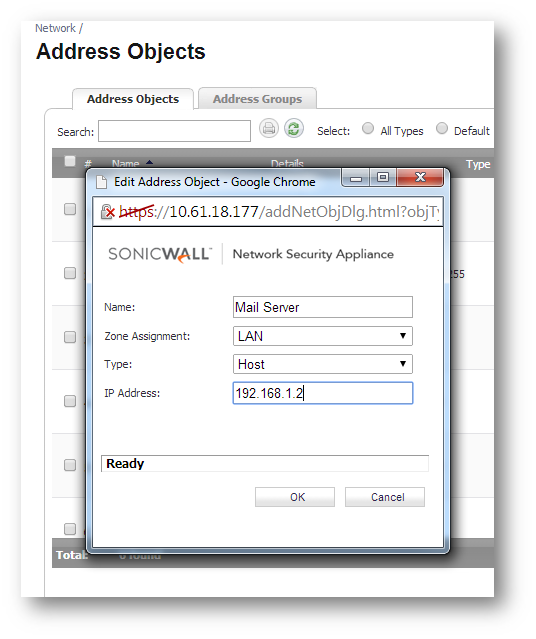
Step 2: Enable Botnet Filter Blocking based on the Firewall Access Rules and Enable Logging.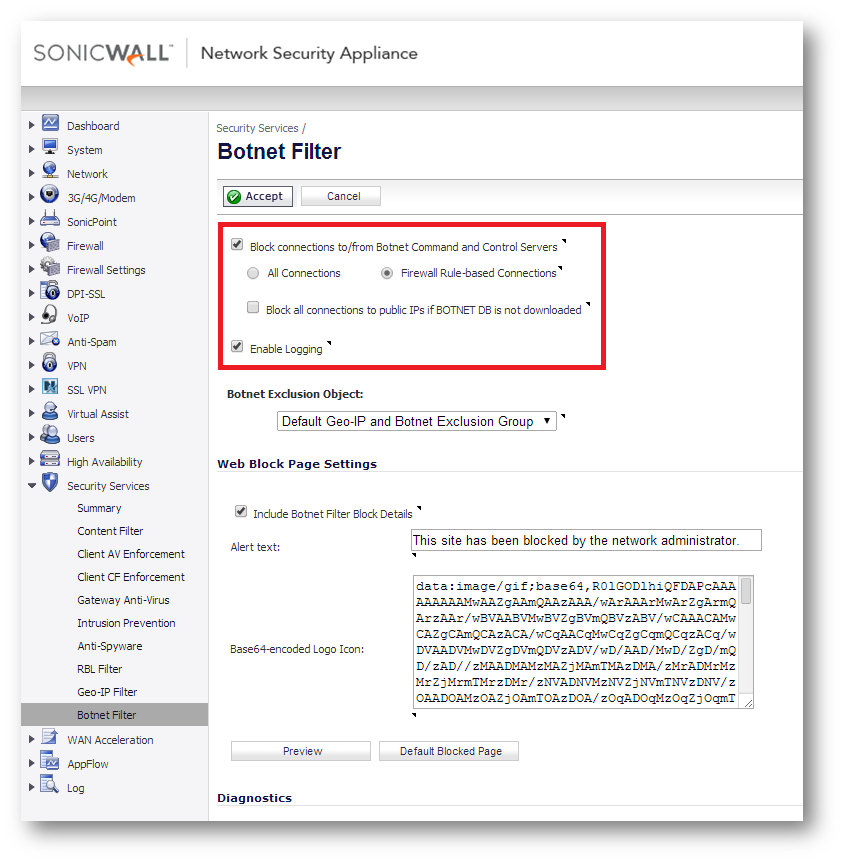
Step 3: Create an Access Rule that we want to apply the Botnet Filter service to. Enable the Botnet Filtering Checkbox on the Access Rule.
In our example we will create an access rule from the LAN>WAN to enable Botnet Filtering from the Mail Server.
Any traffic going to the Internet from the Mail Server will be scanned via the Botnet Filter Security Service, all other network traffic will not be scanned.

Related Articles
- Error:"Invalid API Argument" when modifying the access rules
- Cysurance Partner FAQ
- Configure probe monitoring for WAN Failover and Loadbalancing - SonicWall UTM
Categories
- Firewalls > TZ Series > Geo-IP & Botnet Filter
- Firewalls > SonicWall NSA Series > Geo-IP & Botnet Filter
- Firewalls > SonicWall SuperMassive 9000 Series > Geo-IP & Botnet Filter
- Firewalls > SonicWall SuperMassive E10000 Series > Geo-IP & Botnet Filter


 YES
YES NO
NO