-
Products
-
SonicPlatform
SonicPlatform is the cybersecurity platform purpose-built for MSPs, making managing complex security environments among multiple tenants easy and streamlined.
Discover More
-
-
Solutions
-
Federal
Protect Federal Agencies and Networks with scalable, purpose-built cybersecurity solutions
Learn MoreFederalProtect Federal Agencies and Networks with scalable, purpose-built cybersecurity solutions
Learn More - Industries
- Use Cases
-
-
Partners
-
Partner Portal
Access to deal registration, MDF, sales and marketing tools, training and more
Learn MorePartner PortalAccess to deal registration, MDF, sales and marketing tools, training and more
Learn More - SonicWall Partners
- Partner Resources
-
-
Support
-
Support Portal
Find answers to your questions by searching across our knowledge base, community, technical documentation and video tutorials
Learn MoreSupport PortalFind answers to your questions by searching across our knowledge base, community, technical documentation and video tutorials
Learn More - Support
- Resources
- Capture Labs
-
- Company
- Contact Us
How can I obtain a Certificate from a Windows Certificate Authority (CA)?


Description
This article describes how to obtain a certificate from an internal CA for the purpose of SonicWall Web Management.
Deployment Prerequisites
- Microsoft Windows Active Directory Services installed and configured.
- Microsoft Certificate Services installed and configured.
- Microsoft Internet Information Services (IIS) 7.0 installed and configure.
Deployment Steps
- Exporting the CA Certificate from the Active Directory Server.
- Importing the CA Certificate onto the SonicWall.
- Creating a New Signing Request in SonicWall Appliance.
- Requesting certificate for the new signing Request by the MS Certificate Authority.
- Validating the Certificate on the SonicWall Appliance.
- How to Test
Resolution
Exporting the Root CA Certificate from the Active Directory (AD) Server
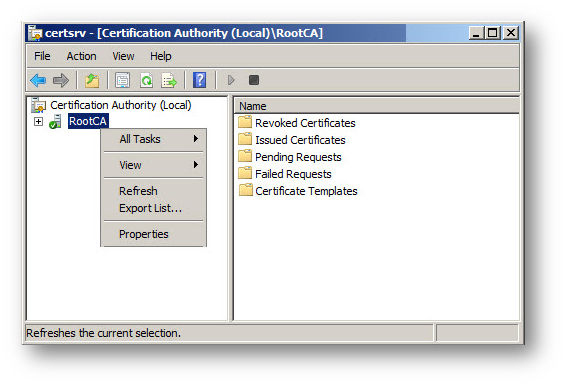
- In the AD server, launch the Certificate Authority application by Start | Run | certsrv.msc.
- Right click the CA you created and select Properties.
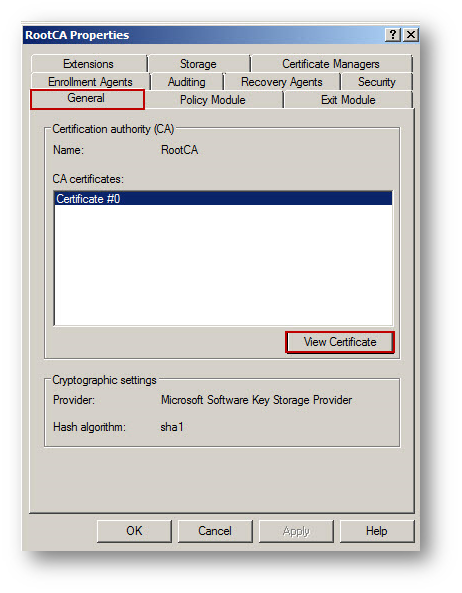
- On the General tab, click View Certificate button.
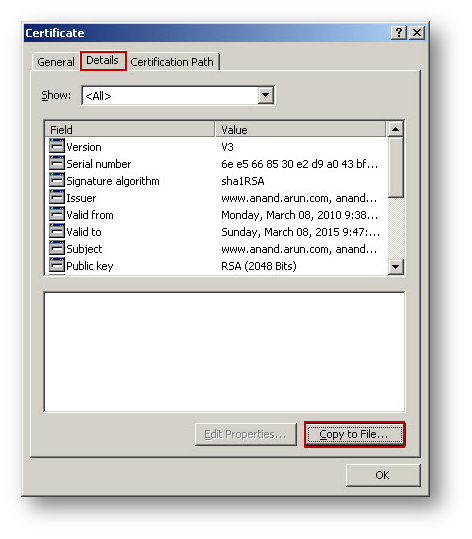
- On the Details tab, select Copy to File.
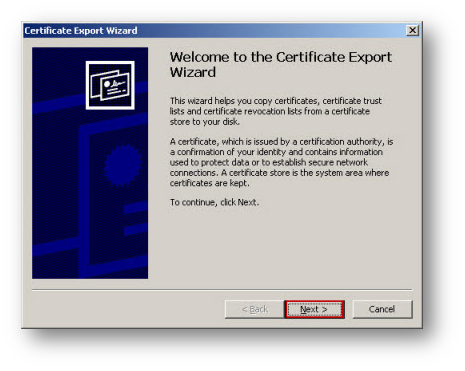
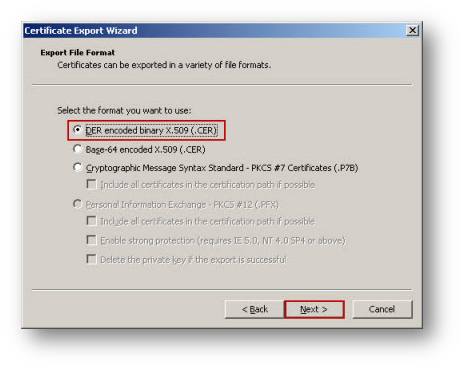
- Follow through the wizard, and select the DER Encoded binary X.509 (.cer) format.
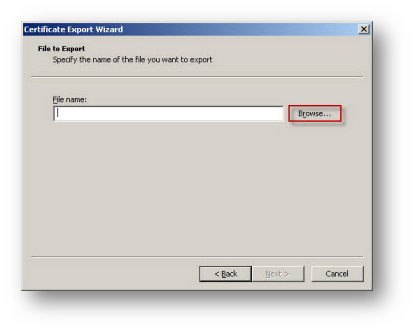
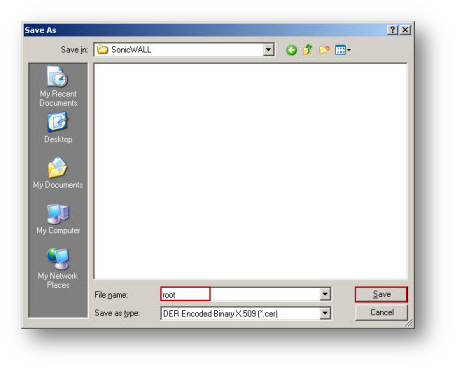
- Click browse and specify a path and filename to save the certificate.
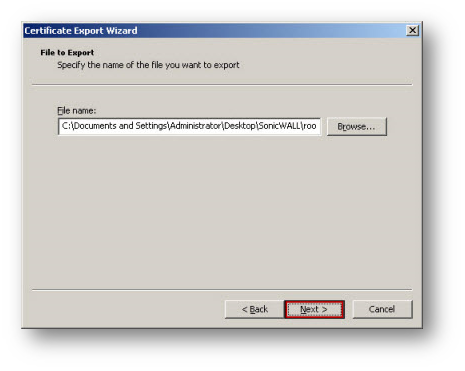
- Click Next button and click Finish.
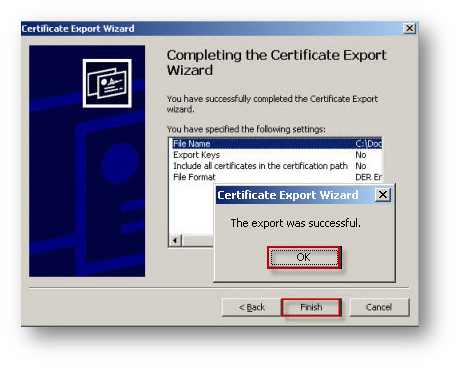
Importing the CA Certificate onto the SonicWall
- Click Manage in the top navigation menu.
- Navigate to Appliance | Certificates.
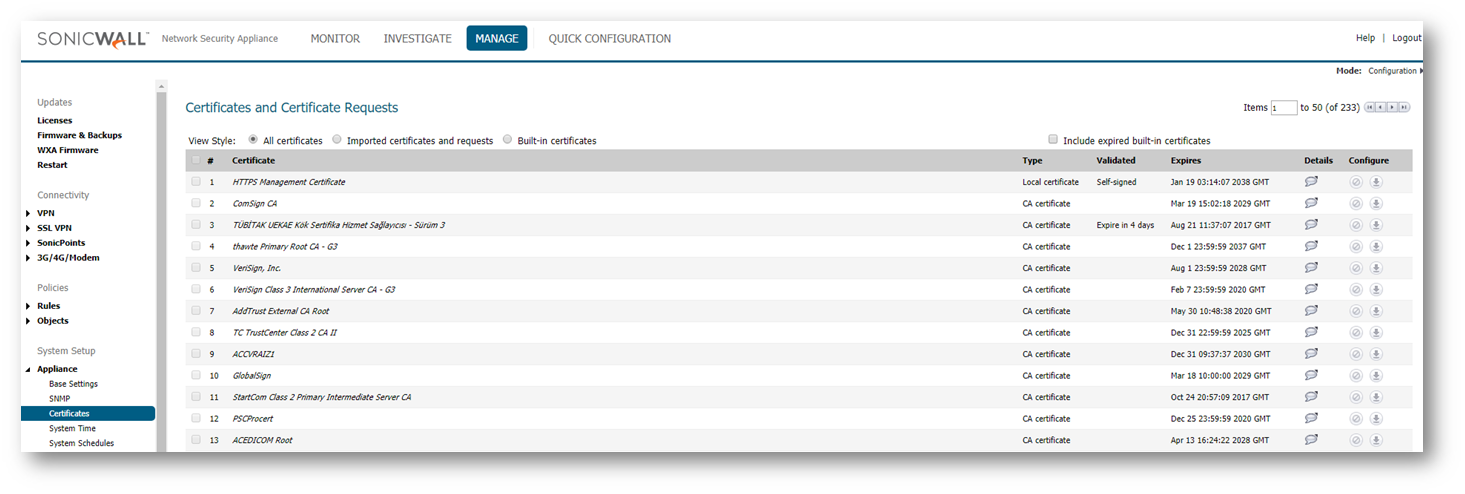
- Click Import. Select the certificate file you just exported.
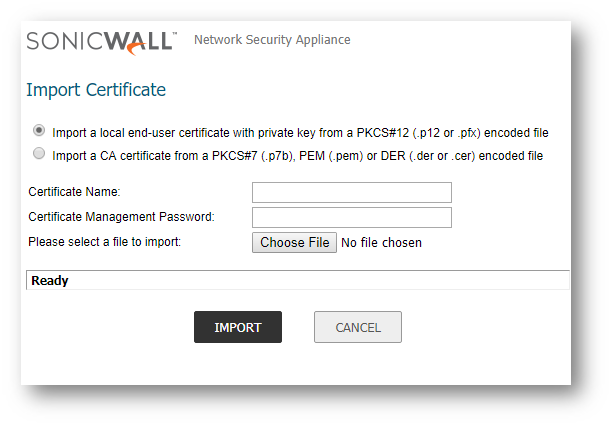
- Select Import a CA certificate from a PKCS#7 (.p7b), PEM (.pem) or DER (.der or .cer) encoded file,
- Click Browse and Select the certificate file you just exported from the MS Certificate Authority.
- Once the root certificate is selected, Click import button.
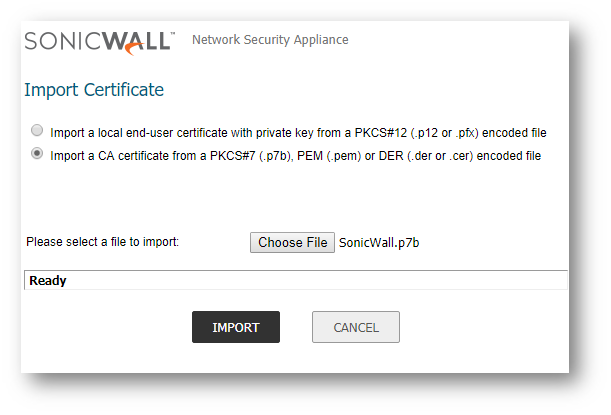
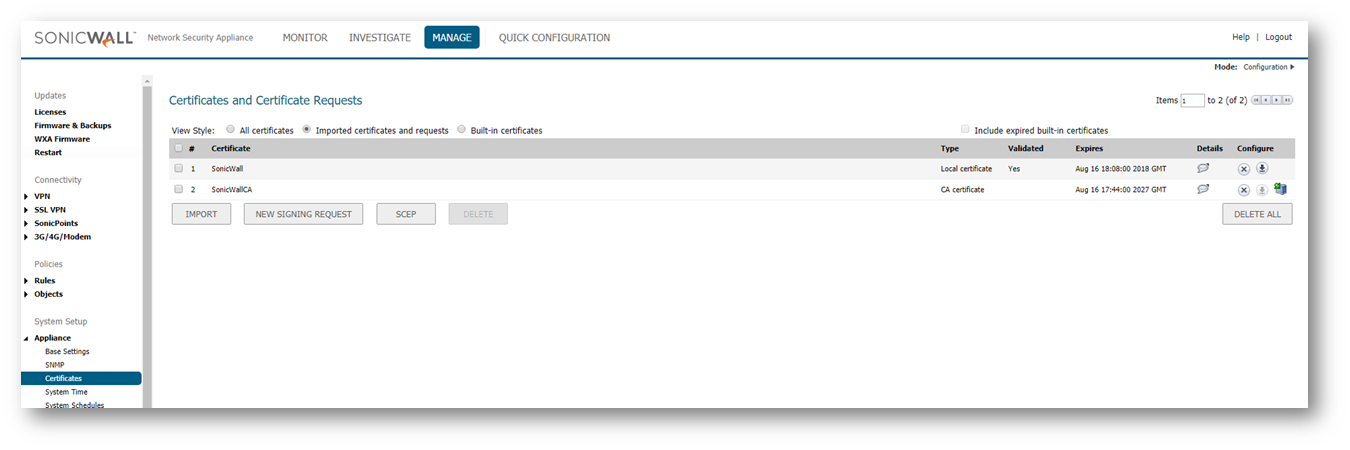
- Once the CA root certificate is imported, it will be listed under the Appliance | Certificates page with type as CA Certificate.
 TIP: This page can be filtered to easily locate this certificate by changing the View Style to Imported certificates and requests.
Creating a Certificate Signing Request (CSR) in SonicWall Appliance
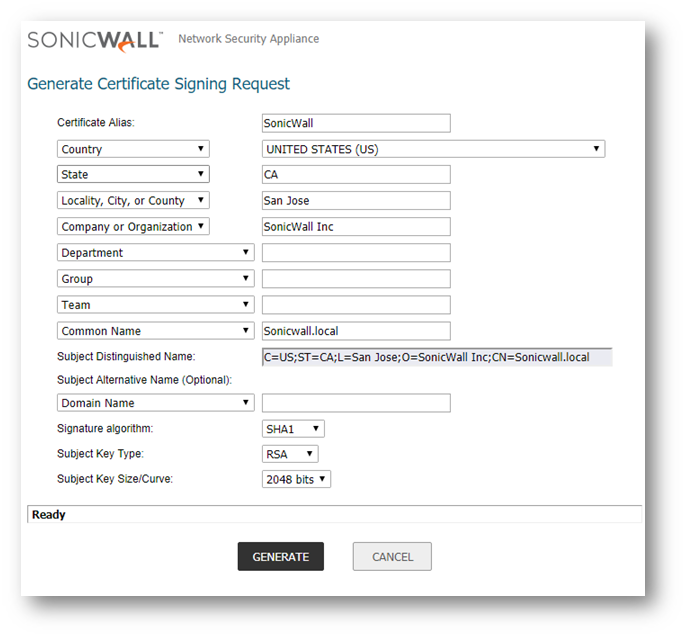
- Navigate to Appliance | Certificates page and click New Signing Request.
- Fill out the CSR form in SonicWall device and click Generate. For the most part, you can leave the drop-down boxes to their defaults and fill out each field as suggested by its corresponding drop-down box.
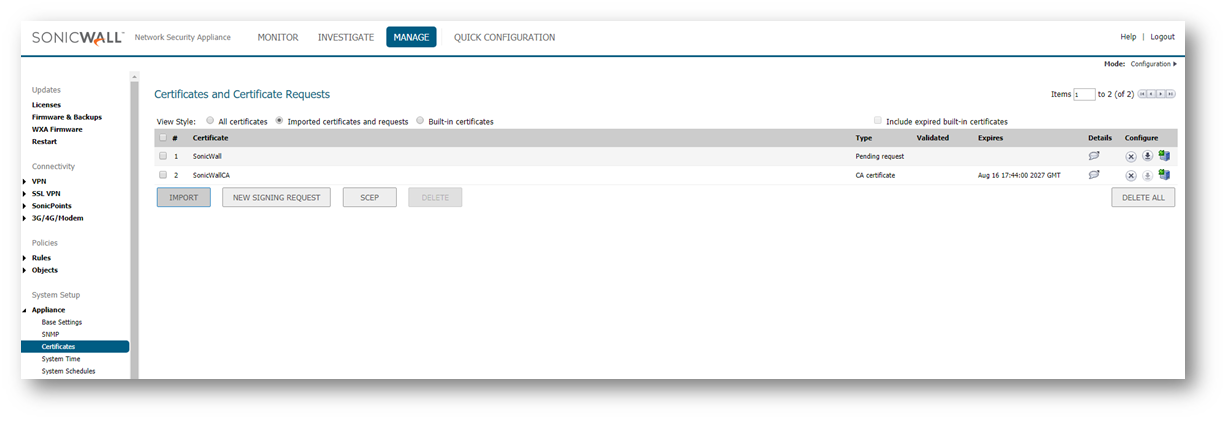
- The Appliance | Certificates page will refresh and your new certificate will appear with a type of Pending Request.
 NOTE: You may need to refresh the page for this status to appear.
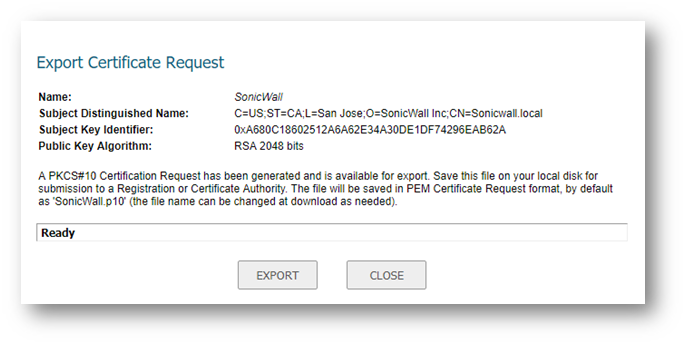
- Click Export
 button. In the new Pop-up window, click Export and save the file locally on your device for later import to the Windows Server.
Requesting a certificate for the CSR from the MS Certificate Authority
 TIP: If the MS CA server is running IIS (and the admin has allowed access to this interface), the easiest way to submit the firewall s CSR is via web browser.
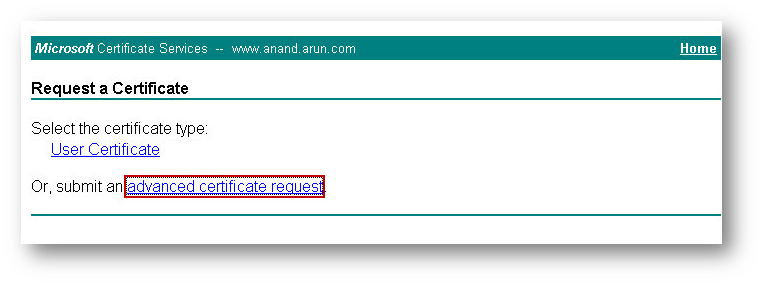
- Open a browser and enter http://x.x.x.x/certsrv/ (replace x.x.x.x with the IP address of your MS CA server). You will be presented with the certificate services interface (see below).
- Select the task Request a Certificate.

- Click advanced certificate request.
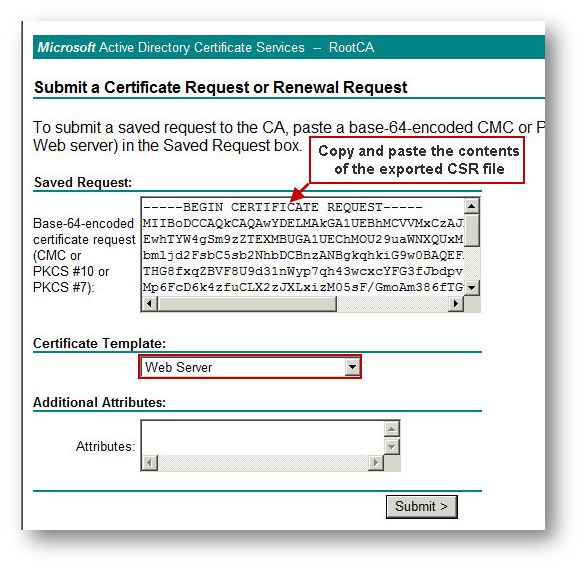
- Select Submit a certificate request by using a base-64-encoded CMC or PKCS #10 file, or submit a renewal request by using a base-64-encoded PKCS #7 file.

- Copy and paste the contents of the CSR in the Saved Request box.
- Select Web Server under Certificate Template.
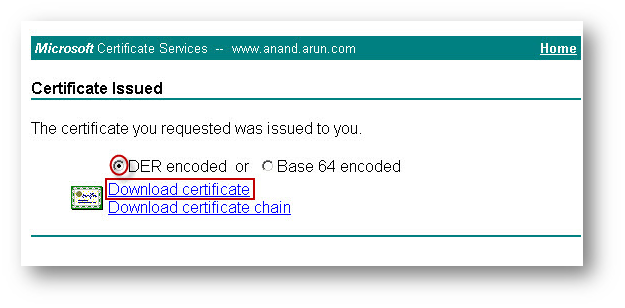
- Select DER encoded and click Download Certificate. Save the file to your local system using whatever name you wish this file will be imported into SonicWall appliance.

Validating the Certificate on the SonicWall Appliance
- Navigate to System | Certificates page.
- Click Upload Signed certificate
 for the certificate that has type Pending request.
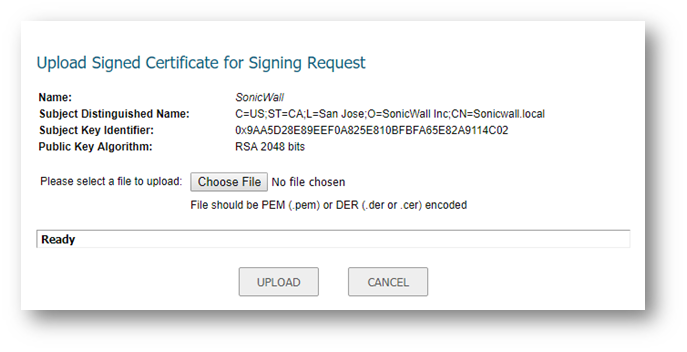
- Browse for the downloaded file from the CA and click Upload.
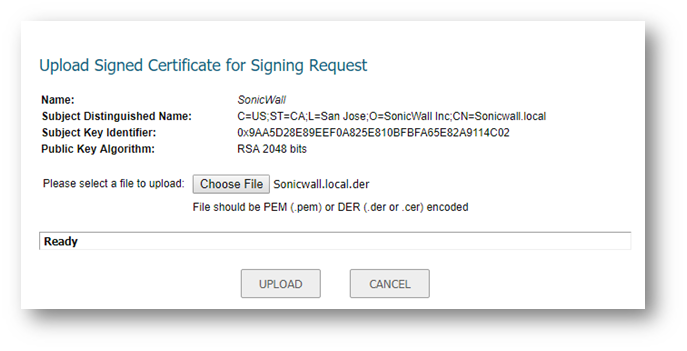
- Once the certificate has been uploaded, the certificate will show type as Local Certificate and Validated as YES.
How to Test
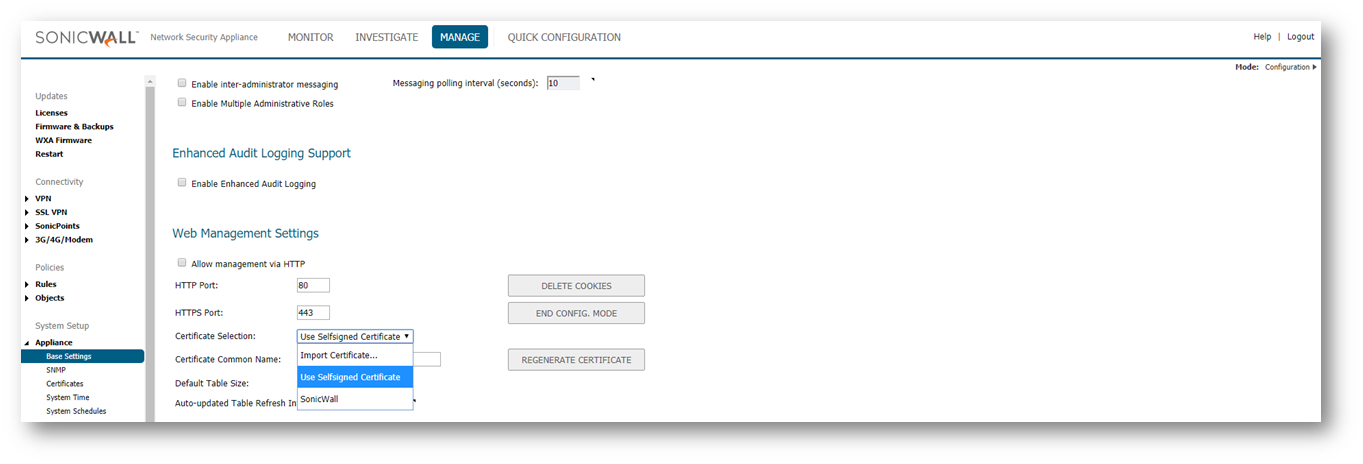
Now that a signed certificate has been imported into the SonicWall, it can be used for HTTPS management of SonicWall interfaces as well as for SSL-VPN. To set the imported certificate as the management certificate, perform the following steps
- Navigate to Appliance | Base Settings.
- Under the Web Management Settings section, select the imported certificate under Certificate Selection.
- Click Accept to save the changes.
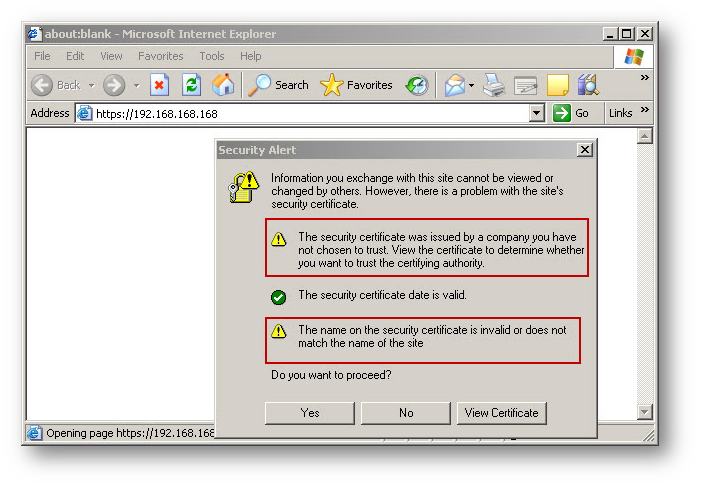
- When logging into the SonicWall after importing the signed certificate you may receive the following browser errors:
 CAUTION:
"The security certificate was issued by a company you have not chosen to trust. View the certificate to determine whether you want to trust the certifying authority".
You get this error because the issuing CA certificate is not in the certificate store of the browser. To resolve it, install the certificate in the certificate store of the browser.
"The name on the security certificate is invalid or does not match the name of the site".
You get this error because you are accessing the site using a different name from the certificate Common Name (CN) you entered when creating the Certificate Signing Request (CSR). In the above example the SonicWall is being accessed using an IP address although the CN in the certificate is SonicWall.local (see above) : You have two options to overcome this error:
- When creating the CSR enter the CN as 192.168.168.168.
- Map the IP address of the SonicWall to the CN.
Related Articles
- Intermittent 'Login Full' error when trying to manage the firewall
- How to configure Rogue Access Point Detection in Wireless?
- Details regarding UDP and ICMP Flood Protection
Categories
- Firewalls > SonicWall SuperMassive 9000 Series > System
- Firewalls > TZ Series > System
- Firewalls > NSa Series > System
- Firewalls > NSv Series > System


 YES
YES NO
NO