-
Products
-
SonicPlatform
SonicPlatform is the cybersecurity platform purpose-built for MSPs, making managing complex security environments among multiple tenants easy and streamlined.
Discover More
-
-
Solutions
-
Federal
Protect Federal Agencies and Networks with scalable, purpose-built cybersecurity solutions
Learn MoreFederalProtect Federal Agencies and Networks with scalable, purpose-built cybersecurity solutions
Learn More - Industries
- Use Cases
-
-
Partners
-
Partner Portal
Access to deal registration, MDF, sales and marketing tools, training and more
Learn MorePartner PortalAccess to deal registration, MDF, sales and marketing tools, training and more
Learn More - SonicWall Partners
- Partner Resources
-
-
Support
-
Support Portal
Find answers to your questions by searching across our knowledge base, community, technical documentation and video tutorials
Learn MoreSupport PortalFind answers to your questions by searching across our knowledge base, community, technical documentation and video tutorials
Learn More - Support
- Resources
- Capture Labs
-
- Company
- Contact Us
How to edit or delete auto added Access Rule(s) and NAT Policies


Description
The firewall automatically creates the set of access rules as well as NAT policies for certain applications to work for the convenience of administrators. Those entries are not permitted to remove or fully edit by default. If there is an absolute requirement to modify/delete then it can be enabled through the internal settings of the firewall.
Resolution
Resolution for SonicOS 7.X
This release includes significant user interface changes and many new features that are different from the SonicOS 6.5 and earlier firmware. The below resolution is for customers using SonicOS 7.X firmware.
 CAUTION: Changing system-generated access rule and NAT policies may cause undesired behavior. Before proceeding it is recommended to export a settings file of the SonicWall firewall. How do I save a backup settings file from a SonicWall firewall?
Step 1 : Log on to the appliance GUI.
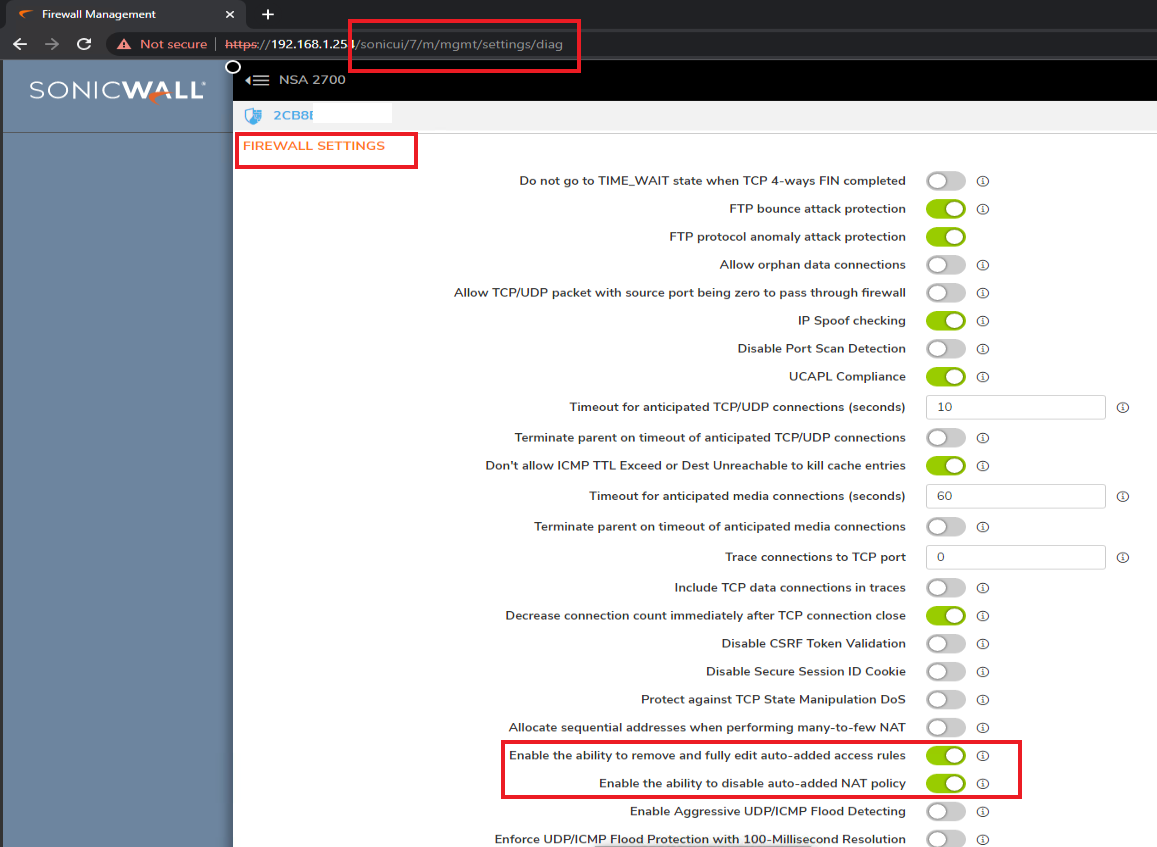
Step 2 : Navigate to diag page after login. Do this by changing the URL https://management_IP/Sonicui/7/m/mgmt/settings/diag. Please refer to How can I access the internal settings of the firewall
Step 3 : Click Internal Settings. The configurations are displayed.
Step 4: Navigate to Firewall settings and select the option Enable the ability to remove and fully edit auto-added access rules. You can choose the option Enable the ability to disable auto-added NAT policy to disable default auto-added NAT policies.

Resolution for SonicOS 6.5
This release includes significant user interface changes and many new features that are different from the SonicOS 6.2 and earlier firmware. The below resolution is for customers using SonicOS 6.5 firmware.
 CAUTION: Changing system-generated access rules and NAT policies may cause undesired behavior. Before proceeding it is recommended to export a settings file of the SonicWall firewall. How do I save a backup settings file from a SonicWall firewall?
To enable:
- Log on to appliance GUI.
- Go to the diag page after login. Do this by changing the URL http://192.168.168.168/main.html to http://192.168.168.168/diag.html.
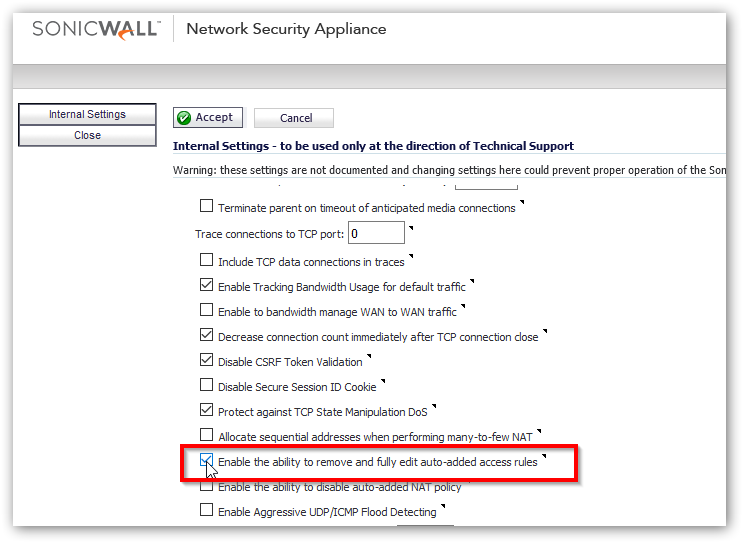
- Click Internal Settings. The configuration options are displayed.
- Navigate to Firewall Settings and select the "Enable the ability to remove and fully edit auto-added access rules"
- Below that option you can also select "Enable the ability to disable auto-added NAT policy"

With this option enabled you can edit/remove auto-added Access Rules.
Related Articles
- Error:"Invalid API Argument" when modifying the access rules
- Cysurance Partner FAQ
- Configure probe monitoring for WAN Failover and Loadbalancing - SonicWall UTM
Categories
- Firewalls > TZ Series
- Firewalls > SonicWall SuperMassive E10000 Series
- Firewalls > SonicWall SuperMassive 9000 Series
- Firewalls > SonicWall NSA Series


 YES
YES NO
NO