-
Products
-
SonicPlatform
SonicPlatform is the cybersecurity platform purpose-built for MSPs, making managing complex security environments among multiple tenants easy and streamlined.
Discover More
-
-
Solutions
-
Federal
Protect Federal Agencies and Networks with scalable, purpose-built cybersecurity solutions
Learn MoreFederalProtect Federal Agencies and Networks with scalable, purpose-built cybersecurity solutions
Learn More - Industries
- Use Cases
-
-
Partners
-
Partner Portal
Access to deal registration, MDF, sales and marketing tools, training and more
Learn MorePartner PortalAccess to deal registration, MDF, sales and marketing tools, training and more
Learn More - SonicWall Partners
- Partner Resources
-
-
Support
-
Support Portal
Find answers to your questions by searching across our knowledge base, community, technical documentation and video tutorials
Learn MoreSupport PortalFind answers to your questions by searching across our knowledge base, community, technical documentation and video tutorials
Learn More - Support
- Resources
- Capture Labs
-
- Company
- Contact Us
デバイスへの管理者アクセスを制限する方法


Description
この記事では、デバイスの安全性を確保し、権限のある担当者のみが変更を行えるように、デバイスへの管理者アクセスを制限する方法について説明します。また、特定のIPアドレスまたはIPアドレスの範囲からのアクセスのみを制限し、それらのIPアドレスのみがデバイスにアクセスできるようにします。
Resolution
SonicOS 7.xの場合
ここではLANインターフェースでの管理者アクセスについて説明します。WANインターフェースでの管理者アクセスについてはLANをWANに読み替えて下さい。
管理者アクセスを有効化
 注意: ここではLANインターフェースとしてX0(既定でLANゾーン)の場合で説明しますが、X0の場合HTTPSアクセスが既定で有効になっています。
- ネットワーク|システム>インターフェイスに移動します。
- LANインターフェースにマウスを移動しポップアップされるメニュの 設定(鉛筆アイコン)をクリックします。
- 管理 の HTTPS チェックボックスを有効にします。
- HTTP から HTTPS へのリダイレクトを有効にするためのルールを追加する をチェックします。
- OKをクリックし設定を反映させます。

この時点で、LANゾーン上のすべてのデバイスは、デバイスの管理ページ(ログインページ)にアクセスできるようになっているはずです。デバイスが特定のIPまたはIPグループに対してのみ応答するように管理を制限するためには、アクセスルールの変更が必要です。
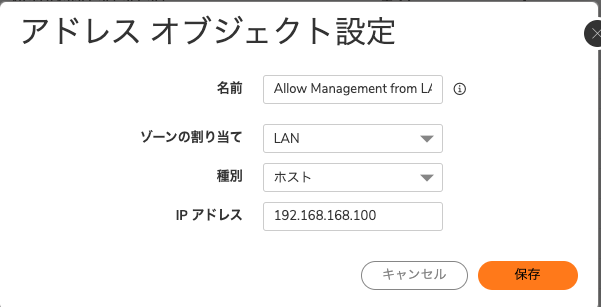
アクセスルールを変更する前に、制限するIPアドレス(ここではアクセスを許可するIPアドレス)を持つアドレスオブジェクトを作成する必要があります。
アドレスオブジェクトの作成
- オブジェクト|一致オブジェクト > アドレス に移動します。
- 追加 をクリックします。
- 名前 フィールドにフレンドリーな名前を入力します。
- ゾーンの割当 で LANゾーンを選択します。
- 1つのIPアドレスに対して管理ページへのアクセスを与える場合は、種別 を ホスト に設定します。IPアドレスの範囲に対してデバイスへのアクセスを与える場合は、種別 で 範囲 を選択します。
- IPアドレス もしくは 開始アドレス、終了アドレス にIPアドレスを入力します。
- 保存します。
- 複数の(非連続の)IPアドレスの場合には、上記を繰り返し複数のアドレスオブジェクトを作成し、アドレスグループタブで一つのグループを作成します。
アクセスルールの編集
- ポリシー|ルールとポリシー > アクセスルール に移動します。
- ドロップダウンボックスをクリックし LAN から LAN をクリックします。
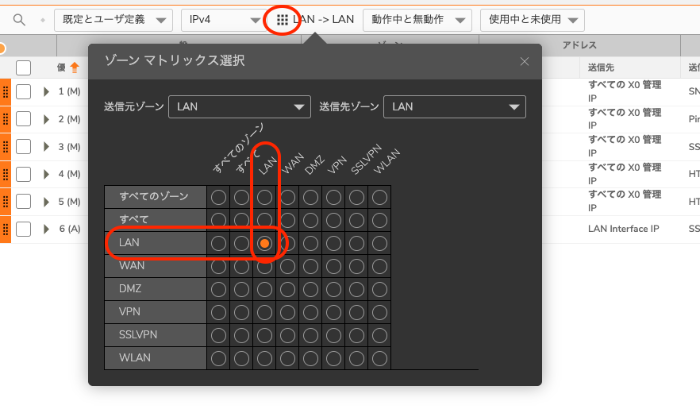
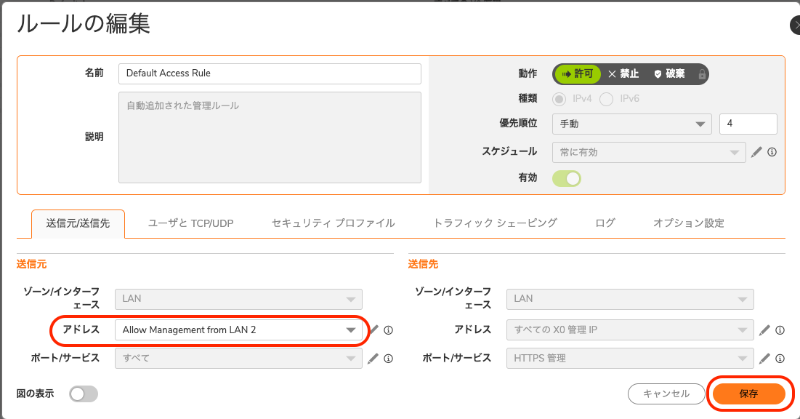
- ここに2つの自動作成された管理ルールが表示されます。

- 両方のルールを編集し、送信元 の アドレス を上で作成した アドレスオブジェクトもしくはアドレスグループ(複数のアドレスオブジェクトの場合) にします。
SonicOS 6.5
Admin access from the LAN
- Navigate to Manage | Network | Interfaces.
- Edit the LAN interface by clicking on
button.
- Enable the HTTPS check box for Management.
- Check the box Add rule to enable redirect from HTTP to HTTPS.
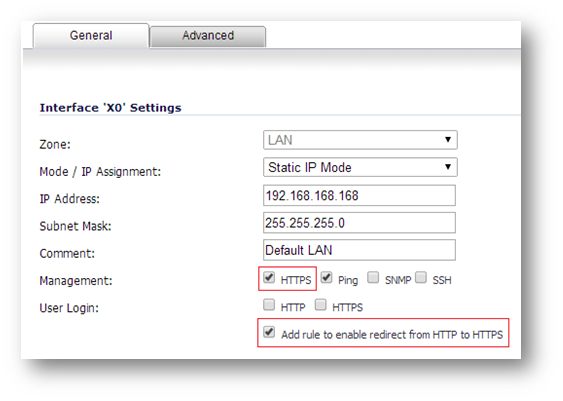
At this point, all the devices on the LAN zone should be able to get to the management page(login page) of the device. To restrict the management so that the device responds only to a particular IP or a Group of IP, an access rule is needed.
To create an access rule, we would need to create an address objects with the required IP addresses. To create an address object
- Navigate to Manage | Policies | Objects | Address Objects.
- Click Add.
- Give a friendly name in the Name field.
- Select the Zone as LAN or any zone from which you need to access the SonicWall.
- Type needs to be set to Host if you need to give access to the management page for just one IP address or you can use the type as range if you need to give access to the device to a range of IP addresses.
- Enter the IP address in the IP address field.
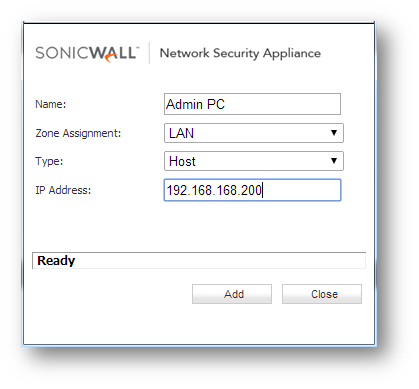
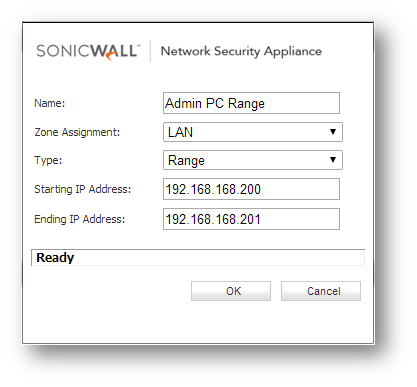
Once the Address objects are created
- Navigate to Manage | Policies | Rules | Access Rules.
- Click on Drop down boxes(radio button).
- From LAN to LAN.
- You will see two auto created management rules here.

- Edit both the rules and select the required address object in the source field and click OK to save the settings.

- At this point, only the Admin PC will be able to access the SonicWall's management page and login to the device.
Admin access from the WAN
Admin access from the WAN is needed only if you need remote access to the device. If you are not going to access the device from the outside world, it is recommended to disable the Management on the WAN interface. In this section, we will consider a scenario where you need access to the device only from your home. An address object needs to be created and the IP address will be the public IP address of your home network. You can find this using third party websites ipchicken.com or whatismyip.com.
- Navigate to Manage | Network | Interfaces.
- Edit the WAN interface by clicking on
button.
- Enable the HTTPS check box for management. Once you enable HTTP checkbox, you will get a warning, Please read and click OK to continue.
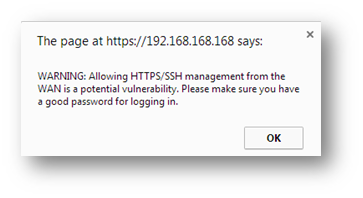
- Check the box Add rule to enable redirect from HTTP to HTTPS.
- Click OK .
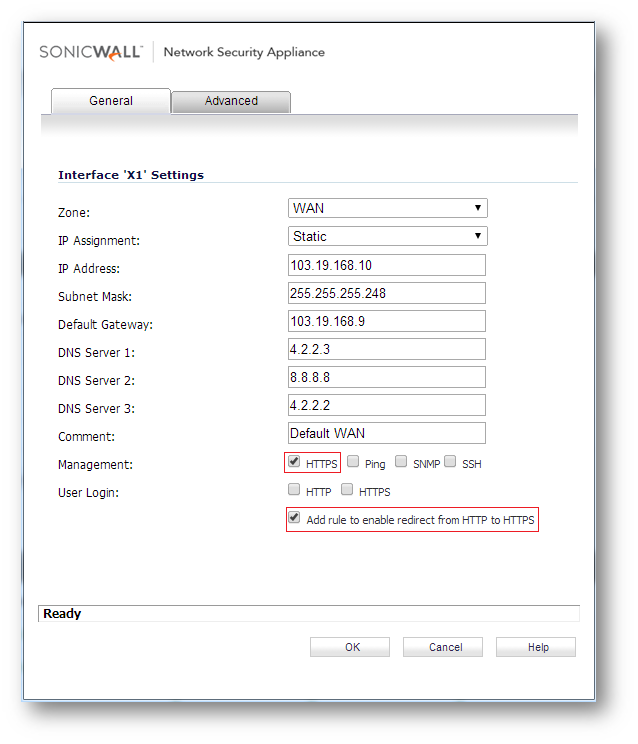
At this point, any device on the WAN zone should be able to get to the management page(login page) of the device. To restrict the management so that the device responds only to a particular IP or a Group of IP, an access rule is needed from zone WAN to WAN.
- Navigate to Manage | Policies | Rules | Access Rules.
- Click on Drop down boxes(radio button).
- From WAN to WAN.
- You will see two auto created management rules here as well.
- Edit both the rules and select the required address object in the source field and click OK to save the settings.

- At this point, only the Home PC will be able to access the SonicWall's management page and login to the device.
SonicOS 6.2 もしくはより古いバージョン
Admin access from the LAN
- Navigate to Network | Interfaces.
- Edit the LAN interface by clicking on
button.
- Enable the HTTPS check box for management..
- Check the box Add rule to enable redirect from HTTP to HTTPS.

At this point, all the devices on the LAN zone should be able to get to the management page(login page) of the device. To restrict the management so that the device responds only to a particular IP or a Group of IP, an access rule is needed.
To create an access rule, we would need to create an address objects with the required IP addresses. To create an Address object,
- Navigate to Network | Address object.
- Click Add.
- Give a friendly name in the Name field.
- Select the zone as LAN or any zone from which you need to access the SonicWall.
- Type needs to be set to Host if you need to give access to the management page for just one IP address or you can use the type as range if you need to give access to the device to a range of IP addresses.
- Enter the IP address in the IP address field.


Once the Address objects are created
- Navigate to Firewall | Access rules.
- Click on Drop down boxes(radio button).
- From LAN to LAN.
- You will see two auto created management rules here.

- Edit both the rules and select the required address object in the source field and click on OK to save the settings.

- At this point, only the Admin PC will be able to access the SonicWall's management page and login to the device.
Admin access from the WAN:
Admin access from the WAN is needed only if you need remote access to the device. If you are not going to access the device from the outside world, it is recommended to disable the Management on the WAN interface. In this section, we will consider a scenario where you need access to the device only from your home. An address object needs to be created and the IP address will be the public IP address of your home network. You can find this using third party websites ipchicken.com or whatismyip.com
- Navigate to Network | Interfaces.
- Edit the WAN interface by clicking on
button.
- Enable the HTTPS check box for management. Once you enable HTTP checkbox, you will get a warning, Please read and click OK to continue.

- Check the box Add rule to enable redirect from HTTP to HTTPS.
- Click OK .

At this point, any device on the WAN zone should be able to get to the management page(login page) of the device. To restrict the management so that the device responds only to a particular IP or a Group of IP, an access rule is needed from zone WAN to WAN.
- Navigate to Firewall | Access rules.
- Click on Drop down boxes(radio button).
- From WAN to WAN
- You will see two auto created management rules here as well.
- Edit both the rules and select the required address object in the source field and click on OK to save the settings.

- At this point, only the home PC will be able to access the SonicWall's management page and login to the device.
Related Articles
Categories
- Firewalls > NSa Series > Firewall Management
- Firewalls > NSv Series > Firewall Management
- Firewalls > TZ Series > Firewall Management UI


 YES
YES NO
NO