


VPN: How to restrict traffic over a site to site VPN tunnel using NAT over VPN(SonicOS Enhanc
 03/26/2020
  17 People found this article helpful
 458,575 Views

Description
VPN: How to restrict traffic over a site to site VPN tunnel using NAT over VPN(SonicOS Enhanced)
Resolution
Feature/Application:
This article illustrates how to restric traffic over a site to site VPN tunnel using the Apply NAT Policies feature in SonicWall VPN GUI.
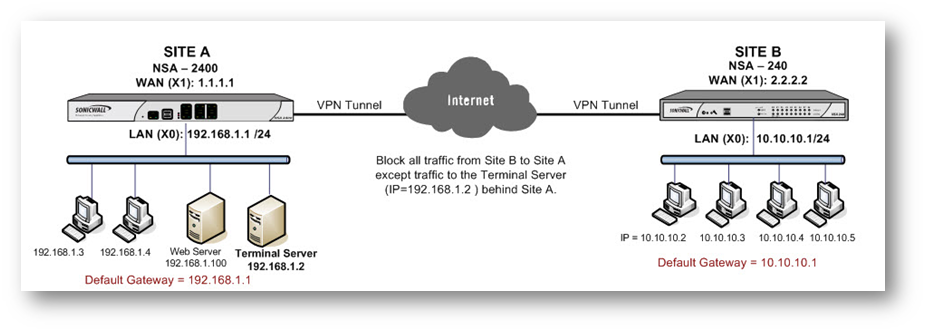
For this scenario it is assumed that a site to site VPN tunnel between an NSA 2400 and an NSA 240 needs to established. However, the hosts behind the NSA 240 should be able to access only the Terminal Server behind the NSA 2400. On the other hand, the hosts behind the NSA 2400 should be able to access everything behind the NSA 240. The configuration of each firewall is the following:
Site A (NSA 2400)
WAN (X1) IP: 1.1.1.1
LAN (X0) IP: 192.168.1.0/24Site B (NSA 240)
WAN (X1) IP: 2.2.2.2
LAN (X0) IP: 10.10.10.0/24Terminal Server IP Address: 192.168.1.2
Subnet Mask: 255.255.255.0
Default Gateway: 192.168.1.1 (X0 IP)Default gateway of hosts
10.10.10.1 (X0 IP)
Procedure:
Site A (NSA 2400) configuration:
Step 1. Login to the SonicWall Management Interface
Step 2. Navigate to the Network > Address Objects page.
Step 3. Create a new Address Object named "Remote Site LAN" with details as per the screenshot:

Step 4. Create a new Address Object named "Terminal Server" with details as per the screenshot:

Step 5. Navigate to the VPN > Settings page.
Step 6. Create a VPN policy with details as per the following screenshots.

Step 7. Click OK to save.
Step 8. Navigate to the Network > NAT Policies page.
Step 9. Select the Custom Policies radio button.
Step 10.Edit the automatically created NAT Policy and change the Translated Destination to "Original".

Site B (NSA 240) configuration:
Step 1. Login to the SonicWall Management Interface
Step 2. Navigate to the Network > Address Objects page.
Step 3. Create a new Address Object named "Remote Site Terminal Server" with details as per the screenshot:

Step 4. Click OK to save.
Step 5. Navigate to the VPN > Settings page.
Step 6. Create a VPN policy with details as per the following screenshots.

Step 7. Click OK to save.
The Tunnel have to be activated by initiating a ping from a host behind the NSA 240 to the Terminal Server IP 192.168.1.2.
How to Test:
- Test by pinging other hosts behind the NSA 2400 and it should fail.
- Likewise, hosts behind the NSA 2400 will be able to ping all hosts behind the NSA 240.
Related Articles
- Configuring split DNS over site to site VPN
- How to enable DNS Doctoring?
- Understanding TCP Handshake violation
Categories
- Firewalls > TZ Series
- Firewalls > SonicWall SuperMassive E10000 Series
- Firewalls > SonicWall SuperMassive 9000 Series
- Firewalls > SonicWall NSA Series
 YES
YES NO
NO