-
Products
-
SonicPlatform
SonicPlatform is the cybersecurity platform purpose-built for MSPs, making managing complex security environments among multiple tenants easy and streamlined.
Discover More
-
-
Solutions
-
Federal
Protect Federal Agencies and Networks with scalable, purpose-built cybersecurity solutions
Learn MoreFederalProtect Federal Agencies and Networks with scalable, purpose-built cybersecurity solutions
Learn More - Industries
- Use Cases
-
-
Partners
-
Partner Portal
Access to deal registration, MDF, sales and marketing tools, training and more
Learn MorePartner PortalAccess to deal registration, MDF, sales and marketing tools, training and more
Learn More - SonicWall Partners
- Partner Resources
-
-
Support
-
Support Portal
Find answers to your questions by searching across our knowledge base, community, technical documentation and video tutorials
Learn MoreSupport PortalFind answers to your questions by searching across our knowledge base, community, technical documentation and video tutorials
Learn More - Support
- Resources
- Capture Labs
-
- Company
- Contact Us
How to Configure Server DPI-SSL


Description
SonicWall DPI-SSL
Deep Packet Inspection of Secure Socket Layer (DPI-SSL) extends SonicWall’s Deep Packet Inspection technology to allow for the inspection of encrypted HTTPS traffic and other SSL-based traffic. The SSL traffic is decrypted transparently, scanned for threats and then re-encrypted and sent along to its destination if no threats or vulnerabilities are found. DPI-SSL provides additional security, application control, and data leakage prevention for analyzing encrypted HTTPS and other SSL-based traffic.
The following security services and features are capable of utilizing DPI-SSL:
- Gateway Anti-Virus
- Gateway Anti-Spyware
- Intrusion Prevention
- Content Filtering
- Application Firewall
- Packet Capture
- Packet Mirror
SERVER DPI-SSL
Server DPI-SSL is one of two deployment scenarios, the other being Client DPI-SSL, used to inspect SSL-based traffic. Server DPI-SSL deployment scenario is typically used to inspect HTTPS traffic when remote clients
connect over the WAN to access content located on the SonicWall security appliance’s LAN (or DMZ).
ServerDPI-SSL is able to decrypt SSL-based traffic in the following manner:
- Configure pairing of an internal address object and certificate.
- When the appliance detects SSL connections to the address object, it presents the paired certificate and negotiates an SSL connection with the connecting client. This enables the SonicWall to inspect the traffic and, if a threat is detected, to enforce Security Services and Application Firewall policies.
In this deployment scenario the owner of the SonicWall UTM owns the certificates and private keys of the origin content servers. Administrators will have to import the server's original certificate into the UTM appliance and create appropriate server IP address to server certificate mappings in the Server DPI-SSL UI.
Further, the pairing of internal address objects with certificates can be either encrypted or "Cleartext". If the pairing is not defined to be cleartext, then an SSL connection to the server is negotiated. This allows for end-to-end encryption of the connection. If the pairing defines the server to be 'cleartext' then a standard TCP connection is made to the server on the original (post NAT remapping) port.
This article illustrates the procedure to configure Server DPI-SSL in the SonicWall UTM.
Resolution
Resolution for SonicOS 6.5
This release includes significant user interface changes and many new features that are different from the SonicOS 6.2 and earlier firmware. The below resolution is for customers using SonicOS 6.5 firmware.
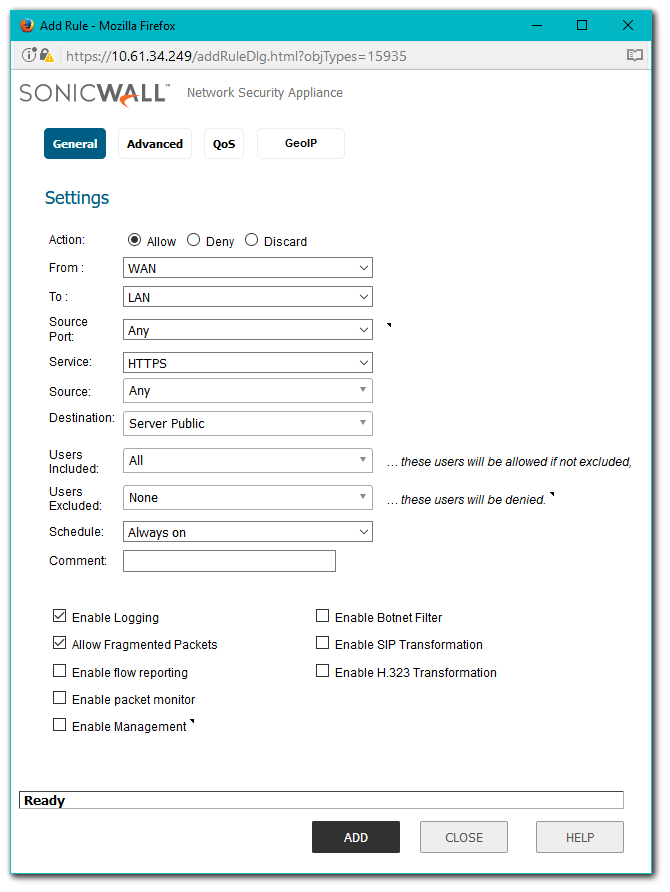
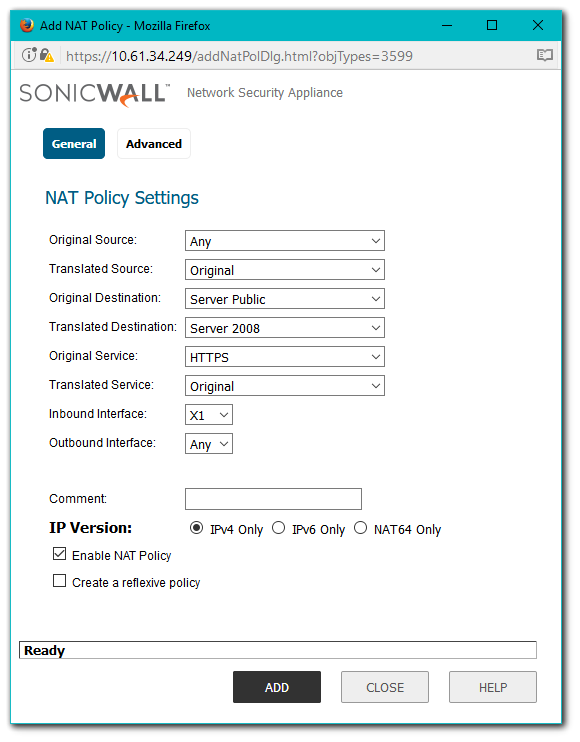
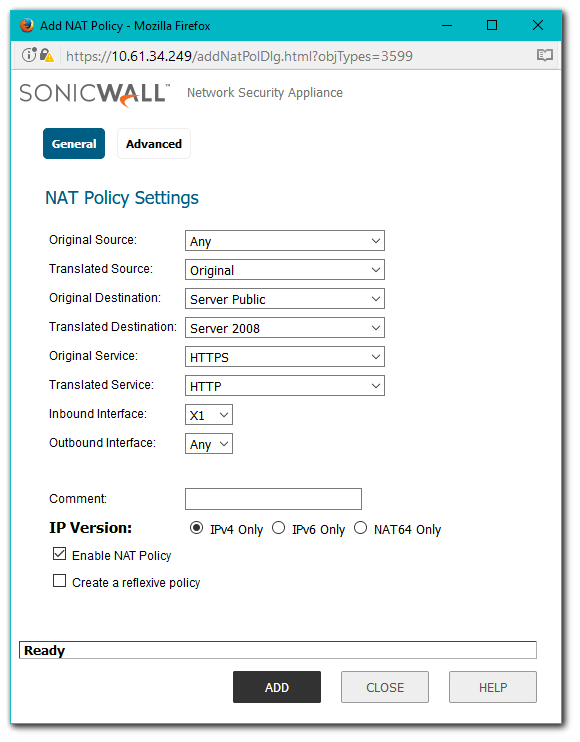
The following NAT Policy and Access Rule requires to be in place before beginning the confguration process.
Importing the Server Certificate
In order for the SonicWall to be able to act as a re-signing authority, the administrator have to import the Server's certificate along with private key. This would be a PKCS-12 formatted certificate file. Exporting (or creating) a certificate with public and private keys is explained in Exporting the Server Certificate along with Private Key section.
- Login to the SonicWall Management interface.
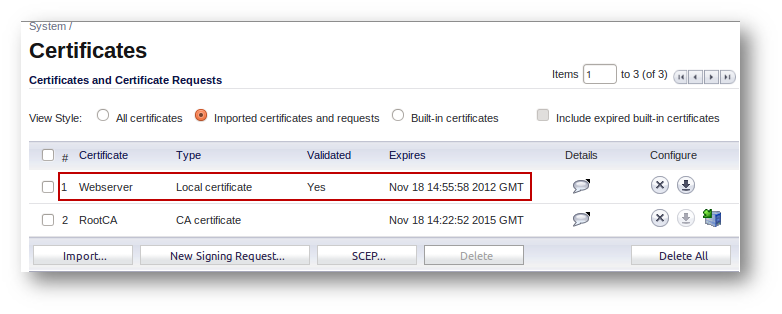
- Navigate to Manage | Appliance | Certificates
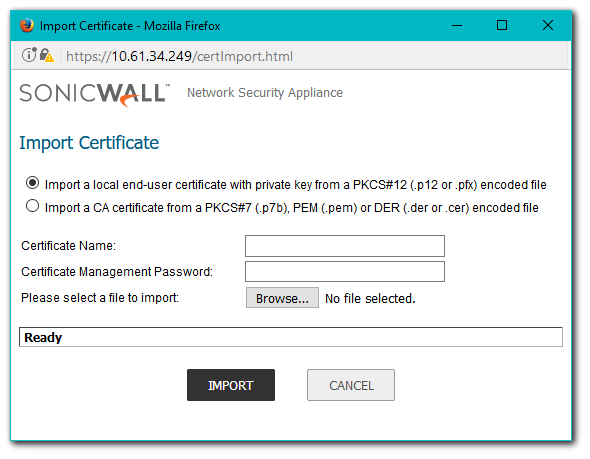
- At the bottom of the page, click on the Import button to open the Import Certificate window.
- Select the radio button under Import a local end-user certificate with private key from a PKCS#12 (.p12 or .pfx) encoded file.
- Enter a name for the certificate
- Enter the password for the certificate under Certificate Management Password
- Click on Browse and select the certificate
- Click on Import to import the certificate.
- Navigate to the Manage | Deep Packet Inspection | SSL Client Deployment page.
- Select the checkbox under Enable SSL Server Inspection
- Click on the Accept button at the top of the page to save the change.
You will be required to restart the SonicWall.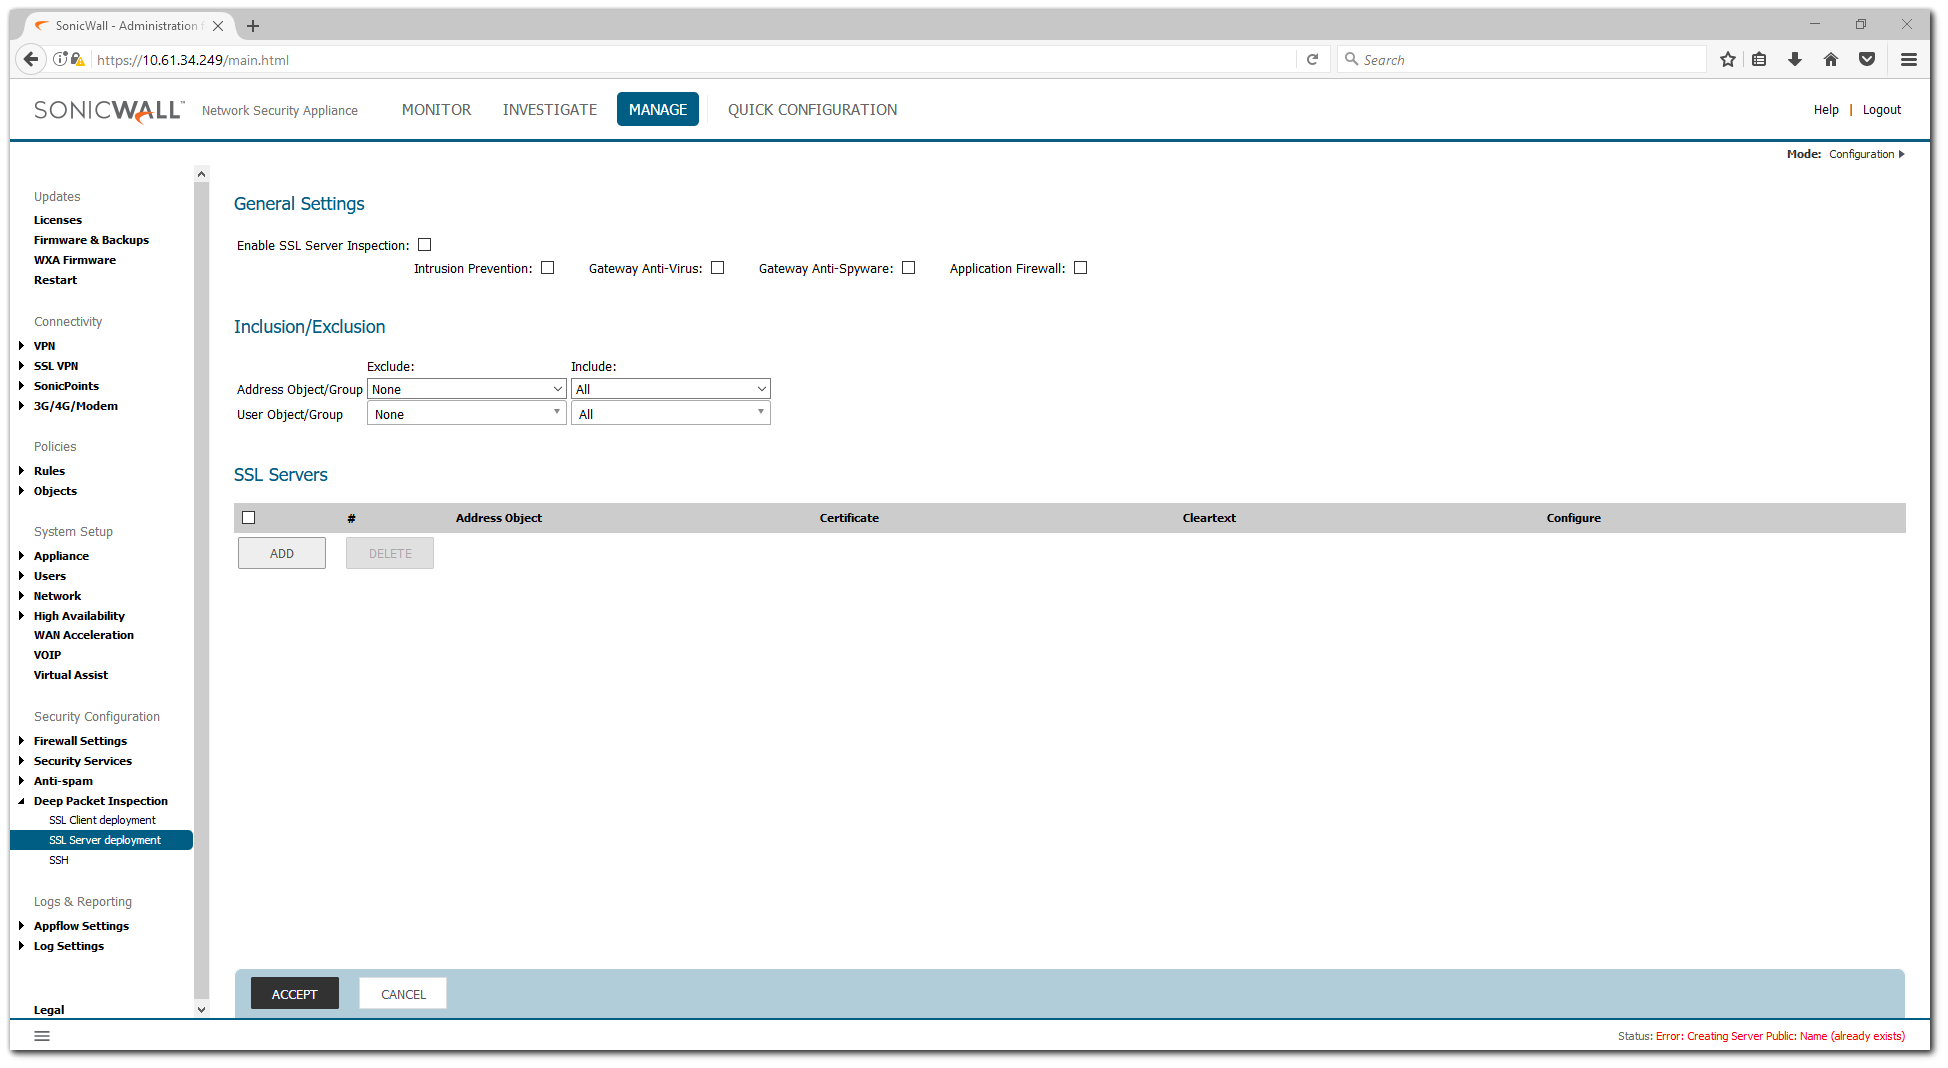
- Under SSL Servers, click on the Add button to bring up the Server DPI-SSL window.
- In the Address Object/Group pulldown menu, select the address object or group for the server or servers that you want to apply DPI-SSL inspection to.
- In the SSL Certificate pulldown menu, select the certificate that will be used to sign the traffic for the server.
- Leave the Cleartext box unchecked. More on the Cleartext below.
- Click on Add and click on Close to save.
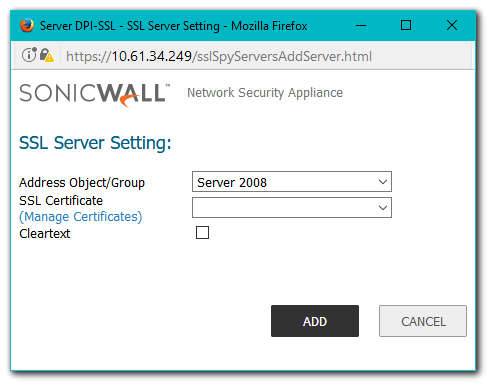
The cleartext option indicates that the portion of the TCP connection between the UTM appliance and the local server will be in the clear without SSL layer, thus allowing SSL processing to be offloaded from the server by the appliance.
In order for such configuration to work properly, the NAT policy should translated from an SSL port to a non-SSL port. For example, in case of HTTPS traffic being used with SSL offloading, an inbound NATpolicy remapping traffic from port 443 to another port needs to be created in order for things to work properly. A port other than port 80 should be used, because port 80 is used for clear text data inbound to the server.
Exporting or creating a PKCS-12 Formatted Certificate File
As mentioned in the Importing Certificate section, Server DPI-SSL deployment requires the administrator to import the server's certificate with private key. This section illustrates the example of creating and/or exporting a PKCS-12 formatted certificate file (.pfx) using Linux and Windows 2008.
The private key and certificate is located in the following locations: /etc/httpd/conf/ssl.key/server.key and /etc/httpd/conf/ssl.crt/server.crt. With these 2 files available, run the following command:
openssl pkcs12 -export -out out.p12 -inkey server.key -in server.crt
Where out.p12 will become PKCS-12 formatted certificate file and server.key and server.crt are PEM formatted private key and certificate file respectively. After the above command, one would be prompted for the password to
protect/encrypted the file. After the password is chosen, the creation of PKCS-12 formatted certificate file is complete and it can be imported into the UTM appliance.
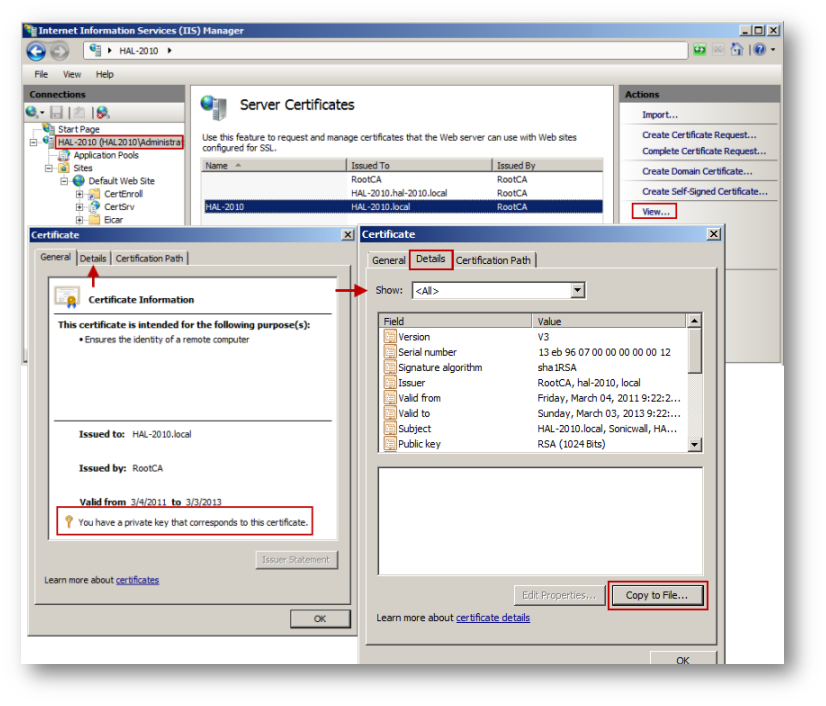
In Microsoft Windows, the PKCS-12 formatted certificate file can be exported either from Internet Information Services (IIS) Manager under Certificates. The following screenshots show the export process:
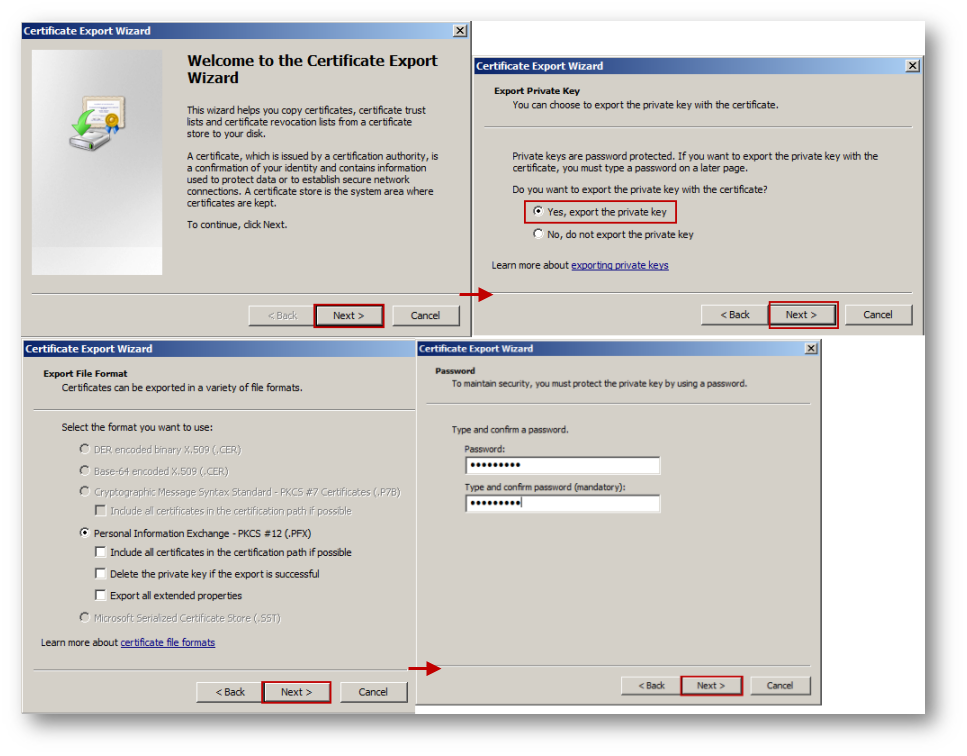
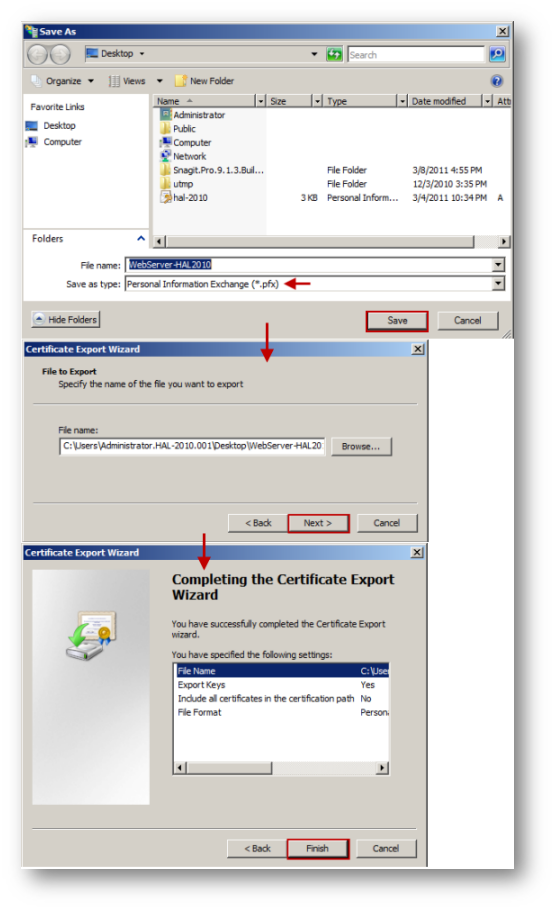
Based on the above configuration, the following test website was hosted with links to download files of type exe, zip, pdf etc.
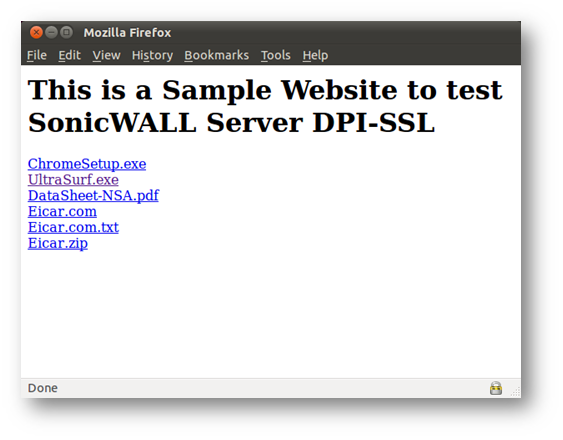
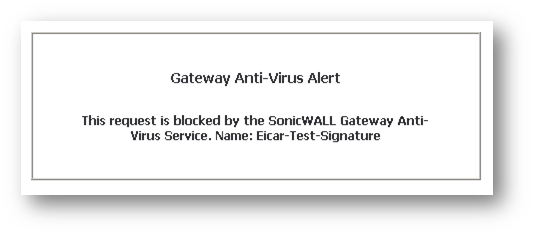
The following logs are displayed when user tries to download any one of the file above because App Control Advanced has been configured to block download of file types exe, zip and pdf.
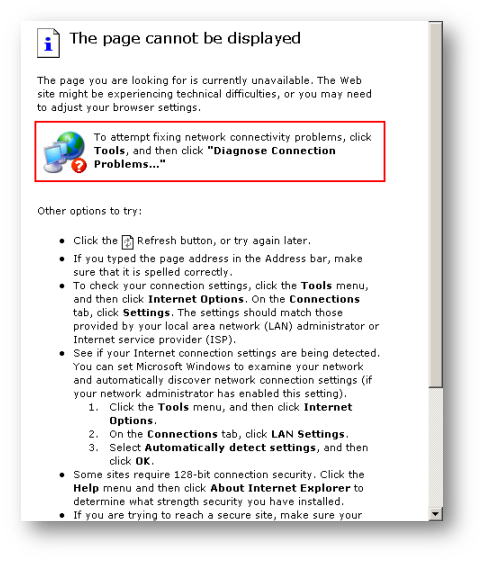
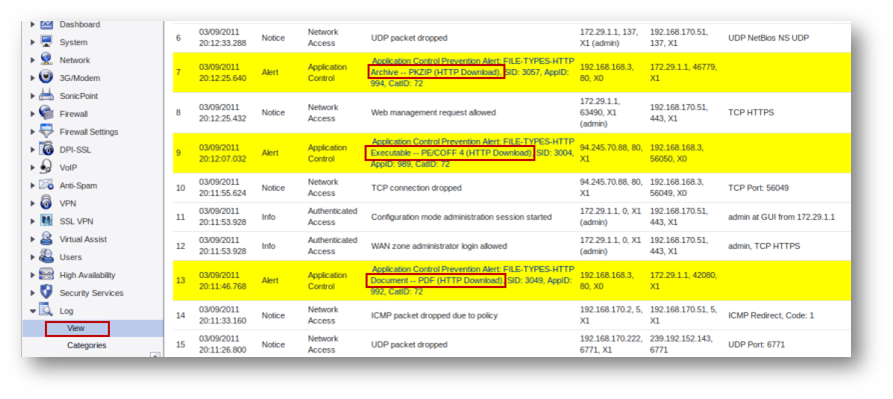
GAV Block Message and log

Resolution for SonicOS 6.2 and Below
The below resolution is for customers using SonicOS 6.2 and earlier firmware. For firewalls that are generation 6 and newer we suggest to upgrade to the latest general release of SonicOS 6.5 firmware.
The following NAT Policy and Access Rule requires to be in place before beginning the confguration process.
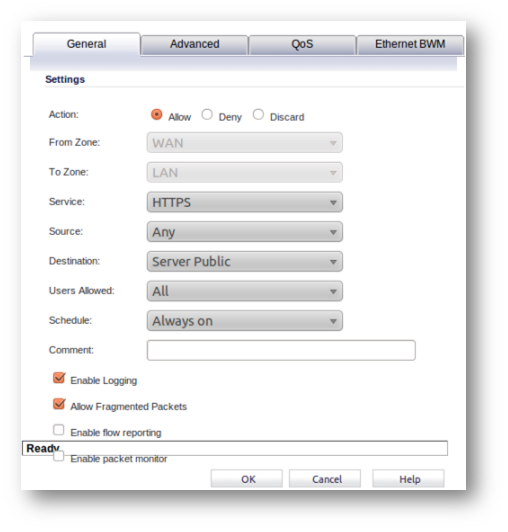
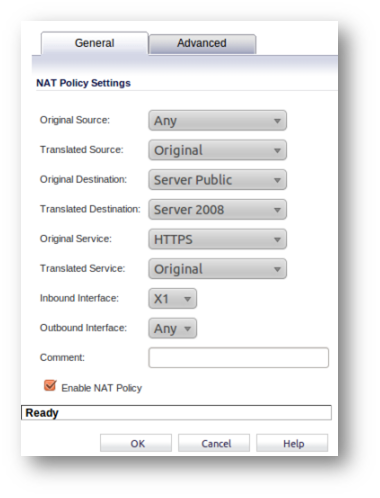
Importing the Server Certificate
In order for the SonicWall to be able to act as a re-signing authority, the administrator have to import the Server's certificate along with private key. This would be a PKCS-12 formatted certificate file. Exporting (or creating) a certificate with public and private keys is explained in Exporting the Server Certificate along with Private Key section.
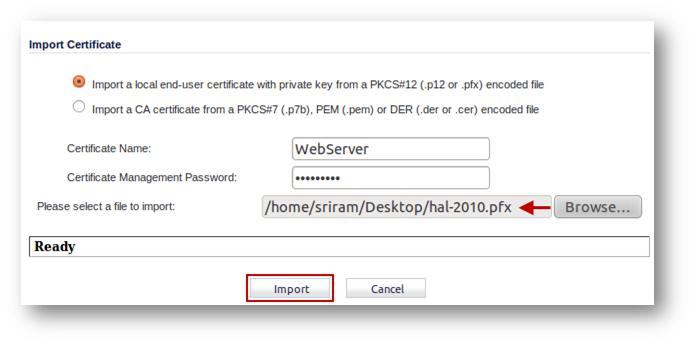
- Login to the SonicWall Management interface.
- Navigate to System | Certificates
- At the bottom of the page, click on the Import button to open the Import Certificate window.
- Select the radio button under Import a local end-user certificate with private key from a PKCS#12 (.p12 or .pfx) encoded file.
- Enter a name for the certificate
- Enter the password for the certificate under Certificate Management Password
- Click on Browse and select the certificate
- Click on Import to import the certificate.

- Navigate to the DPI-SSL | Server SSL page.
- Select the checkbox under Enable SSL Server Inspection
- Click on the Accept button at the top of the page to save the change.
You will be required to restart the SonicWall.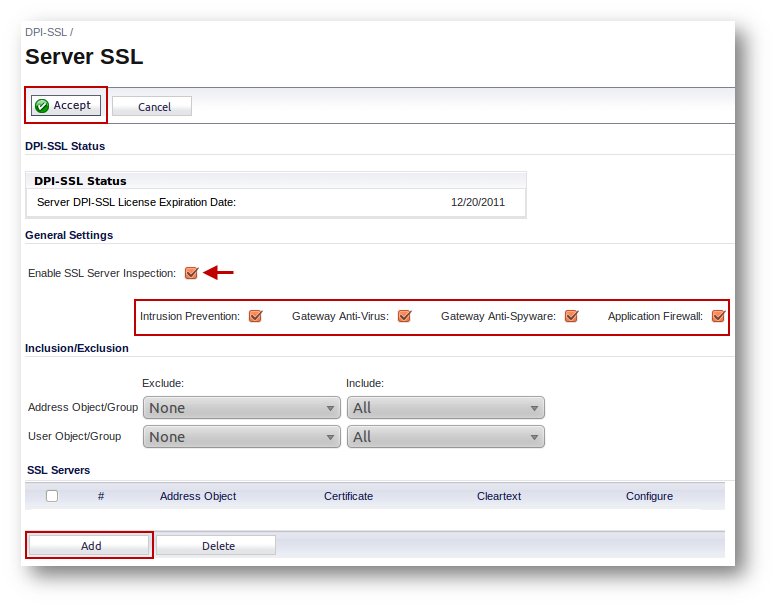
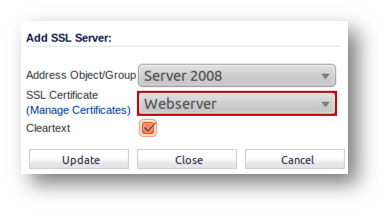
- Under SSL Servers, click on the Add button to bring up the Server DPI-SSL window.
- In the Address Object/Group pulldown menu, select the address object or group for the server or servers that you want to apply DPI-SSL inspection to.
- In the SSL Certificate pulldown menu, select the certificate that will be used to sign the traffic for the server.
- Leave the Cleartext box unchecked. More on the Cleartext here.
- Click on ADD and click on Close to save.

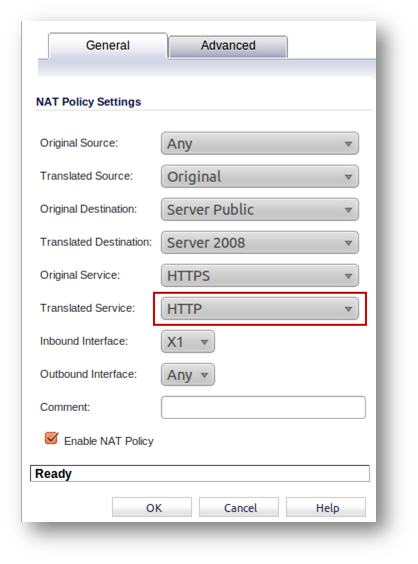
The cleartext option indicates that the portion of the TCP connection between the UTM appliance and the local server will be in the clear without SSL layer, thus allowing SSL processing to be offloaded from the server by the appliance.
In order for such configuration to work properly, the NAT policy should translated from an SSL port to a non-SSL port. For example, in case of HTTPS traffic being used with SSL offloading, an inbound NATpolicy remapping traffic from port 443 to another port needs to be created in order for things to work properly. A port other than port 80 should be used, because port 80 is used for clear text data inbound to the server.
Exporting or creating a PKCS-12 Formatted Certificate File
As mentioned in the Importing Certificate section, Server DPI-SSL deployment requires the administrator to import the server's certificate with private key. This section illustrates the example of creating and/or exporting a PKCS-12 formatted certificate file (.pfx) using Linux and Windows 2008.
The private key and certificate is located in the following locations: /etc/httpd/conf/ssl.key/server.key and /etc/httpd/conf/ssl.crt/server.crt. With these 2 files available, run the following command:
openssl pkcs12 -export -out out.p12 -inkey server.key -in server.crt
Where out.p12 will become PKCS-12 formatted certificate file and server.key and server.crt are PEM formatted private key and certificate file respectively. After the above command, one would be prompted for the password to
protect/encrypted the file. After the password is chosen, the creation of PKCS-12 formatted certificate file is complete and it can be imported into the UTM appliance.
In Microsoft Windows, the PKCS-12 formatted certificate file can be exported either from Internet Information Services (IIS) Manager under Certificates. The following screenshots show the export process:


Based on the above configuration, the following test website was hosted with links to download files of type exe, zip, pdf etc.

The following logs are displayed when user tries to download any one of the file above because App Control Advanced has been configured to block download of file types exe, zip and pdf.


GAV Block Message and log


Related Articles
- Enabling TCP, UDP and ICMP Flood Protection.
- CFS Category 100
- GVC 4.9.14 and above are not connecting - Phase 1 Proposal does not match
Categories
- Firewalls > SonicWall NSA Series > DPI-SSL
- Firewalls > TZ Series > DPI-SSL
- Firewalls > SonicWall SuperMassive 9000 Series > DPI-SSL
- Firewalls > SonicWall SuperMassive E10000 Series > DPI-SSL


 YES
YES NO
NO