-
Products
-
SonicPlatform
SonicPlatform is the cybersecurity platform purpose-built for MSPs, making managing complex security environments among multiple tenants easy and streamlined.
Discover More
-
-
Solutions
-
Federal
Protect Federal Agencies and Networks with scalable, purpose-built cybersecurity solutions
Learn MoreFederalProtect Federal Agencies and Networks with scalable, purpose-built cybersecurity solutions
Learn More - Industries
- Use Cases
-
-
Partners
-
Partner Portal
Access to deal registration, MDF, sales and marketing tools, training and more
Learn MorePartner PortalAccess to deal registration, MDF, sales and marketing tools, training and more
Learn More - SonicWall Partners
- Partner Resources
-
-
Support
-
Support Portal
Find answers to your questions by searching across our knowledge base, community, technical documentation and video tutorials
Learn MoreSupport PortalFind answers to your questions by searching across our knowledge base, community, technical documentation and video tutorials
Learn More - Support
- Resources
- Capture Labs
-
- Company
- Contact Us
How to Configure DHCP Service & Scope in SonicWall CLI (Command Line Interface)


Description
This article explains how to Configure DHCP Service & Scope in SonicWall CLI (Command Line Interface)
Resolution
Resolution for SonicOS 6.5
This release includes significant user interface changes and many new features that are different from the SonicOS 6.2 and earlier firmware. The below resolution is for customers using SonicOS 6.5 firmware.
AAccess SonicWall CLI through Console (connecting a serial cable directly to SonicWall device console port ) or via SSH (default port 22 or custom SSH port, if changed in SonicWall).
Step 1:
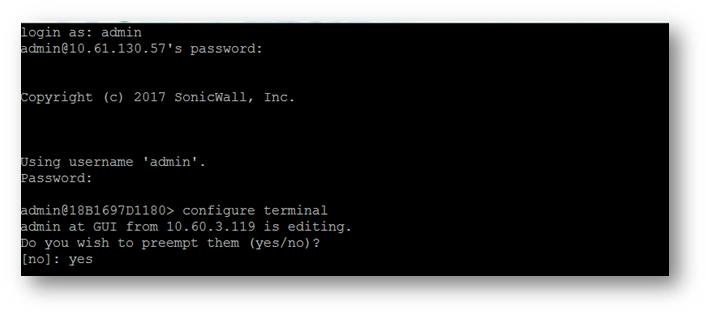
Log into SonicWall CLI using the administrator username/password, to enable and create DHCP scope.
Once logged into CLI, navigate from "enable mode" to "configuration mode" in order to make the required changes, as shown in the screenshot below
Step 2:
Following commands set will enable the DHCP service on SonicWall.

Step 3:
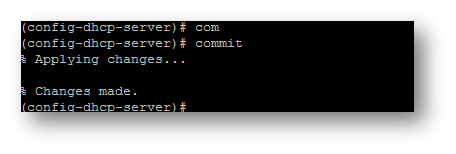
Enter the command "commit" to update the changes in SonicWall configuration permanently.
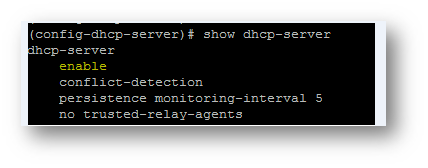
To verify the status of DHCP server after saving the changes above type the command "show dhcp-server", and look for "enable" under dhcp-server, as shown below:
Step: 4
To create DHCP scope, enter the Command "scope dynamic A.B.C.D A.B.C.D" Replace A.B.C.D with starting range and second with ending range.
Add Netmask, and Default Gateway, for the created scope, as shown below
DNS server address can be configured or be inherited from the SonicWall WAN Interface

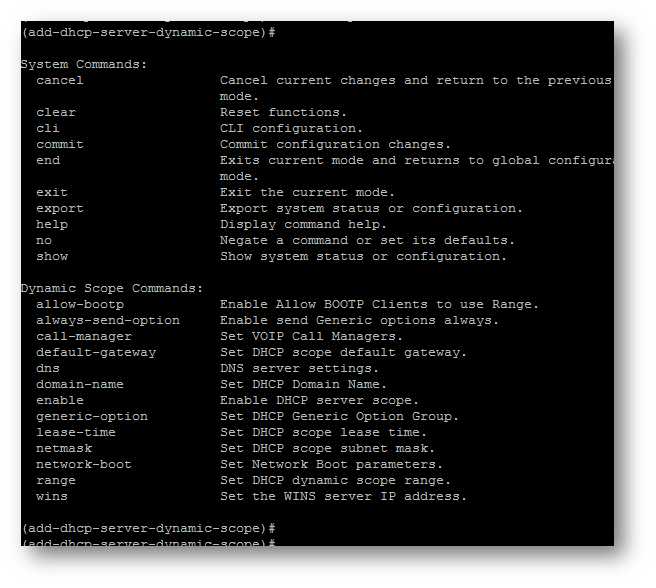
Additional parameters can also be set for the configured DHCP scope, as shown below:
Step 5:
After required parameters has been configured, apply Commit Command to save the changes.
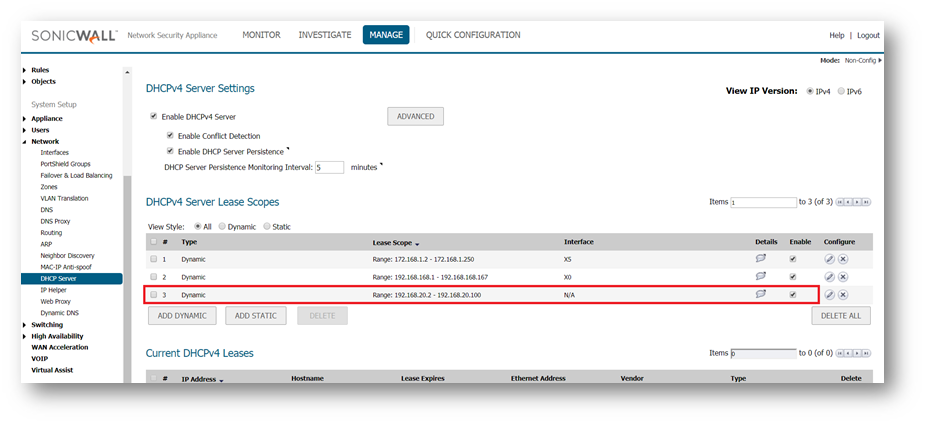
Newly added Scope can be viewed in web GUI, as shown below:
Resolution for SonicOS 6.2 and Below
The below resolution is for customers using SonicOS 6.2 and earlier firmware. For firewalls that are generation 6 and newer we suggest to upgrade to the latest general release of SonicOS 6.5 firmware.
Access SonicWall CLI through Console (connecting a serial cable directly to SonicWall device console port ) or via SSH (default port 22 or if custom SSH port, if changed in SonicWall).
Step 1:
Log into SonicWall CLI using the administrator username/password, to enable and create DHCP scope.
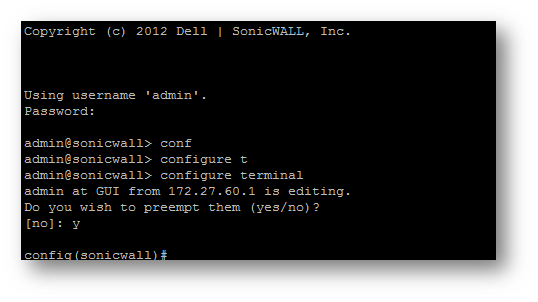
Once logged into CLI, navigate from "enable mode" to "configuration mode" in order to make the required changes, as shown in the screenshot below:
Step 2:
Following commands set will enable the DHCP service on SonicWall.

Step 3:
Enter the command "commit" to update the changes in SonicWall configuration permanently.

To verify the status of DHCP server after saving the changes above type the command "show DHCP-server", and look for "enable" under dhcp-server, as shown below:

Step: 4
To view list of previously created scopes type the command "Dynamic-scope" at (config-dhcp-server)#, as shown in the screenshot below:
To create DHCP scope, enter the Command "Dynamic-scope A.B.C.D A.B.C.D" Replace A.B.C.D with starting range and second with ending range.

Step 5:
- a) Add Netmask, and Default Gateway, for the created scope, as shown below:

- b) DNS server address can be configured or be inherited from the SonicWall WAN Interface
Refer the screenshot below: DNS server address has been inherited from WAN

c) Additional parameters can also be set for the configured DHCP scope, as shown below:

Step 6:After required parameters has been configured, apply commit "command " to save the changes.

Step 7:
To enable and lease out IP from the created IP scope, apply enable command to the scope.
Refer to screenshot below:

Newly added Scope can be viewed in web GUI, as shown below:

Related Articles
- How to access a more specific network over VPN tunnel while having another Route All VPN policy
- How to limit bandwidth usage when playing YouTube videos using App Rules
- SonicWall TZ80 In-Product settings migration
Categories
- Firewalls > TZ Series
- Firewalls > SonicWall NSA Series
- Firewalls > SonicWall SuperMassive 9000 Series
- Firewalls > SonicWall SuperMassive E10000 Series


 YES
YES NO
NO