-
Products
-
SonicPlatform
SonicPlatform is the cybersecurity platform purpose-built for MSPs, making managing complex security environments among multiple tenants easy and streamlined.
Discover More
-
-
Solutions
-
Federal
Protect Federal Agencies and Networks with scalable, purpose-built cybersecurity solutions
Learn MoreFederalProtect Federal Agencies and Networks with scalable, purpose-built cybersecurity solutions
Learn More - Industries
- Use Cases
-
-
Partners
-
Partner Portal
Access to deal registration, MDF, sales and marketing tools, training and more
Learn MorePartner PortalAccess to deal registration, MDF, sales and marketing tools, training and more
Learn More - SonicWall Partners
- Partner Resources
-
-
Support
-
Support Portal
Find answers to your questions by searching across our knowledge base, community, technical documentation and video tutorials
Learn MoreSupport PortalFind answers to your questions by searching across our knowledge base, community, technical documentation and video tutorials
Learn More - Support
- Resources
- Capture Labs
-
- Company
- Contact Us
How can I enforce local authentication for my users before allowing access to the Internet?


Description
SonicOS uses firewall access rules, among other features, to restrict or augment traffic ingressing and egressing your network. By default all trusted zones, such as the LAN, have default access rules allowing them to get to all Trusted and Public Zones. Conversely, Public Zones cannot get to Trusted Zones by default but can be allowed access via port forwarding. If you'd like more information on port forwarding please reference How to Enable Port Forwarding and Allow Access to a Server Through the SonicWall.
The SonicWall is also able to restrict traffic from any zone to any zone by access rules and using groups. This implementation will redirect a user to authenticate against the SonicWall before they're allowed to pass traffic through it. Implementing this allows administrators to restrict certain users or groups as desired as well as also forcing them to authenticate for purposes of Content Filtering, Security Service, and so on.
 TIP: There is a transparent process by which User Authentication can be done known as Single Sign-On (SSO). If you'd like more information on SSO please reference Configuring Single Sign-On.
 NOTE: The configuration in this article is presented as required Users to authenticate before passing traffic from the LAN to the WAN. However these principles can be applied from any zone to any other zone, and across any services.
Resolution
Resolution for SonicOS 7.X
This release includes significant user interface changes and many new features that are different from the SonicOS 6.5 and earlier firmware. The below resolution is for customers using SonicOS 7.X firmware.
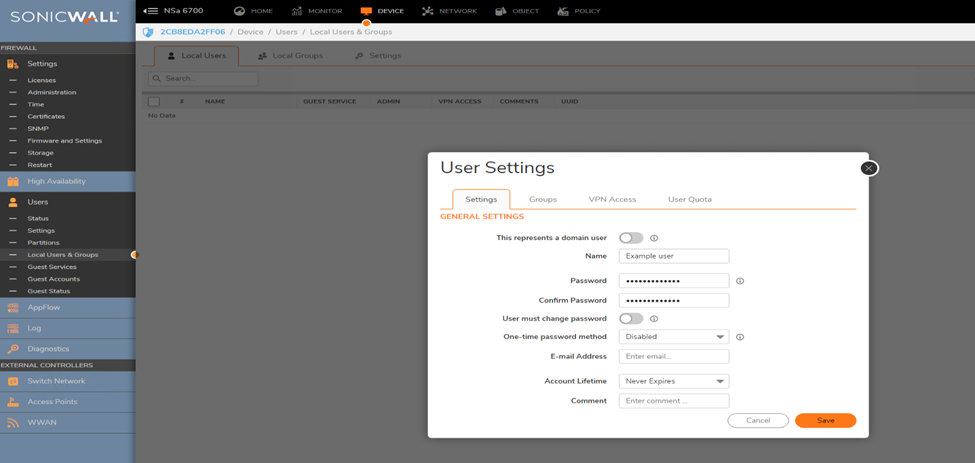
Creating Users
 NOTE: Users could be either created locally or authenticated via LDAP or RADIUS. For this example we'll use Local Users.
Login to the SonicWall Management GUI.
- Click Device in the top navigation menu.
- Navigate to Users | Local Users & Groups.
- Under Local Users Tab.
- Click Add.
- Create a Local User.
- Click Accept to Save.
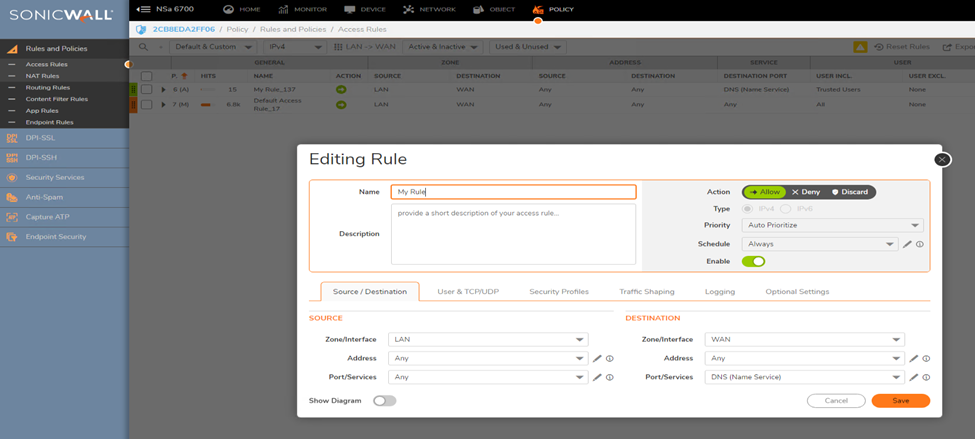
Change the Access Rule to only Allow Trusted Users and Add a DNS Access Rule
For the purpose of this article, you can create an outbound access rule which allows LAN devices to get to the WAN.
- Click Policy in the top navigation menu.
- Navigate to Rules and Policies | Access Rules.
- Click on Add.
FIRST RULE (which enforces user authentication):
- Set Source/Destination zones as LAN and WAN and leave everything as default.
- Click on the "Users & TCP/UDP" tab and set Users Included to Trusted Users


 CAUTION: Without an access rule allowing DNS Traffic out, the authentication page will not show and the traffic will be blocked unless the users manually go to the authentication page and authenticate.
SECOND RULE (which bypasses user authentication for DNS Traffic):
- Add a new rule
- Set Source/Destination zones as LAN and WAN and Port/Services to "DNS Name Services"
- Leave everything else as default
 NOTE: make sure the rule has a higher priority than the previous one you created!

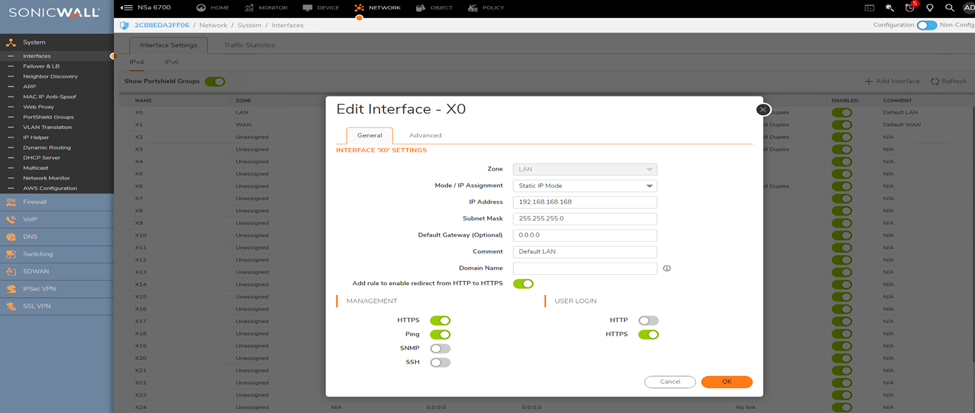
Enable User Login on the LAN interface of the SonicWall
- Click Network in the top navigation menu. Navigate to System | Interfaces and click Configure for the Interface the users device exists on.
- Enable the check-boxes for HTTPS under "User Login" and Add rule to enable redirect from HTTP to HTTPS.
- Click OK.
Resolution for SonicOS 6.5
This release includes significant user interface changes and many new features that are different from the SonicOS 6.2 and earlier firmware. The below resolution is for customers using SonicOS 6.5 firmware.
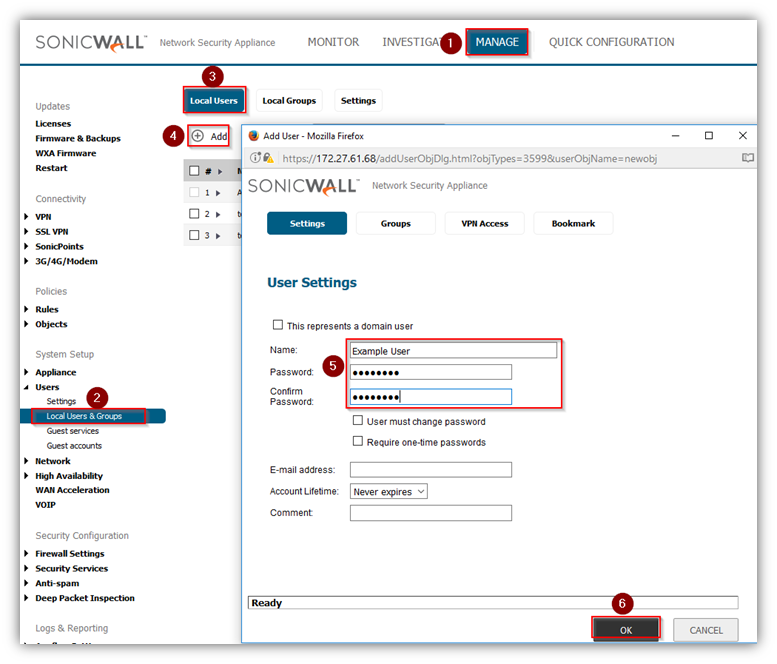
Creating Users
 NOTE: Users could be either created locally or authenticated via LDAP or RADIUS. For this example we'll use Local Users.
Login to the SonicWall Management GUI.
- Click Manage in the top navigation menu.
- Navigate to Users | Local Users & Groups.
- Under Local Users Tab.
- Click Add.
- Create a Local User.
- Click Accept to Save.
Change the Access Rule to only Allow Trusted Users and Add a DNS Access Rule
For the purpose of this article, you can create an outbound access rule which allows LAN devices to get to the WAN.
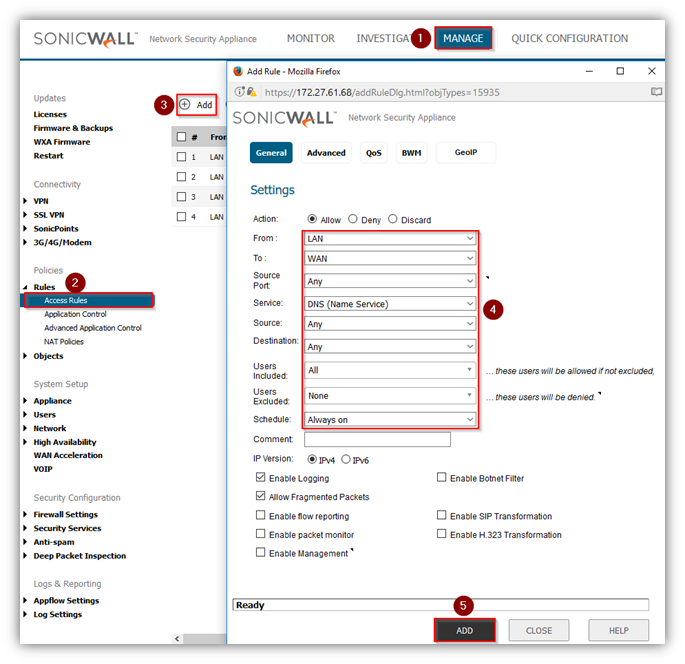
- Click Manage in the top navigation menu.
- Navigate to Rules | Access Rules.
- Click on Add.
FIRST RULE (which enforces user authentication):
- Set Source/Destination zones as LAN and WAN and leave everything as default.
- Set Users Included to Trusted Users. Click ADD.
 CAUTION: Without an access rule allowing DNS Traffic out this configuration will not work. The DNS access rule is only required when Users are utilizing DNS names.
SECOND RULE (which bypasses user authentication for DNS Traffic):
- Add a new rule
- Set From/To zones as LAN and WAN and Service to "DNS Name Services"
- Leave everything else as default
 NOTE: make sure the rule has a higher priority than the previous one you created!
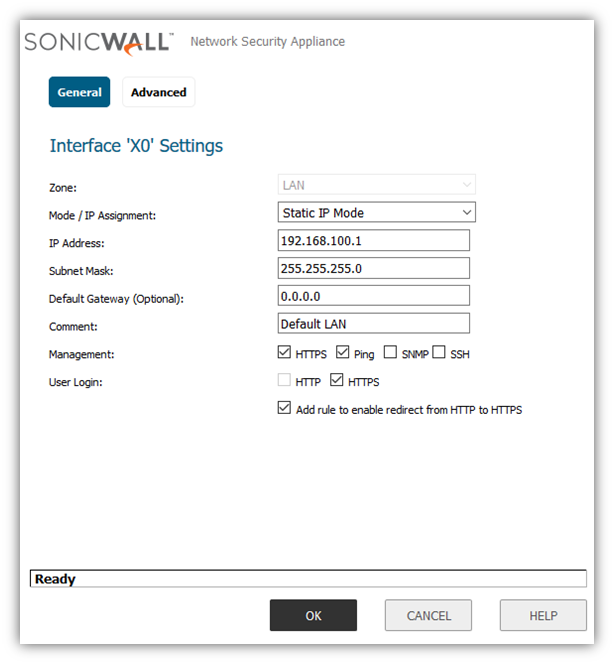
Enable User Login on the LAN interface of the SonicWall
- Click Manage in the top navigation menu. Navigate to Network | Interfaces and click Configure for the Interface the users device exists on.
- Enable the check-boxes for HTTPS and Add rule to enable redirect from HTTP to HTTPS under User Login.
- Click OK.
Related Articles
- How to migrate settings from GEN6 to GEN7 firewall?
- Supported SonicWall and 3rd party SFP and SFP+ modules that can be used with SonicWall TZ series
- How to Block Google QUIC Protocol on SonicOSX 7.0?
Categories
- Firewalls > TZ Series > User Login
- Firewalls > SonicWall SuperMassive E10000 Series > User Login
- Firewalls > SonicWall SuperMassive 9000 Series > User Login
- Firewalls > NSa Series > User Login
- Firewalls > NSv Series > User Login


 YES
YES NO
NO