


TZ製品での仮想アクセスポイントの設定方法
 07/24/2024
  6 People found this article helpful
 403,227 Views

Description
TZ製品での仮想アクセスポイントの設定方法を説明します。
仮想アクセスポイント(VAP: Virtual Access Point)とは、一つの物理無線アクセスポイントを論理的に複数のアクセスポイントに分割する機能です。
ワイアレス内蔵TZ製品では、一つの内蔵無線アクセスポイントに加え一つ以上の仮想アクセスポイントを作成することが可能です。
物理/仮想によらずアクセスポイント毎にSSIDを設定します。例えば、社員用にはshyain というSSIDを設定し、お客さま用にguestというSSIDを設定した仮想アプライアンスを作成したとします。shyainに接続した端末(社員)にはインターネットアクセスに加えて、社員の共有サーバへのアクセスも行えるようにします。guestに接続した端末(お客様)にはインターネットアクセスだけができるようにすることが可能です。
仮想アクセスポイントは、一つの物理アクセスポイントに対し複数設定することができますが、周波数帯(5Ghz/2.4GHz)ごとに物理アクセスポイントのチャネルを共有するため、帯域が増えるわけではありませんので注意してください。
Resolution
 NOTE: ここでは、内臓の無線LANの設定が適切に行えていて使用できる状態である事を前提に説明します。
SonicOS7での設定方法
設定方法の概要
- VAP用のWLANサブインターフェースを追加
- Guest Zoneの仮想インターフェースのDHCPスコープの確認
- アクセスルールの確認
- 新しい仮想アクセスポイントプロファイルの作成
- 新しい仮想アクセスポイントの作成
- 仮想アクセスポイントグループの設定
- 内部無線LANに仮想アクセスポイントグループを割り当て
VAP用のWLANサブインターフェースを追加
SonicOSでは一つの物理インターフェースに、複数の仮想インターフェースを追加して論理的に分割することが可能です。TZに内蔵した無線LANインターフェース(W0)でも同様に複数の仮想インターフェースを作成することが可能です。一つのVAPは一つの仮想ネットワークコネクションに対応します。
- ネットワーク | システム | インターフェース | Network | System | Interfacesページで インターフェース設定 タブを表示します。
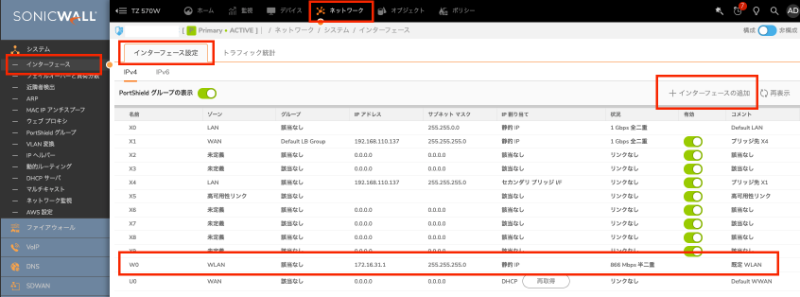
- インターフェースの追加をクリックし仮想インターフェース を選択します。
ゾーン: クリックしゾーンの作成...を選択します。
名前-任意の文字列を指定します。
セキュリティ種別 - 無線 を選択
アクセスルールの自動生成: 信頼度:低>WAN>公開>無線>保護>信頼度:高。
インタネットアクセスを許可しその他のゾーンへの通信を許可するためには、以下の通り設定します。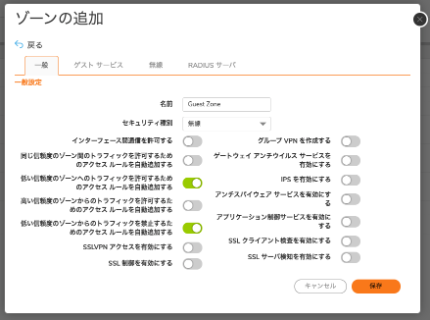
VLAN タグ: 1〜4094で任意の番号を設定します。尚、物理インターフェースのVPANタグは0(タグなしとなります。)
親インターフェース: W0を設定します。
モード/IP割り当て: 親インターフェース(W0)と同じモードにしてください。レイヤ2ブリッジモードの場合、ブリッジ先インターフェースは、事前に作成してください。
IPアドレス/サブネットマスク: 静的IPモードの時に他のサブネットとオーバラップしないIPサブネットで指定します。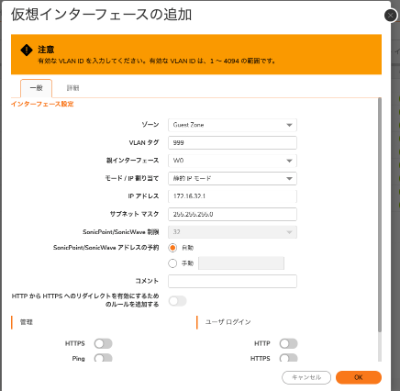
- OKをクリックします。ウェブ管理が無効の警告が表示されるのでOKをクリックして続行します。

Guest Zoneの仮想インターフェースのDHCPスコープの確認
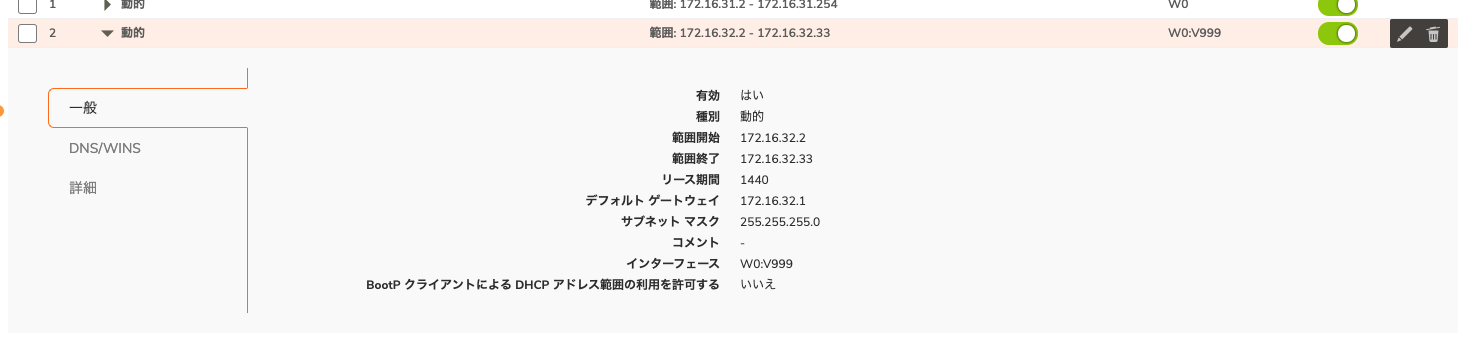
仮想インターフェースを作成すると、自動的に仮想インターフェースに対応したDHCPサーバリース範囲を作成されます。
- ネットワーク | システム | DHCPサーバ ページで DHCPサーバリース範囲 タブを選択します。
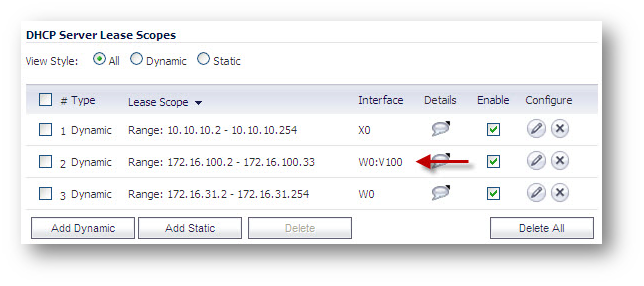
- リース範囲が仮想インターフェースで設定したサブネットであることを確認します。また、アドレス範囲は32個分の範囲に自動的に設定されています。32以上の無線LAN端末を接続する可能性がある場合、適切に範囲を設定してください。
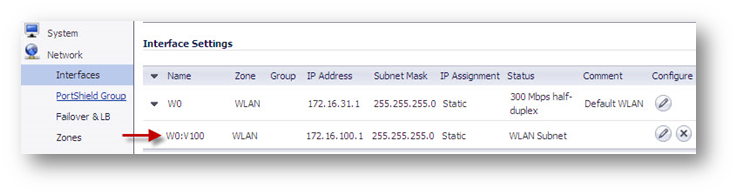
- インターフェース がW0:VXXX(XXXはVLANID)である事を確認します。
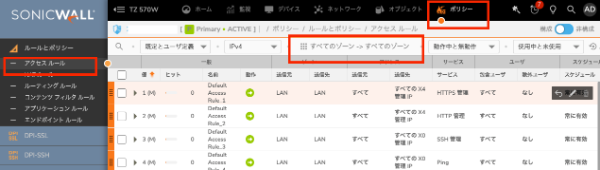
アクセスルールの確認
ポリシー | ルールとポリシー | アクセスルールで、Guest Zoneから他のゾーン、他のゾーンからGuest Zoneへのアクセスルールを確認し、必要であれば会社のポリシーにしたがって適切に変更します。
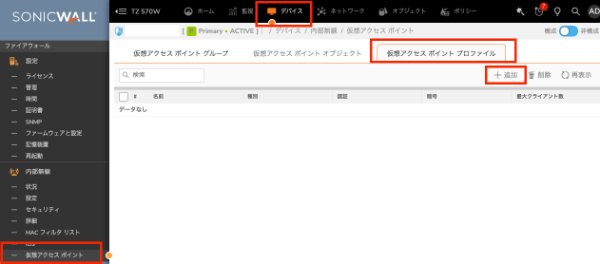
新しい仮想アクセスポイントプロファイルの作成
仮想アクセスポイントに適用するプロファイルを作成します。物理アクセスポイント(W0)と異なる、セキュリティ設定を行うことが可能です。
- デバイス | 内部無線 | 仮想アクセスポイント のページで 仮想アクセスポイントプロファイル タブを開きます。
- 追加をクリックします。
- 仮想アクセスポイントプロファイルの設定を行います。
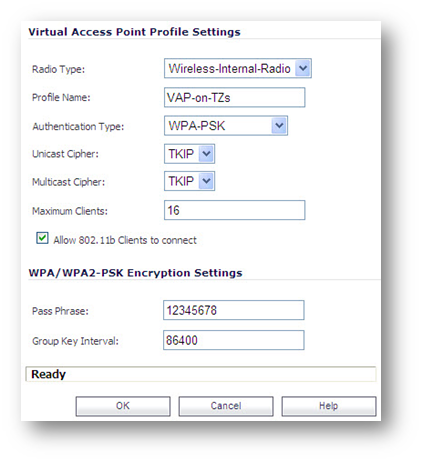
プロファイル名: に任意の名前を設定します。
認証種別: 希望の認証種別を設定します。全ての端末でサポートされていてかつ高いセキュリティを保つためには、WPA3/WPA2-PSK はWPA3をサポートしていない端末でもWPA2で接続が可能です。
最大クライアント数: 既定値は16です。16台以上の端末を接続する場合は、変更してください。
パスフレーズ: 認証種別がWPA以上の場合、任意のパスフレーズを設定します。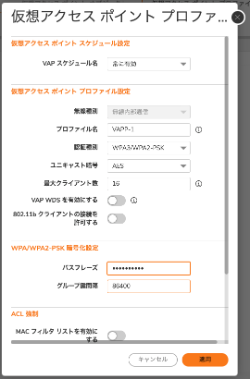
- 適用をクリックします。

新しい仮想アクセスポイントの作成
- デバイス | 内部無線 | 仮想アクセスポイント のページで 仮想アクセスポイントオブジェクト タブを開きます。
- 追加をクリックします
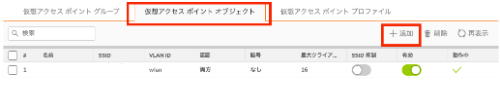
- 仮想アクセスポイントの詳細情報を設定します。
一般 タブ
名前: 任意の名前を指定します。
SSID: この仮想アクセスポイントのSSIDを設定します。物理アクセスポイント(W0)とは異なるSSIDを設定してください。
VLAN ID: W0の仮想インターフェースで指定したVLAN IDを指定します。
詳細 タブ
プロファイル名: 仮想アクセスポイント プロファイルで作成したプロファイルを選択します。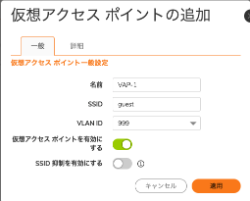
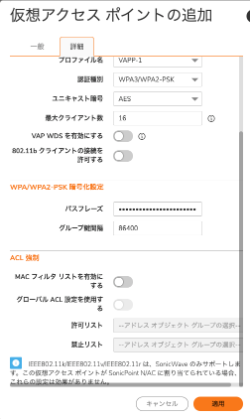
- 適用 をクリックします。

仮想アクセスポイントグループの設定
初期設定では、仮想アクセスポイントグループには、物理アクセスポイントを含む一つのグループが一つ存在します。作製した新しい仮想アクセスポイントをグループに追加することによって、内蔵無線LANの物理アクセスポイント(W0)でこの仮想アクセスポイントを動作させるよう設定します。
- デバイス | 内部無線 | 仮想アクセスポイント のページで 仮想アクセスポイントグループ タブを開きます。
- 内部APグループ の部分でクリックします。
- 右側に設定アイコン(鉛筆)が表示されるのでクリックします。

- 左側の使用可能なAPオブジェクト のリストから作成した仮想アクセスポイントを選択し、中央の追加ボタンをクリックし左側の仮想APグループのメンバ のリストに追加します。
- 適用をクリックします。
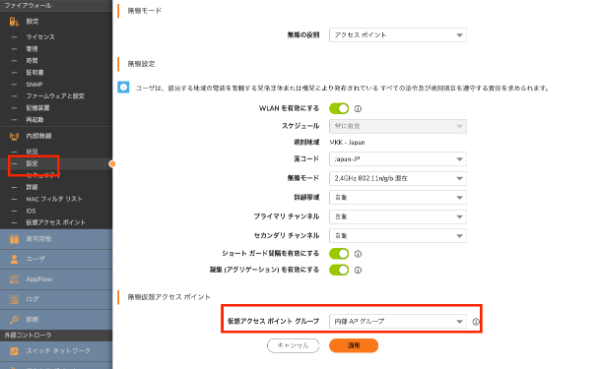
内部無線LANに仮想アクセスポイントグループを割り当て
- デバイス | 内部無線 | 設定 のページを開きます。
- 仮想アクセスポイントグループ で 内部APグループを選択します。
- 適用をクリックします。
これで、設定は全て完了です。無線LANクライアントで、対象のSSIDを瀬たくして接続しそれぞれのIPアドレスが割り当てられる事を確認します。
SonicOS6.5での設定方法
Adding a Wireless LAN (WLAN) Sub-Interface for VAP
A Wireless LAN (WLAN) subnet allows you to split a single wireless radio interface (W0) into many virtual network connections, each carrying its own set of configurations. The WLAN subnet solution allows each VAP to have its own virtual separate subinterface, even though there is only a single 802.11 radio.
- Click Manage in the top navigation menu.
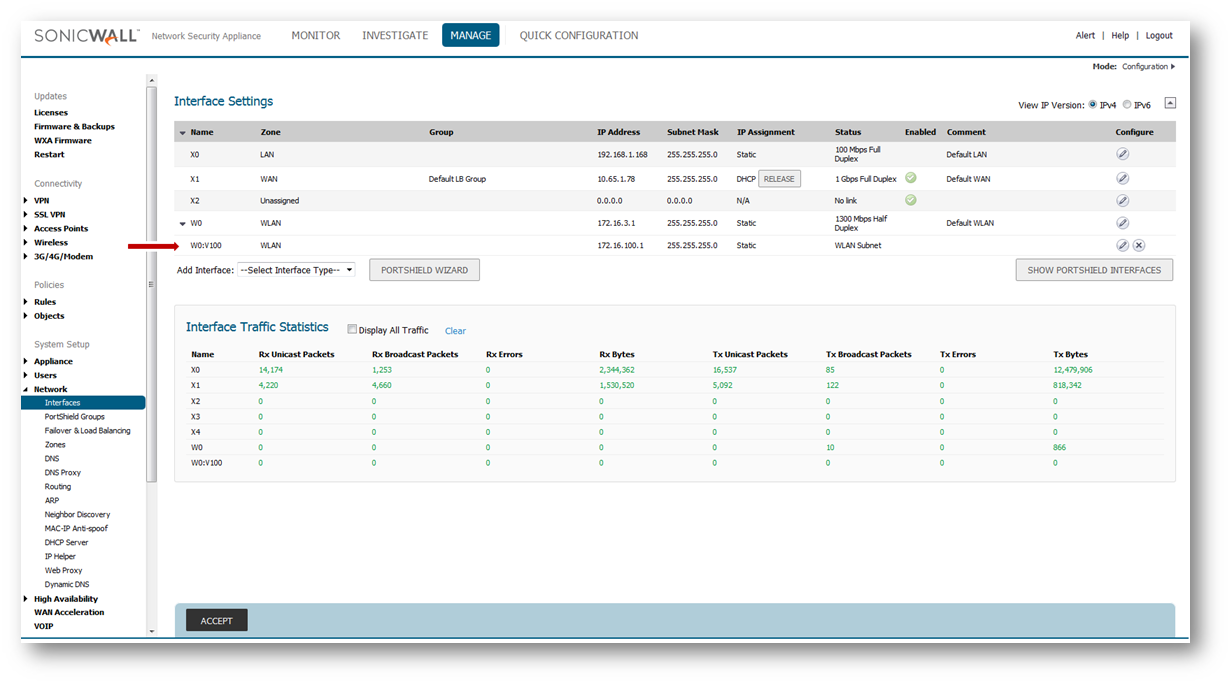
- WLAN subnets are configured from the System Setup | Network | Interfaces page and clicking on the option "Add Interface" and selecting the option from the drop down " Virtual Interface"
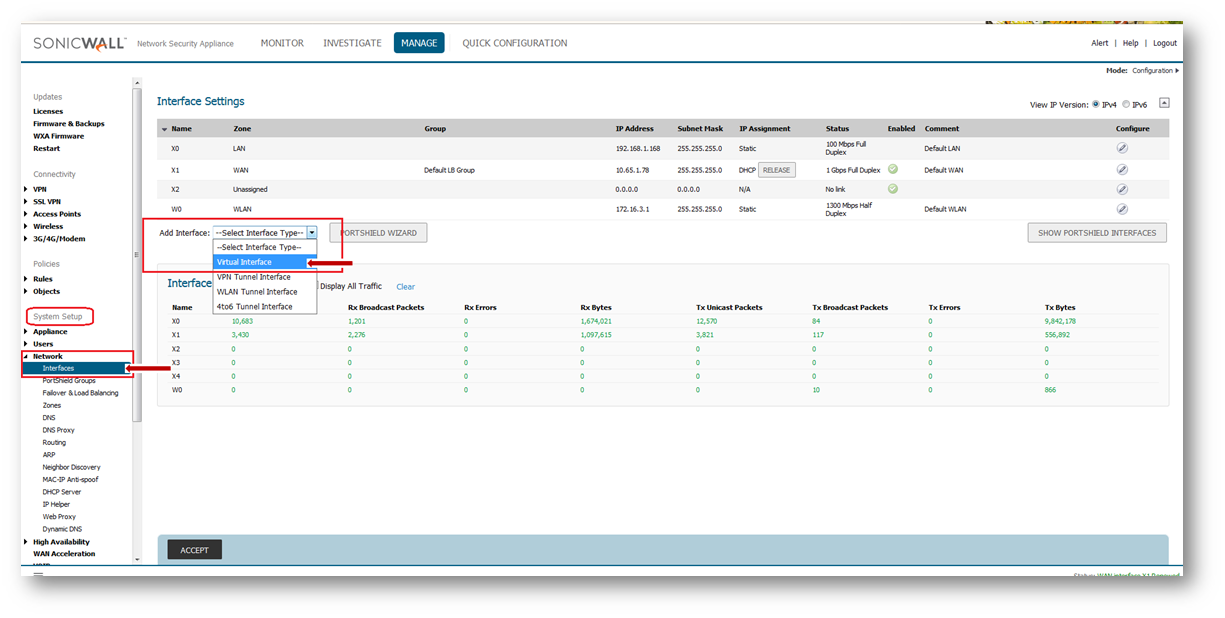
- Configure the Sub-interface
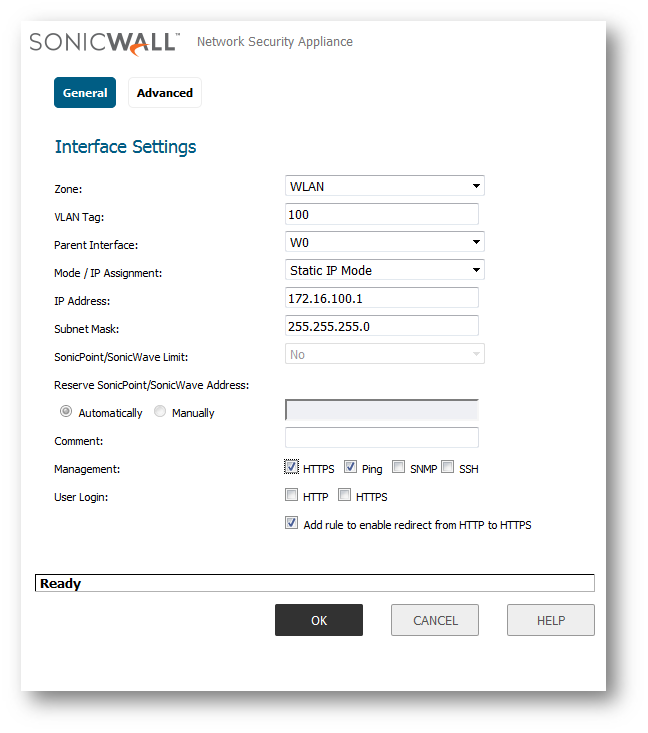 | Zone: Select WLAN |
3. Click OK
Adding a DHCP Scope for the VAP Sub-Interface
The DHCP server assigns leased IP addresses to users within specified ranges, known as "Scopes". Take care in making these settings manually, as a scope of 200 addresses for multiple interfaces that will only use 30 can lead to connection issues due to lease exhaustion. The DHCP scope should be resized as each interface/subinterface is defined to ensure that adequate DHCP space remains for all subsequently defined interfaces. Failure to do so may cause the auto-creation of subsequent DHCP scopes to fail, requiring manual creation after performing the requisite scope resizing.
1. DHCP Server Scope is set from the System Setup | Network | DHCP Server page.
2. Ensure Enable DHCP Server option is Checked
3. SonicWall appliance will automatically add a DHCP scope when an Interface/Sub-Interface is created.
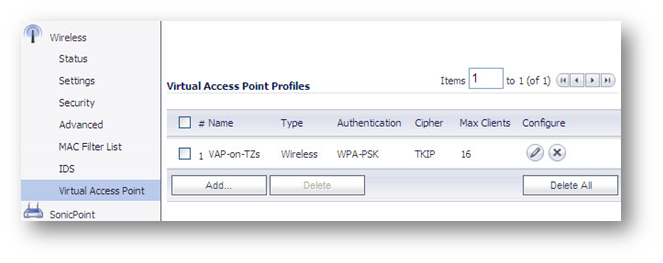
Adding a New Virtual Access Point - Profile
A Virtual Access Point Profile allows the administrator to pre-configure and save access point settings in a profile. VAP Profiles allows settings to be easily applied to new Virtual Access Points.
1. Virtual Access Point Profiles are configured from the Connectivity | Wireless | Virtual Access Point page.
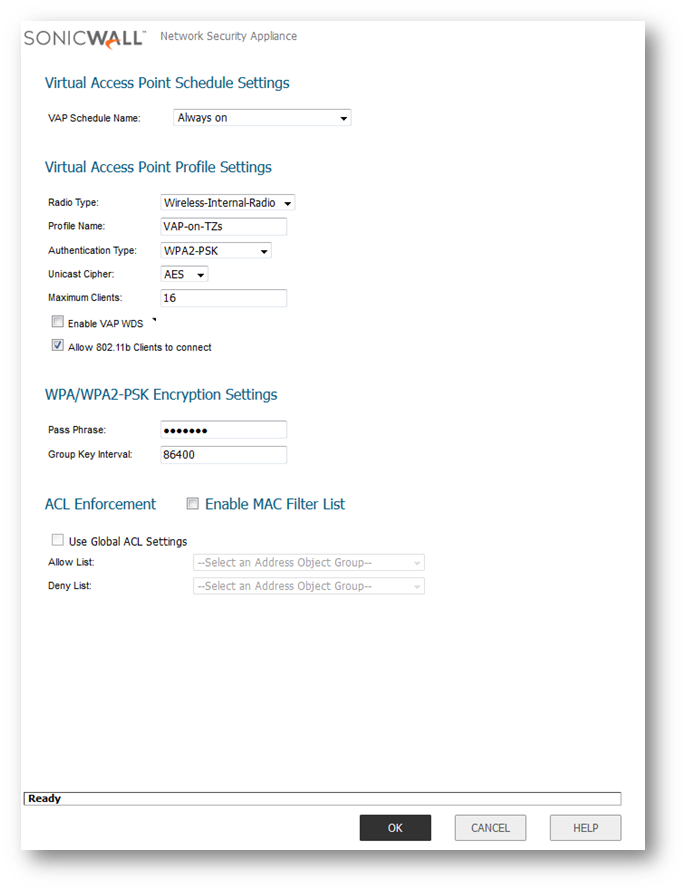
2. Scroll to the bottom of the page to Virtual Access Point Profiles section, click Add... button and choose an Authentication Type.
SonicWall Recommends : WPA2-PSK. This authentication type is more secure as compared to WPA.

Adding a New Virtual Access Point
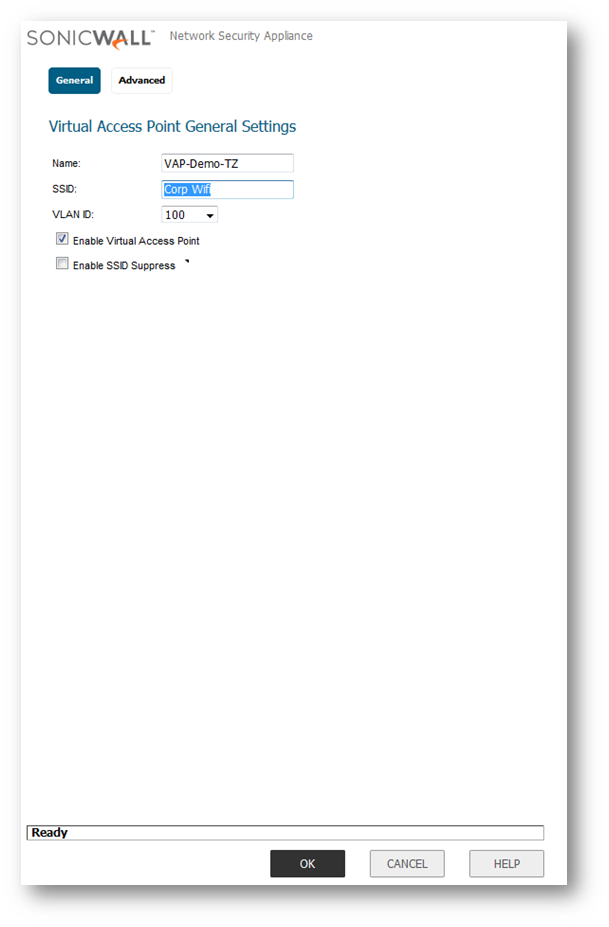
The VAP Settings feature allows for setup of general VAP settings. SSID and wireless subnet name are configured through VAP Settings.
- Virtual Access Points are configured from the Connectivity | Wireless | Virtual Access Point page.
- Under Virtual Access Points section, Click Add... button
- Enter the SSID
- Under Subnet Name: choose the appropriate WLAN sub-interfaces from the drop down list
- Click on "Advanced" and from the "Profile Name" and choose the configured Profile
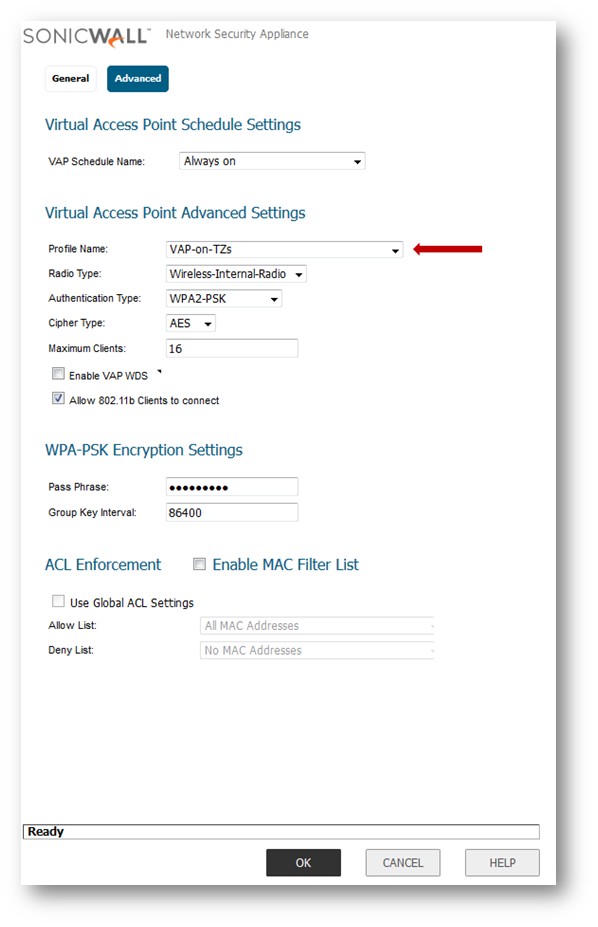
- Click "OK"

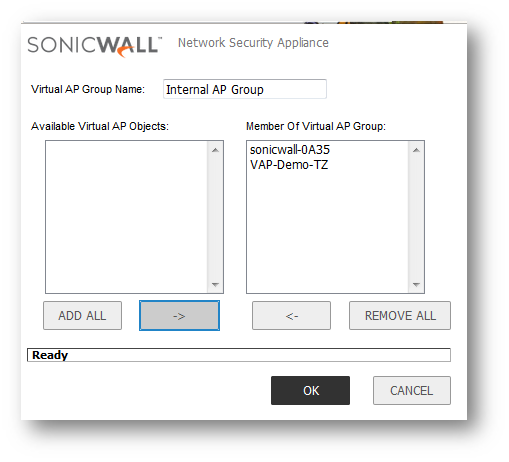
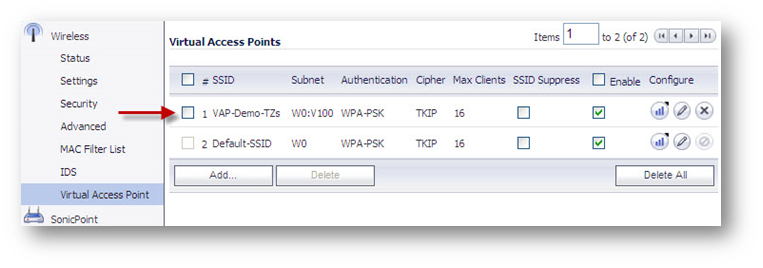
Virtual Access Point Group
The Virtual Access Point Groups feature allows for grouping of multiple VAP objects to be simultaneously applied to your internal wireless radio. Virtual Access Point Groups are configured from the Connectivity | Wireless | Virtual Access Point page.
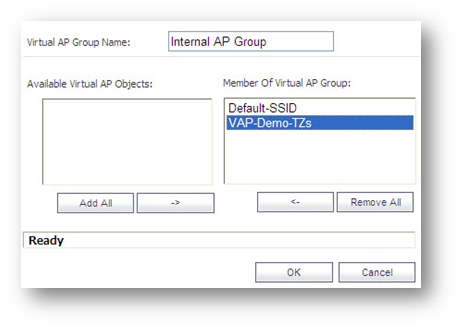
- Click on the Configure button as shown in the GUI

- Move the Virtual Access Point Object and make it a part of the "Member of Virtual AP Group" and click on "OK"

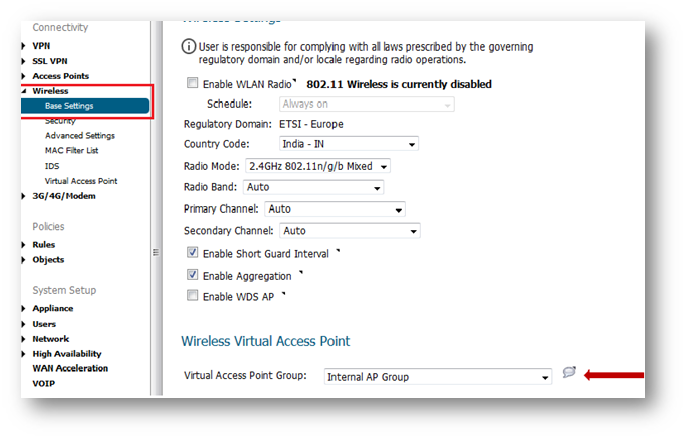
Assign VAP Group to Internal Wireless Radio
After your VAPs are configured and added to a VAP group, that group must be specified in the Connectivity | Wireless | Base Settings page in order for the VAPs to be available through your internal wireless radio. The default group is called Internal AP Group (scroll to the bottom of the page).
How to Test:
From you wireless client computer, scan and connect to the SSID (e.g VAP-Demo-TZs) and enter the Preshared Key (e.g. if WPA is chosen). Once connected your wireless adapter will acquire an the IP address from the appropriate WLAN sub-interface.
Resolution for SonicOS 6.2 and Below
The below resolution is for customers using SonicOS 6.2 and earlier firmware. For firewalls that are generation 6 and newer we suggest to upgrade to the latest general release of SonicOS 6.5 firmware.
Step 1: Adding a Wireless LAN (WLAN) Sub-Interface for VAP
A Wireless LAN (WLAN) subnet allows you to split a single wireless radio interface (W0) into many virtual network connections, each carrying its own set of configurations. The WLAN subnet solution allows each VAP to have its own virtual separate subinterface, even though there is only a single 802.11 radio.
1. WLAN subnets are configured from the Network | Interfaces page.
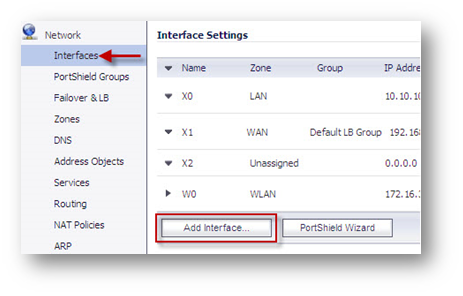
2. Click on Add Interface... button
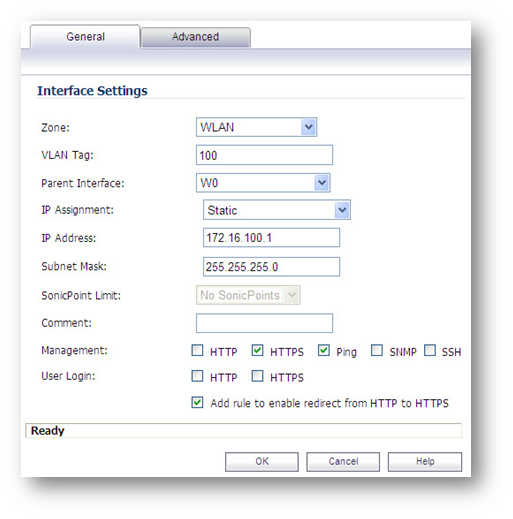 | Zone: Select WLAN |
3. Click OK
Step 2: Adding a DHCP Scope for the VAP Sub-Interface
The DHCP server assigns leased IP addresses to users within specified ranges, known as "Scopes". Take care in making these settings manually, as a scope of 200 addresses for multiple interfaces that will only use 30 can lead to connection issues due to lease exhaustion. The DHCP scope should be resized as each interface/subinterface is defined to ensure that adequate DHCP space remains for all subsequently defined interfaces. Failure to do so may cause the auto-creation of subsequent DHCP scopes to fail, requiring manual creation after performing the requisite scope resizing.
1. DHCP Server Scope is set from the Network | DHCP Server page.
2. Ensure Enable DHCP Server option is Checked
3. SonicWall appliance will automatically add a DHCP scope when an Interface/Sub-Interface is created.
Step 3: Adding a New Virtual Access Point - Profile
A Virtual Access Point Profile allows the administrator to pre-configure and save access point settings in a profile. VAP Profiles allows settings to be easily applied to new Virtual Access Points.
1. Virtual Access Point Profiles are configured from the Wireless | Virtual Access Point page.
2. Scroll to the bottom of the page to Virtual Access Point Profiles section, click Add... button and choose an Authentication Type.
Step 4: Adding a New Virtual Access Point
The VAP Settings feature allows for setup of general VAP settings. SSID and wireless subnet name are configured through VAP Settings.
1. Virtual Access Points are configured from the Wireless | Virtual Access Point page.
2. Under Virtual Access Points section, Click Add... button
3. Enter the SSID
4. Under Subnet Name: choose the appropriate WLAN sub-interfaces from the drop down list.
5. Click OK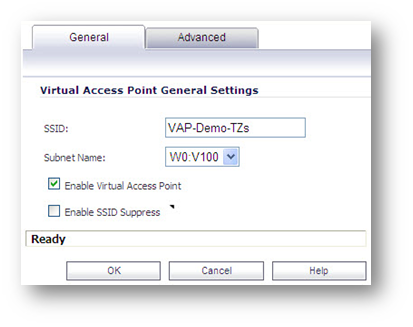
Step 5: Virtual Access Point Group
The Virtual Access Point Groups feature allows for grouping of multiple VAP objects to be simultaneously applied to your internal wireless radio. Virtual Access Point Groups are configured from the Wireless | Virtual Access Point page.

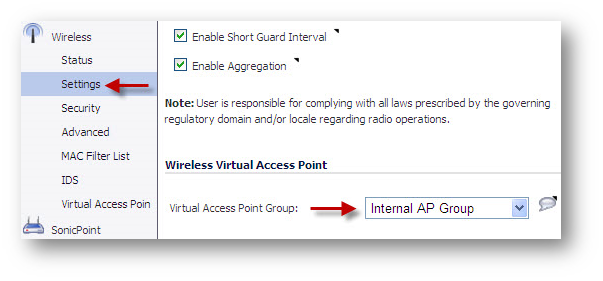
Step 6: Assign VAP Group to Internal Wireless Radio
After your VAPs are configured and added to a VAP group, that group must be specified in the Wireless | Settings page in order for the VAPs to be available through your internal wireless radio. The default group is called Internal AP Group (scroll to the bottom of the page).
How to Test:
From you wireless client computer, scan and connect to the SSID (e.g VAP-Demo-TZs) and enter the Preshared Key (e.g. if WPA is chosen). Once connected your wireless adapter will acquire an the IP address from the appropriate WLAN sub-interface.
 YES
YES NO
NO